Wi-Fi Access and Instructions
Mt. SAC offers free limited Wi-Fi to all students, staff, and guests of the campus. Staff and Students should connect to the Mt. SAC network using their Portal username and password.
Visitors and guests of the college should connect to the Guest network. Follow the links below to find out how to connect to the different networks using your preferred device.
Faculty and Staff: How to connect to the "MtSAC" Wi-Fi network
Students, Visitors and Guests: How to connect to the "Guest" Wi-Fi network
Staff and Students: How to connect to the "MtSAC" Wi-Fi network
-
- Using an Android Smartphone or Tablet
Note: Directions are using the base Android 12 operating system. Different phone models and previous versions may look different but will generally follow the same steps.
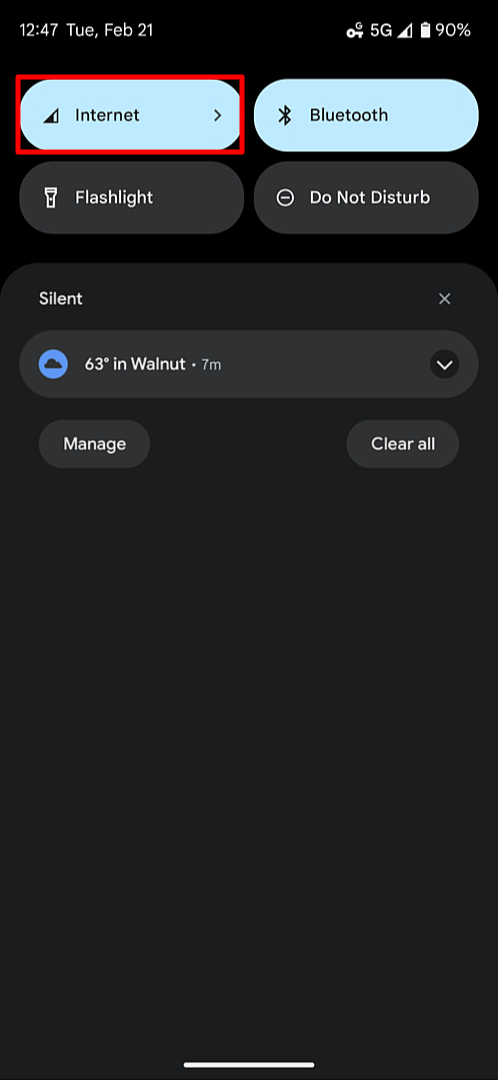
1. Unlock your device and swipe down from the top of the screen to access the Quick Settings panel. Tap on the Internet icon to bring up network settings.
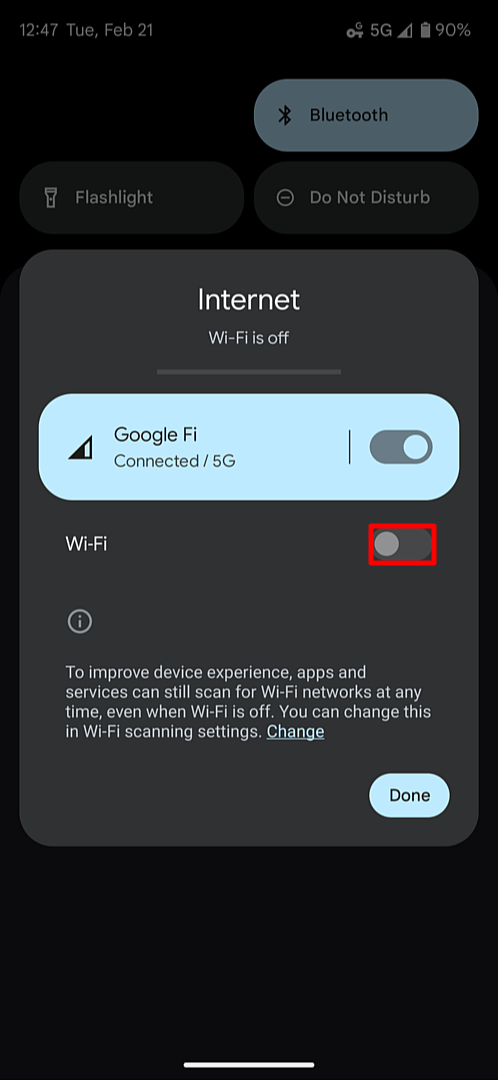
2. Look for the Wi-Fi toggle and tap it to turn it on.
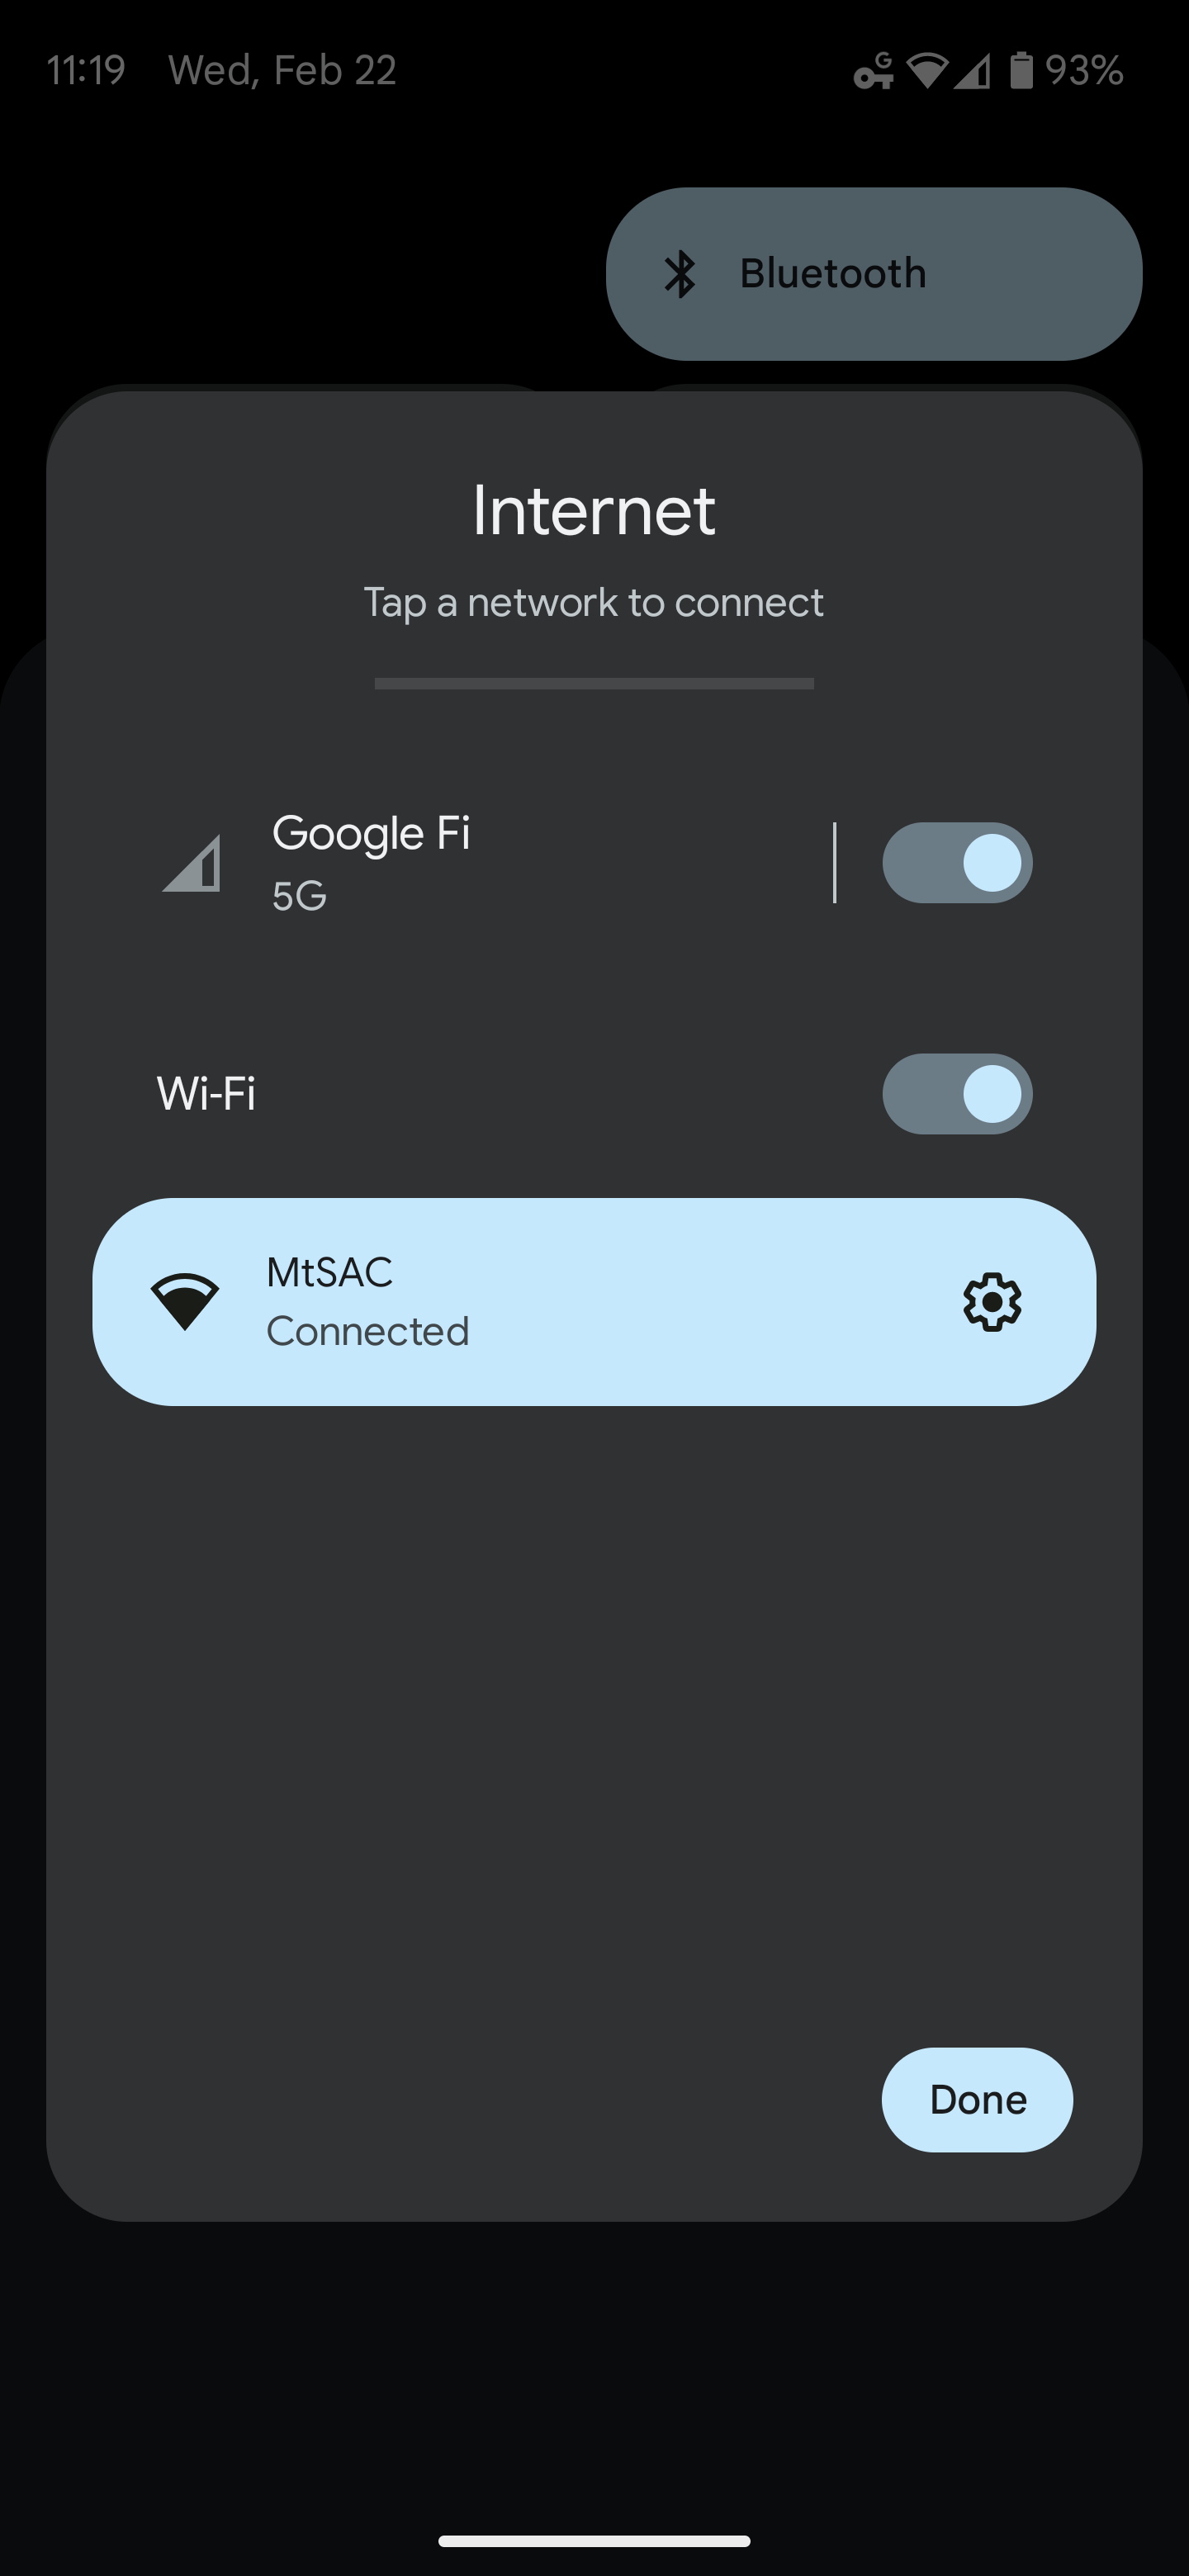
3. Once the Wi-Fi is turned on, a list of available Wi-Fi networks will appear. Tap on the "MtSAC" Wi-Fi network.

4. Enter the settings below. Your device may not have all these options, just enter the ones that are available to you. Replace "portal username" and "portal password" with YOUR Portal username and password respectively.
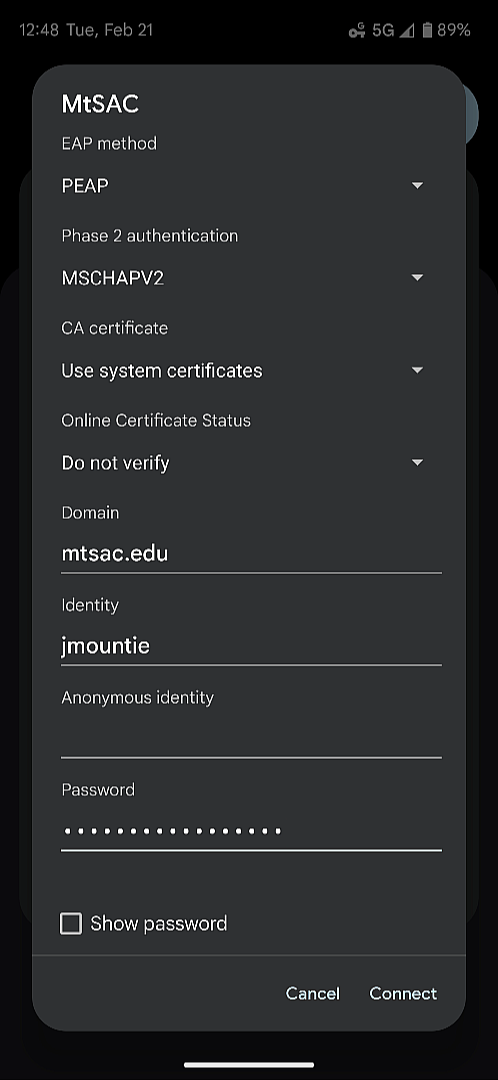
EAP method: PEAP
Phase 2 authentication: MSCHAPV2
CA certificate: Use system certificates
Online Certificate Status: Do not verify
Domain: mtsac.edu
Identity: "portal username"
Anonymous identity: leave empty
Password: "portal password"5. Then tap "Connect". Once connected, you will see that you are connected to the "MtSAC" Wi-Fi network.
6. That's it! If you're having trouble connecting, make sure you're in range of the network and that you're entering the correct settings. If your portal password has changed for any reason, you will need to "forget" the network and add it again using the steps above.
To "forget" the network, open your quick settings again and tap the Wi-Fi icon. Tap the gear icon next to the "MtSAC" network to open up the settings. Then tap the "Forget" icon. - Using a Windows PC
Note: Directions are using the Windows 10 operating system. Different versions may look different but will generally follow the same steps.
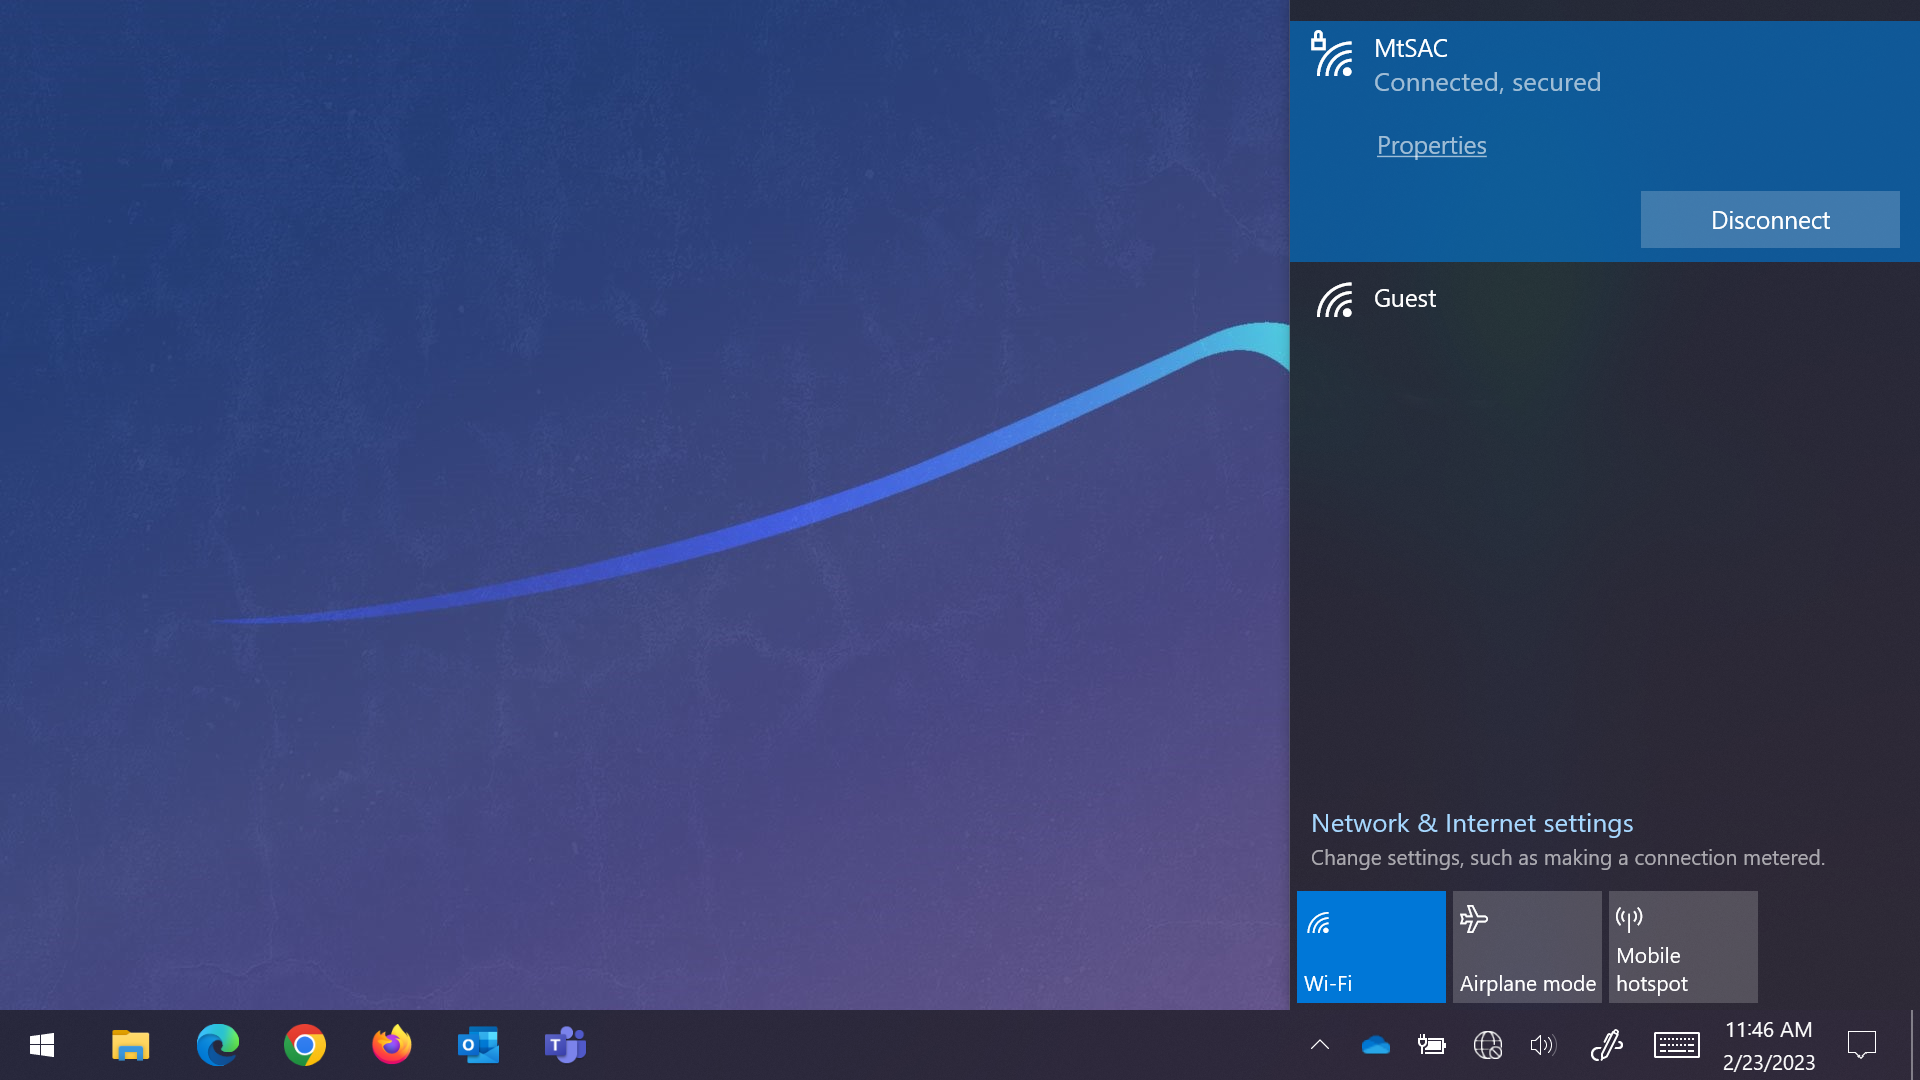
1. In the bottom right of your taskbar click the network icon to bring up network settings. Your network icon may look like a Globe, Monitor, or Wi-Fi Signal depending on the current status of your connection.
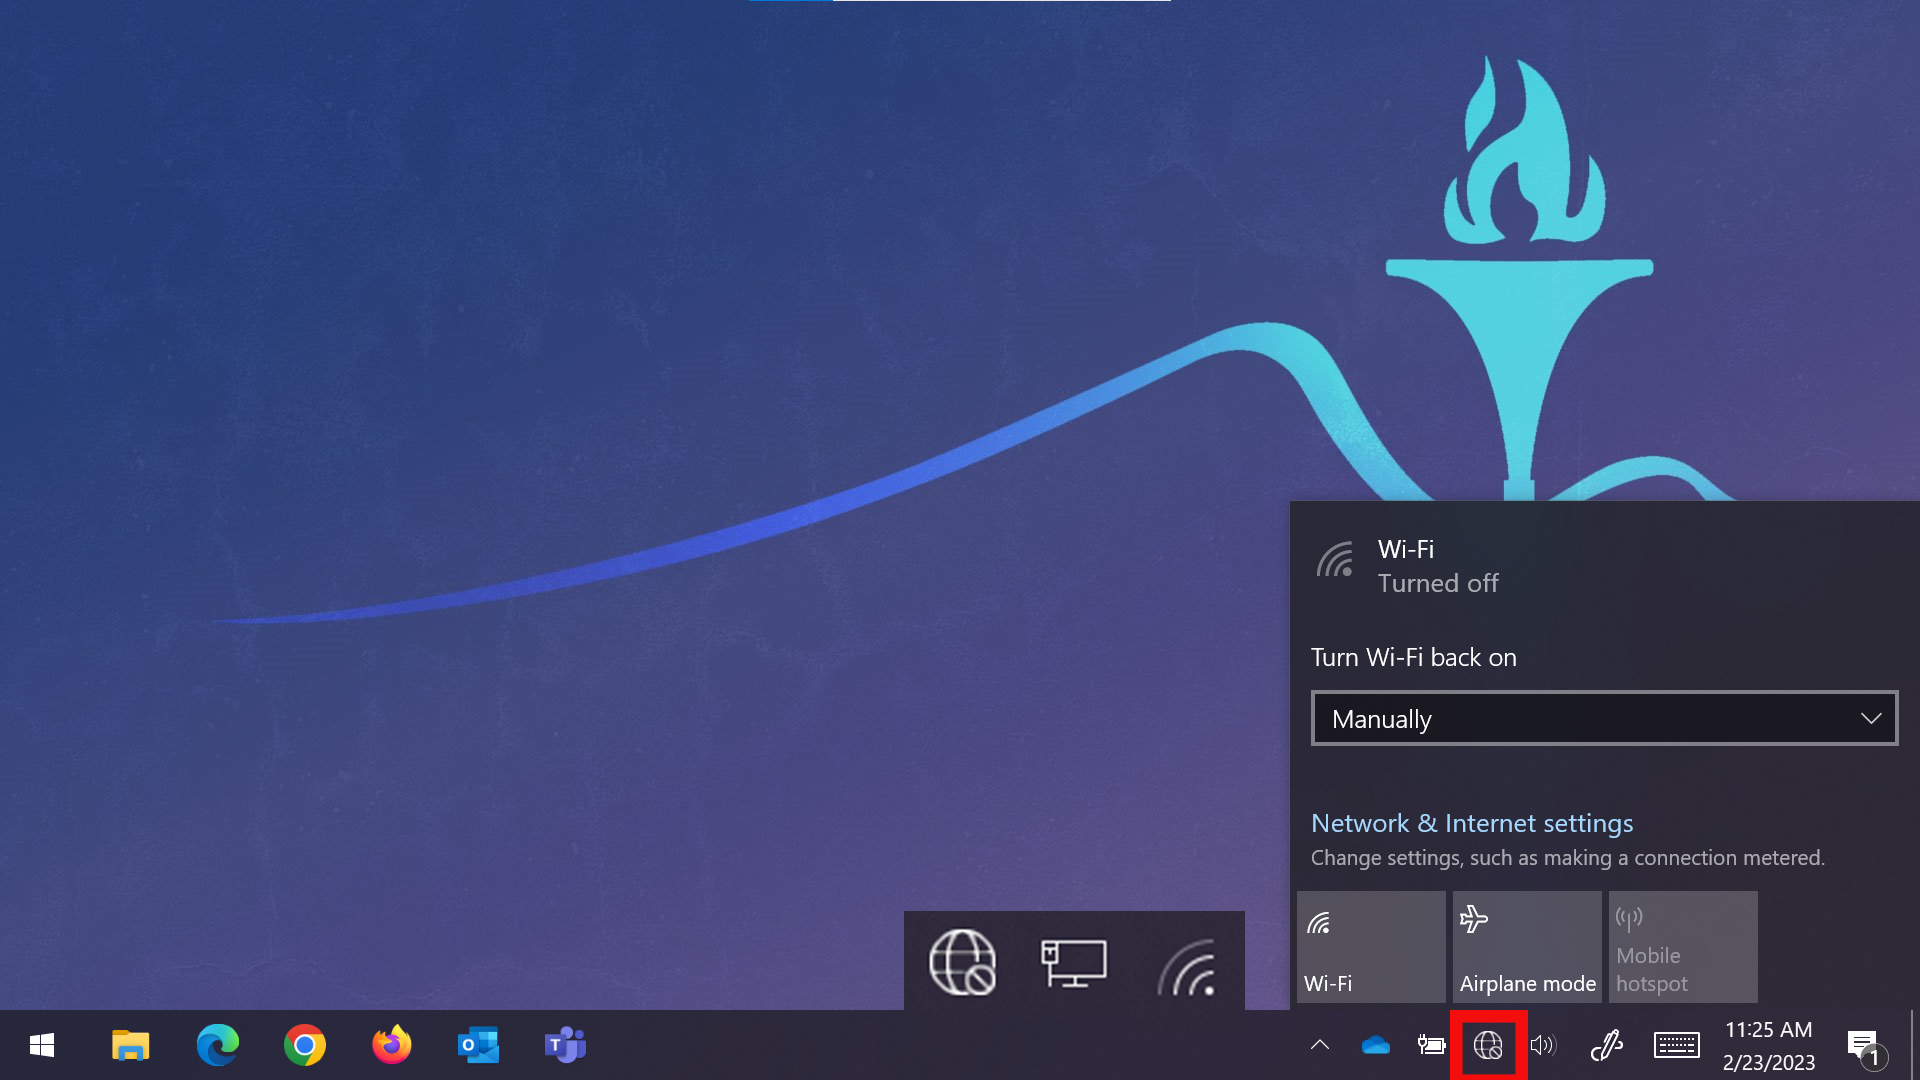
2. If your PC's Wi-Fi is turned off click the Wi-Fi icon to turn it back on.
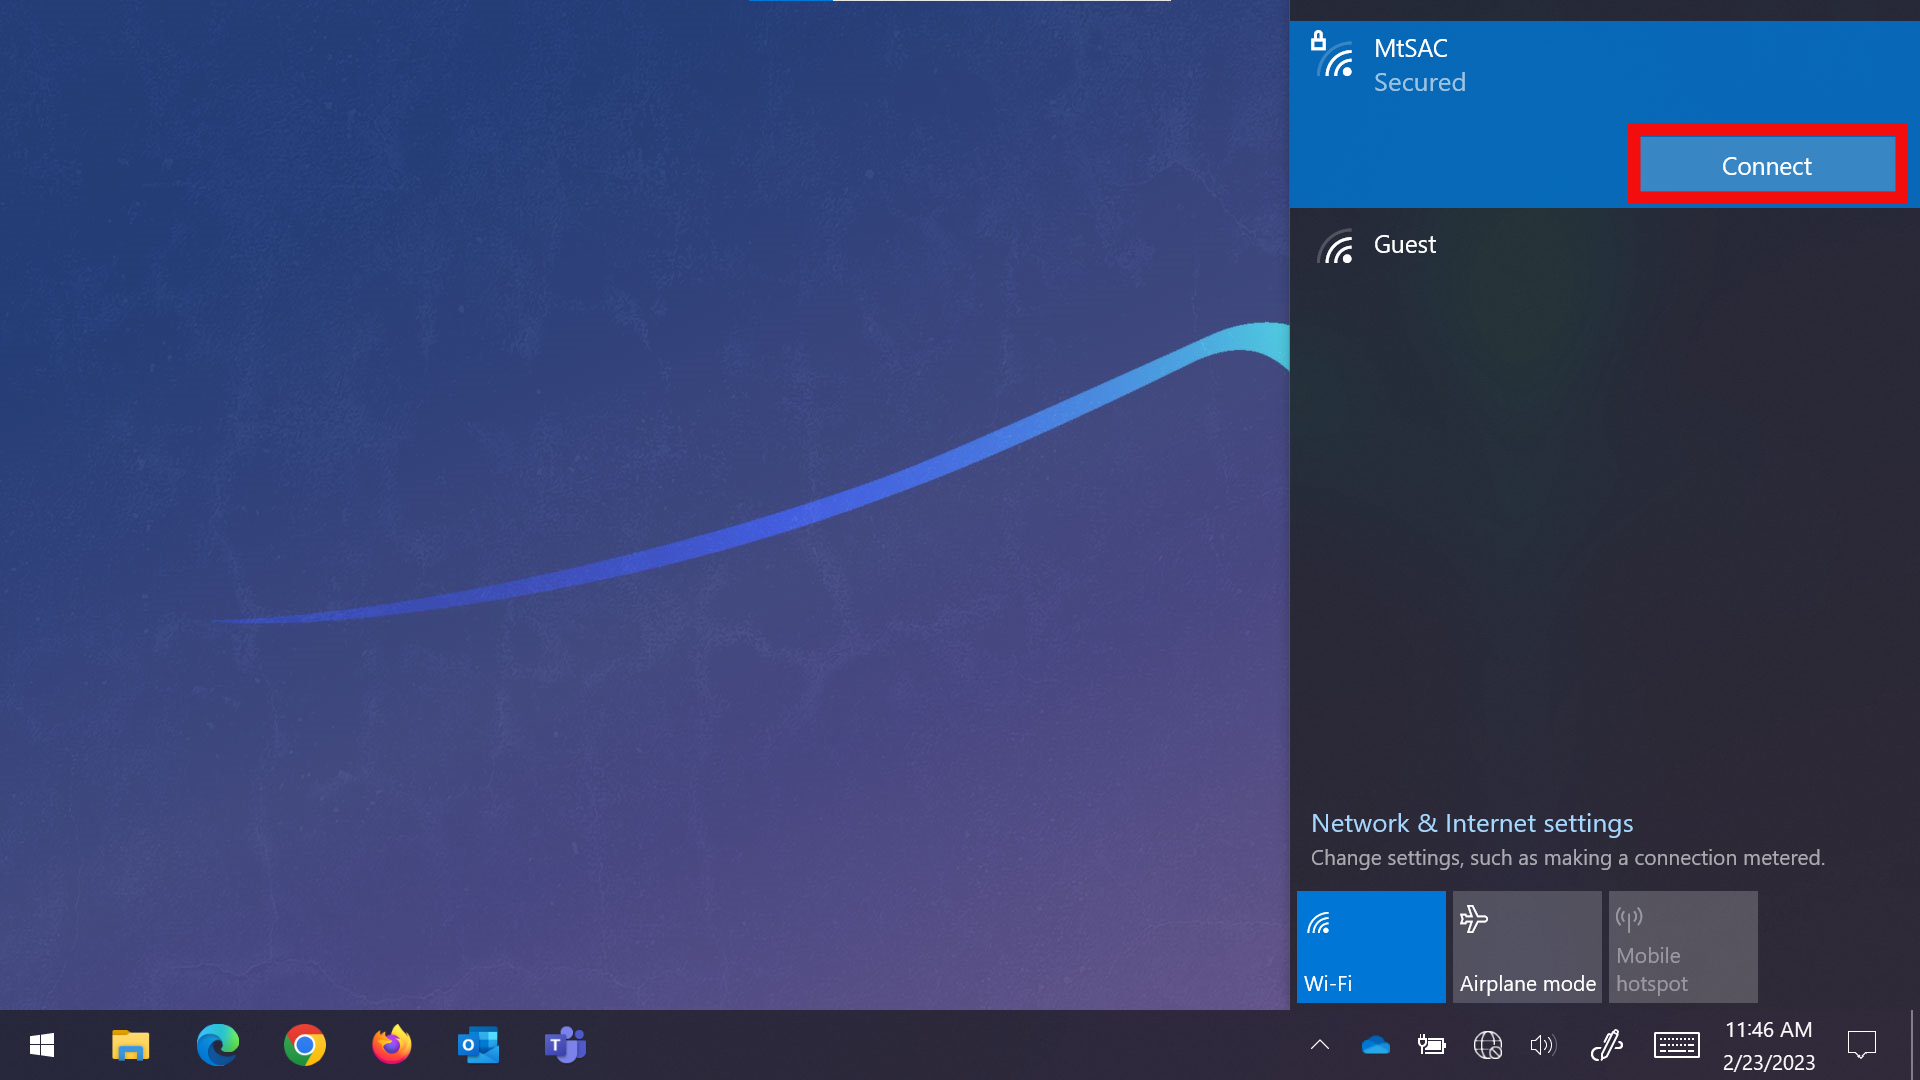
3. You will see a list of available Wi-Fi networks. Click the "MtSAC" network, then click the Connect button.
4. If you are on a campus issued PC logged in with your Portal Username and Password, you will automatically connect. If you are on another device, you will need to enter your Portal Username and Password into the fields and click the OK button.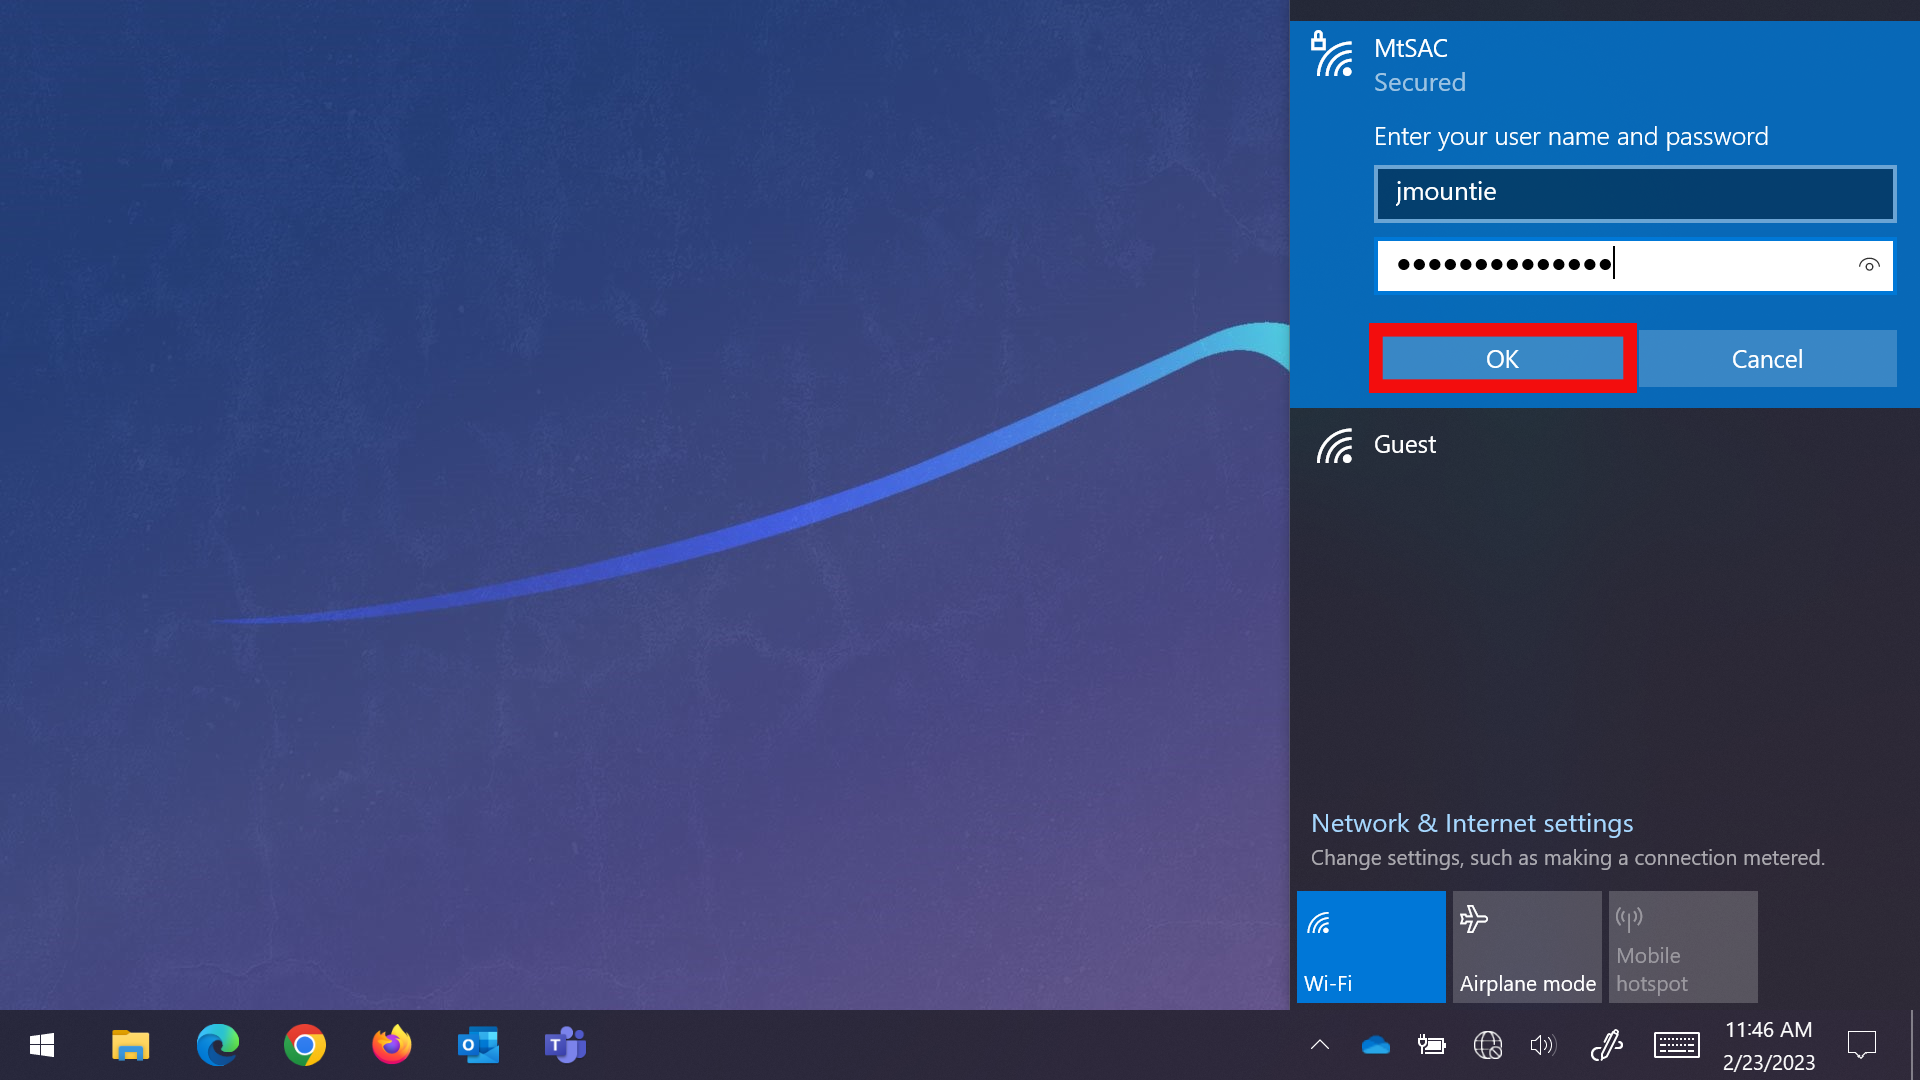
5. You will be prompted to Continue to connect. click the Connect button to continue.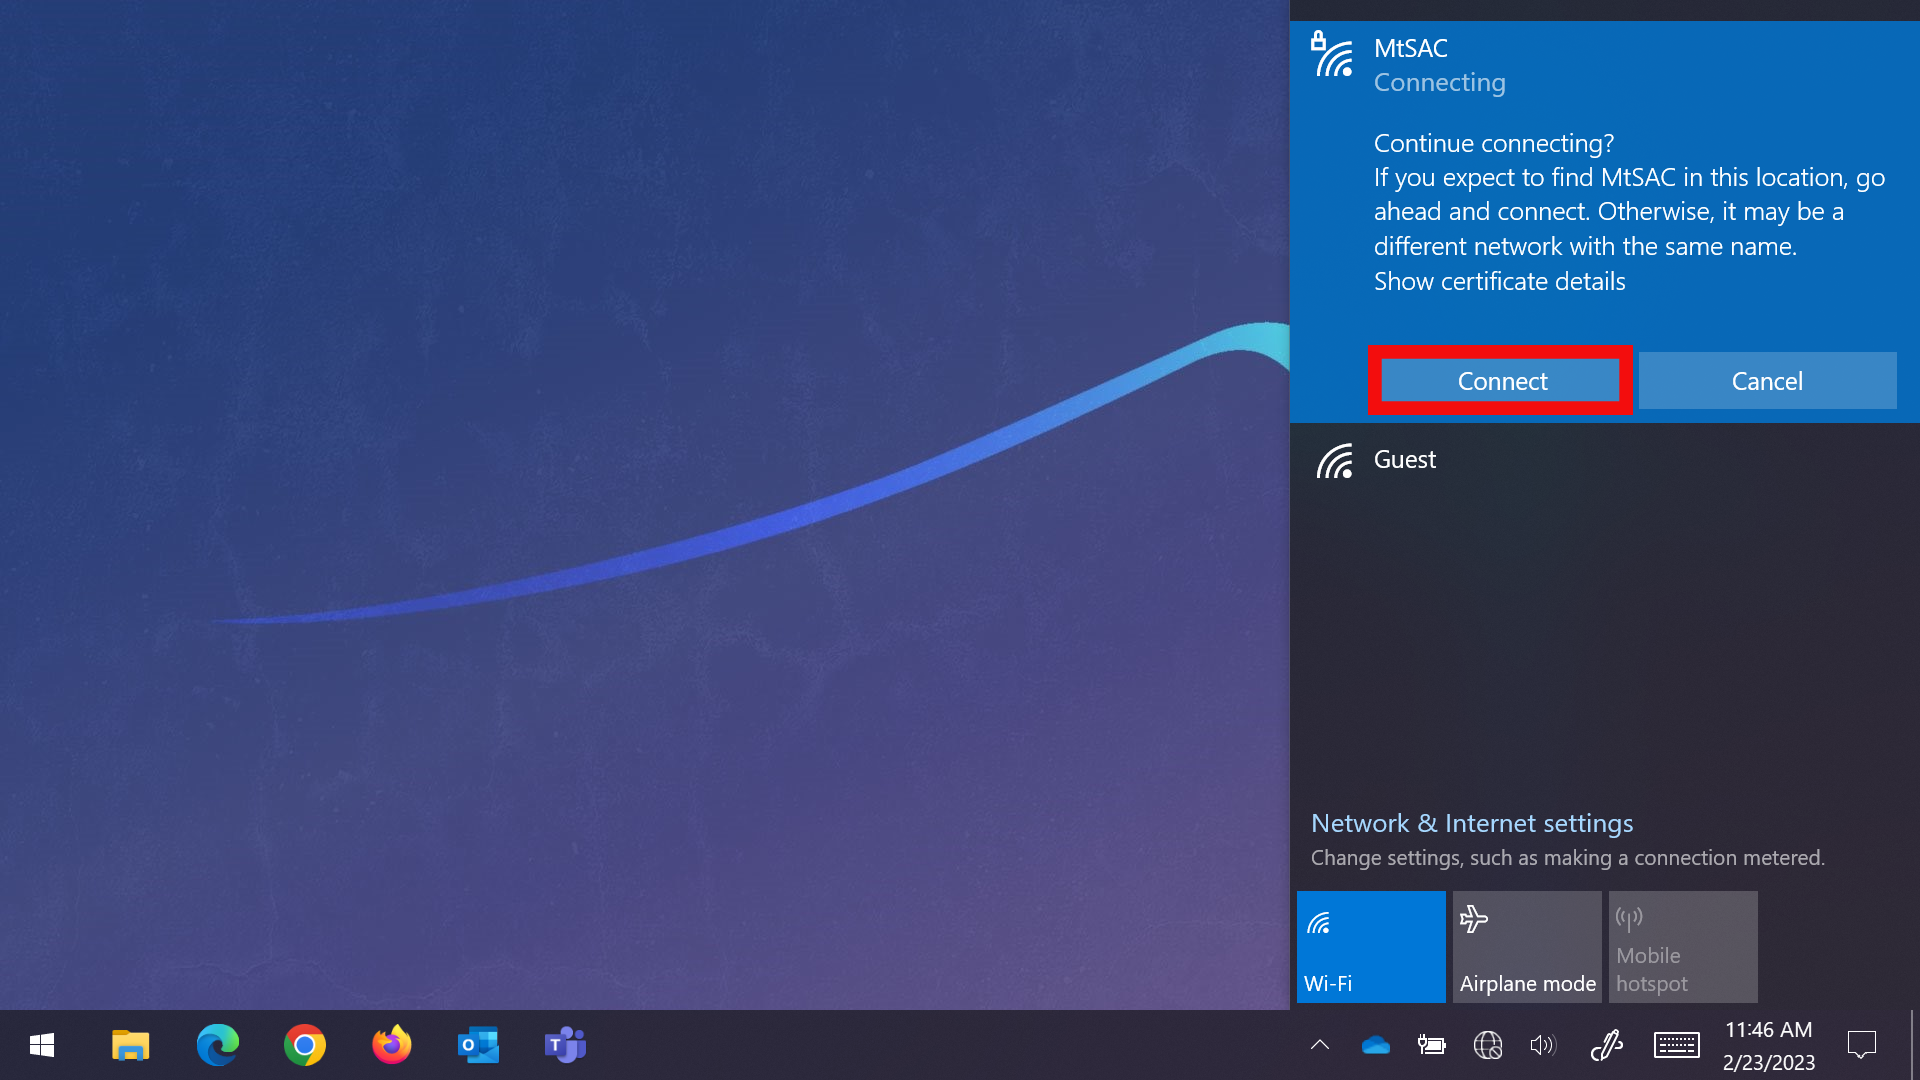
6. That's it! You should now be connected to the Wi-Fi network on your Windows 10 device. If you're having trouble connecting, make sure you're in range of the network and that you're entering the correct password (if applicable). Additionally, you can try resetting your network adapter by going to "Settings" > "Network & Internet" > "Status" > "Network reset" and following the prompts.
- Using an iOS (Apple) Smartphone or Tablet
Note: Directions are using the iOS 16.2 operating system. Different versions may look different but will generally follow the same steps.
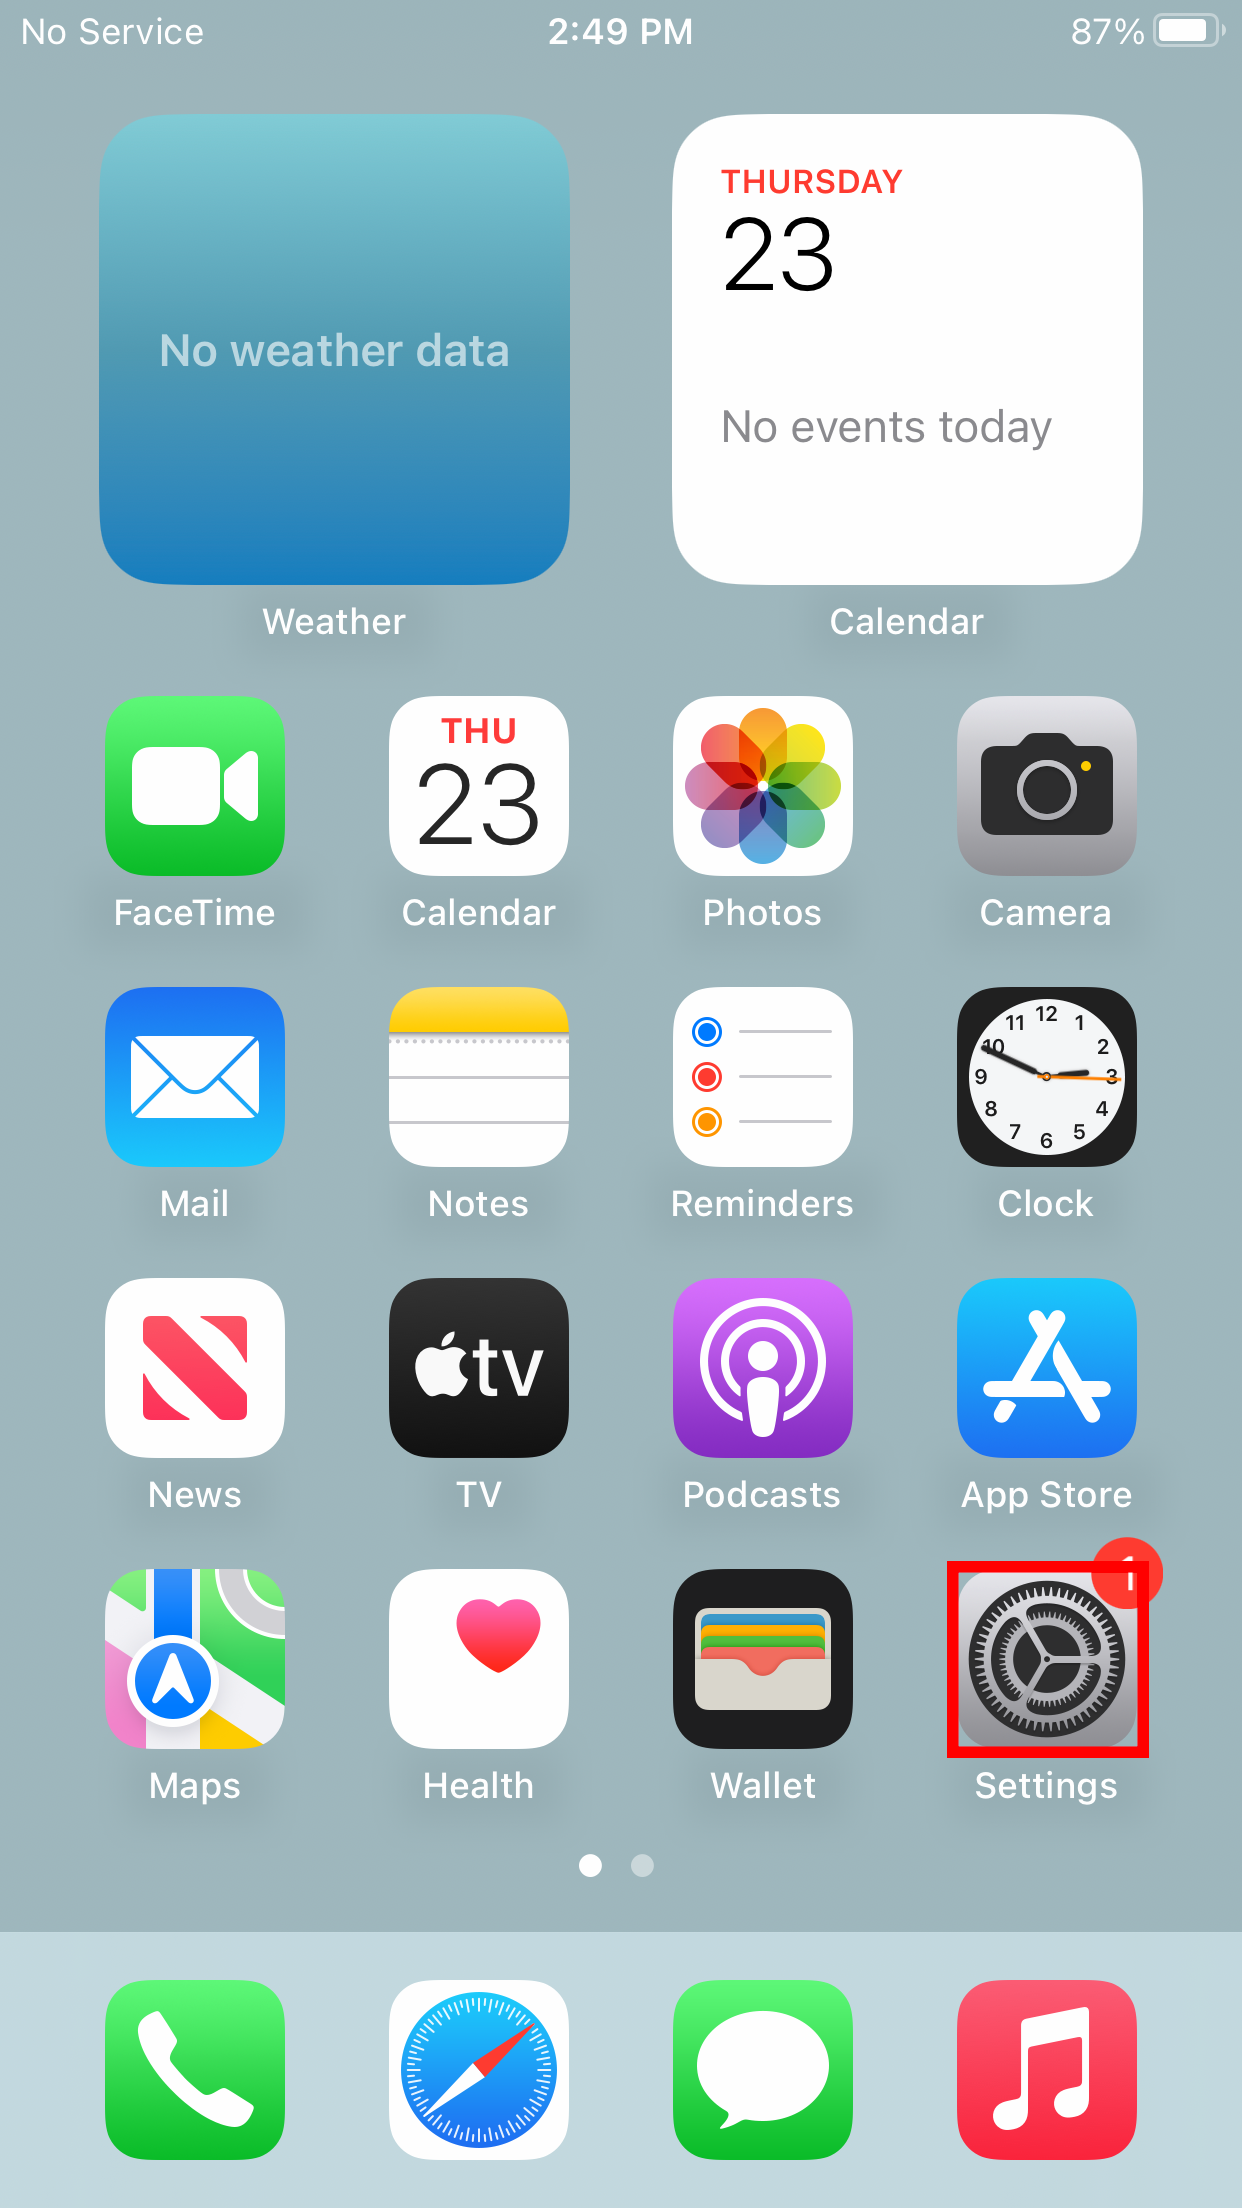
1. Unlock your device and tap the Settings icon to open system settings.
2. In Settings, tap Wi-Fi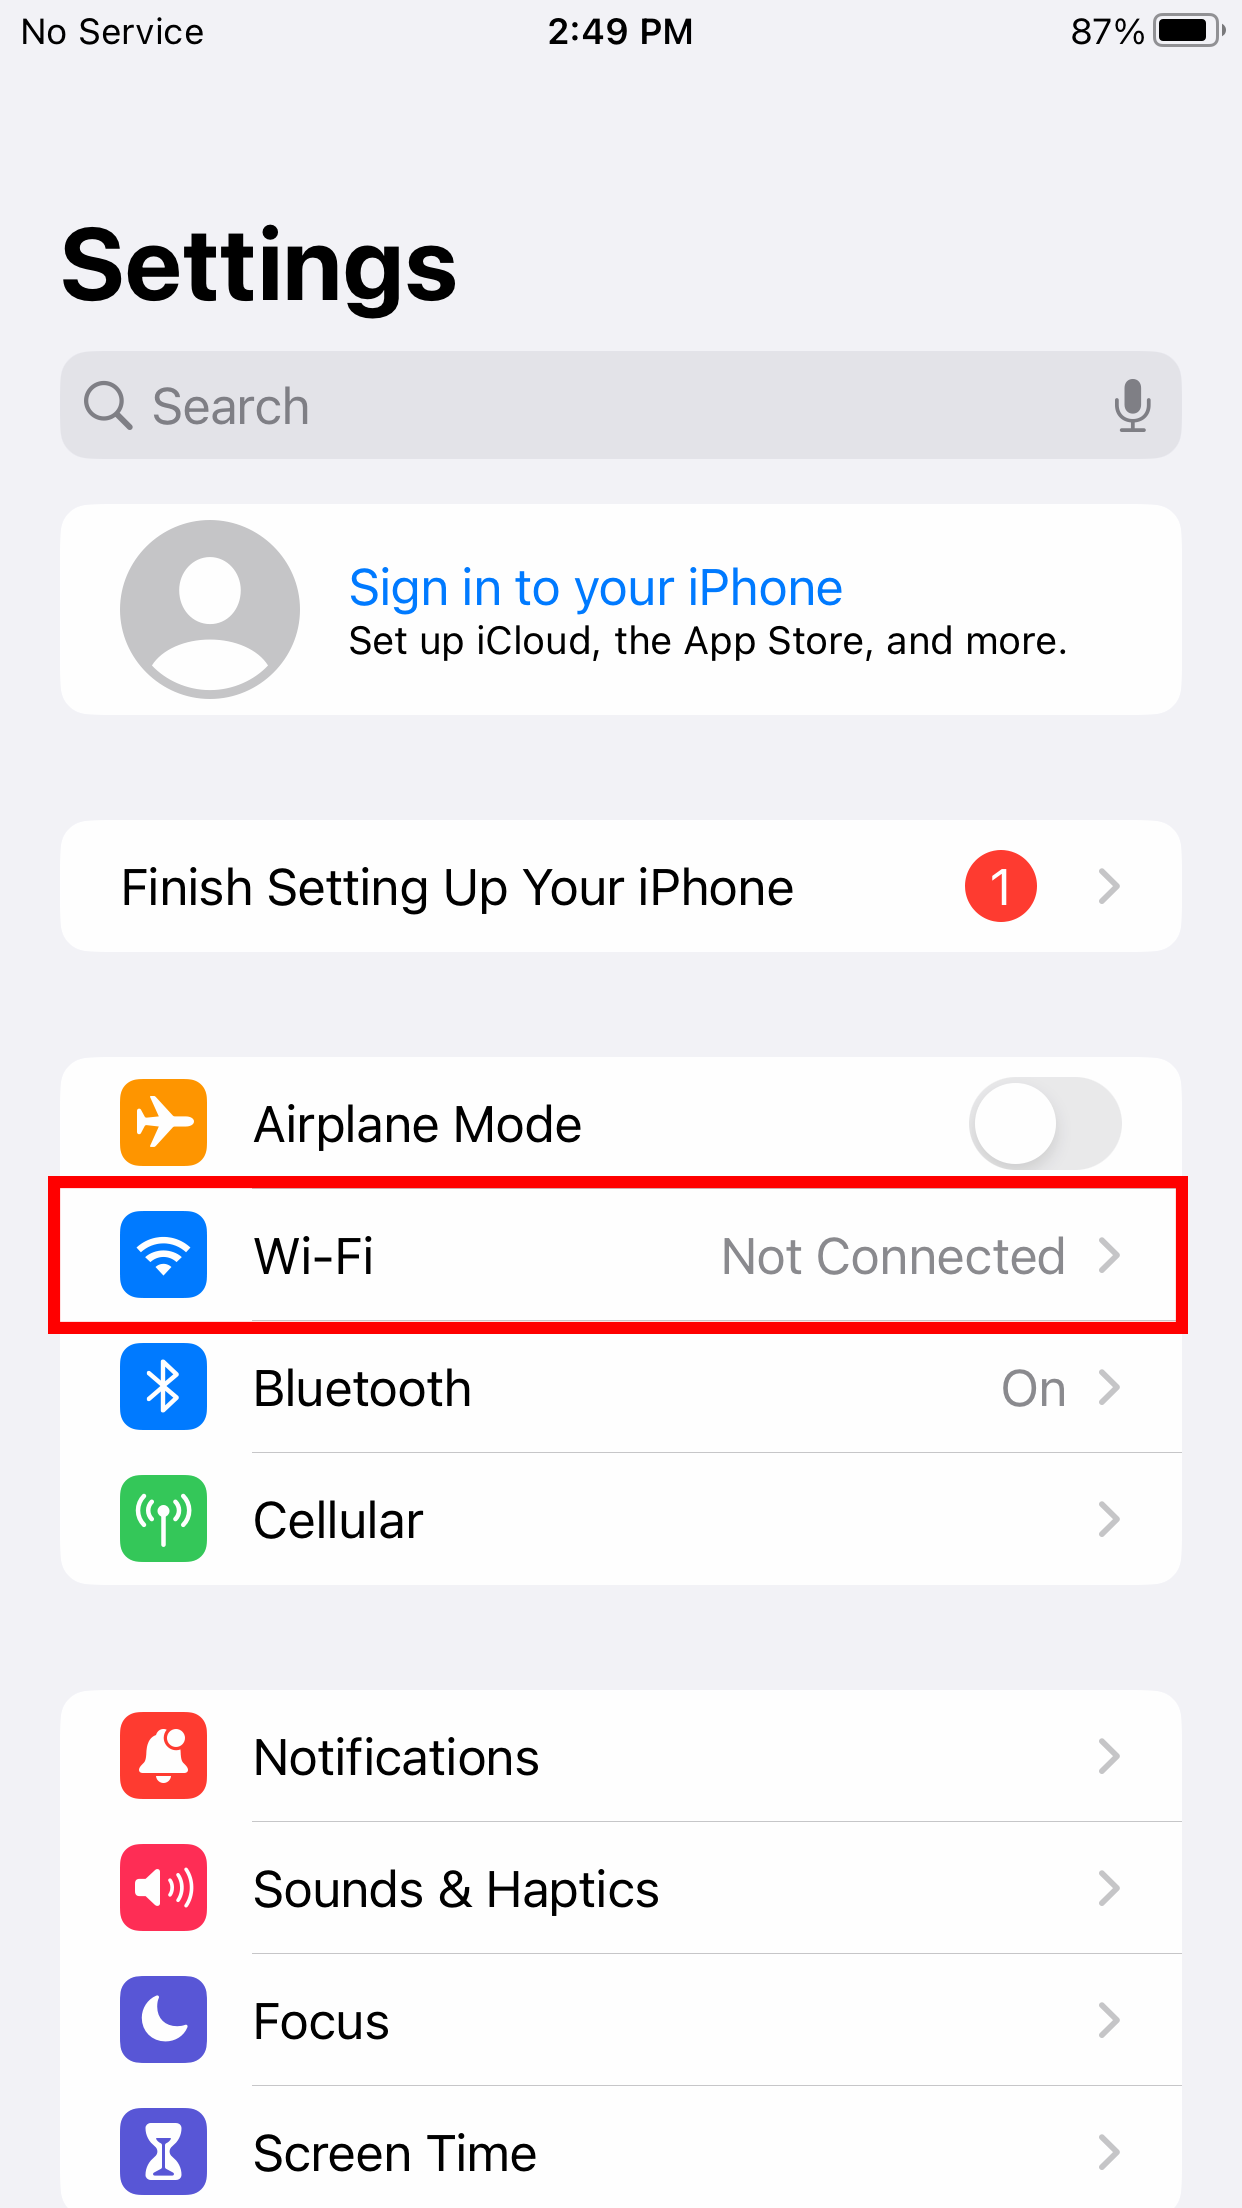
3. If the Wi-Fi is not turned on, tap the toggle to turn it on.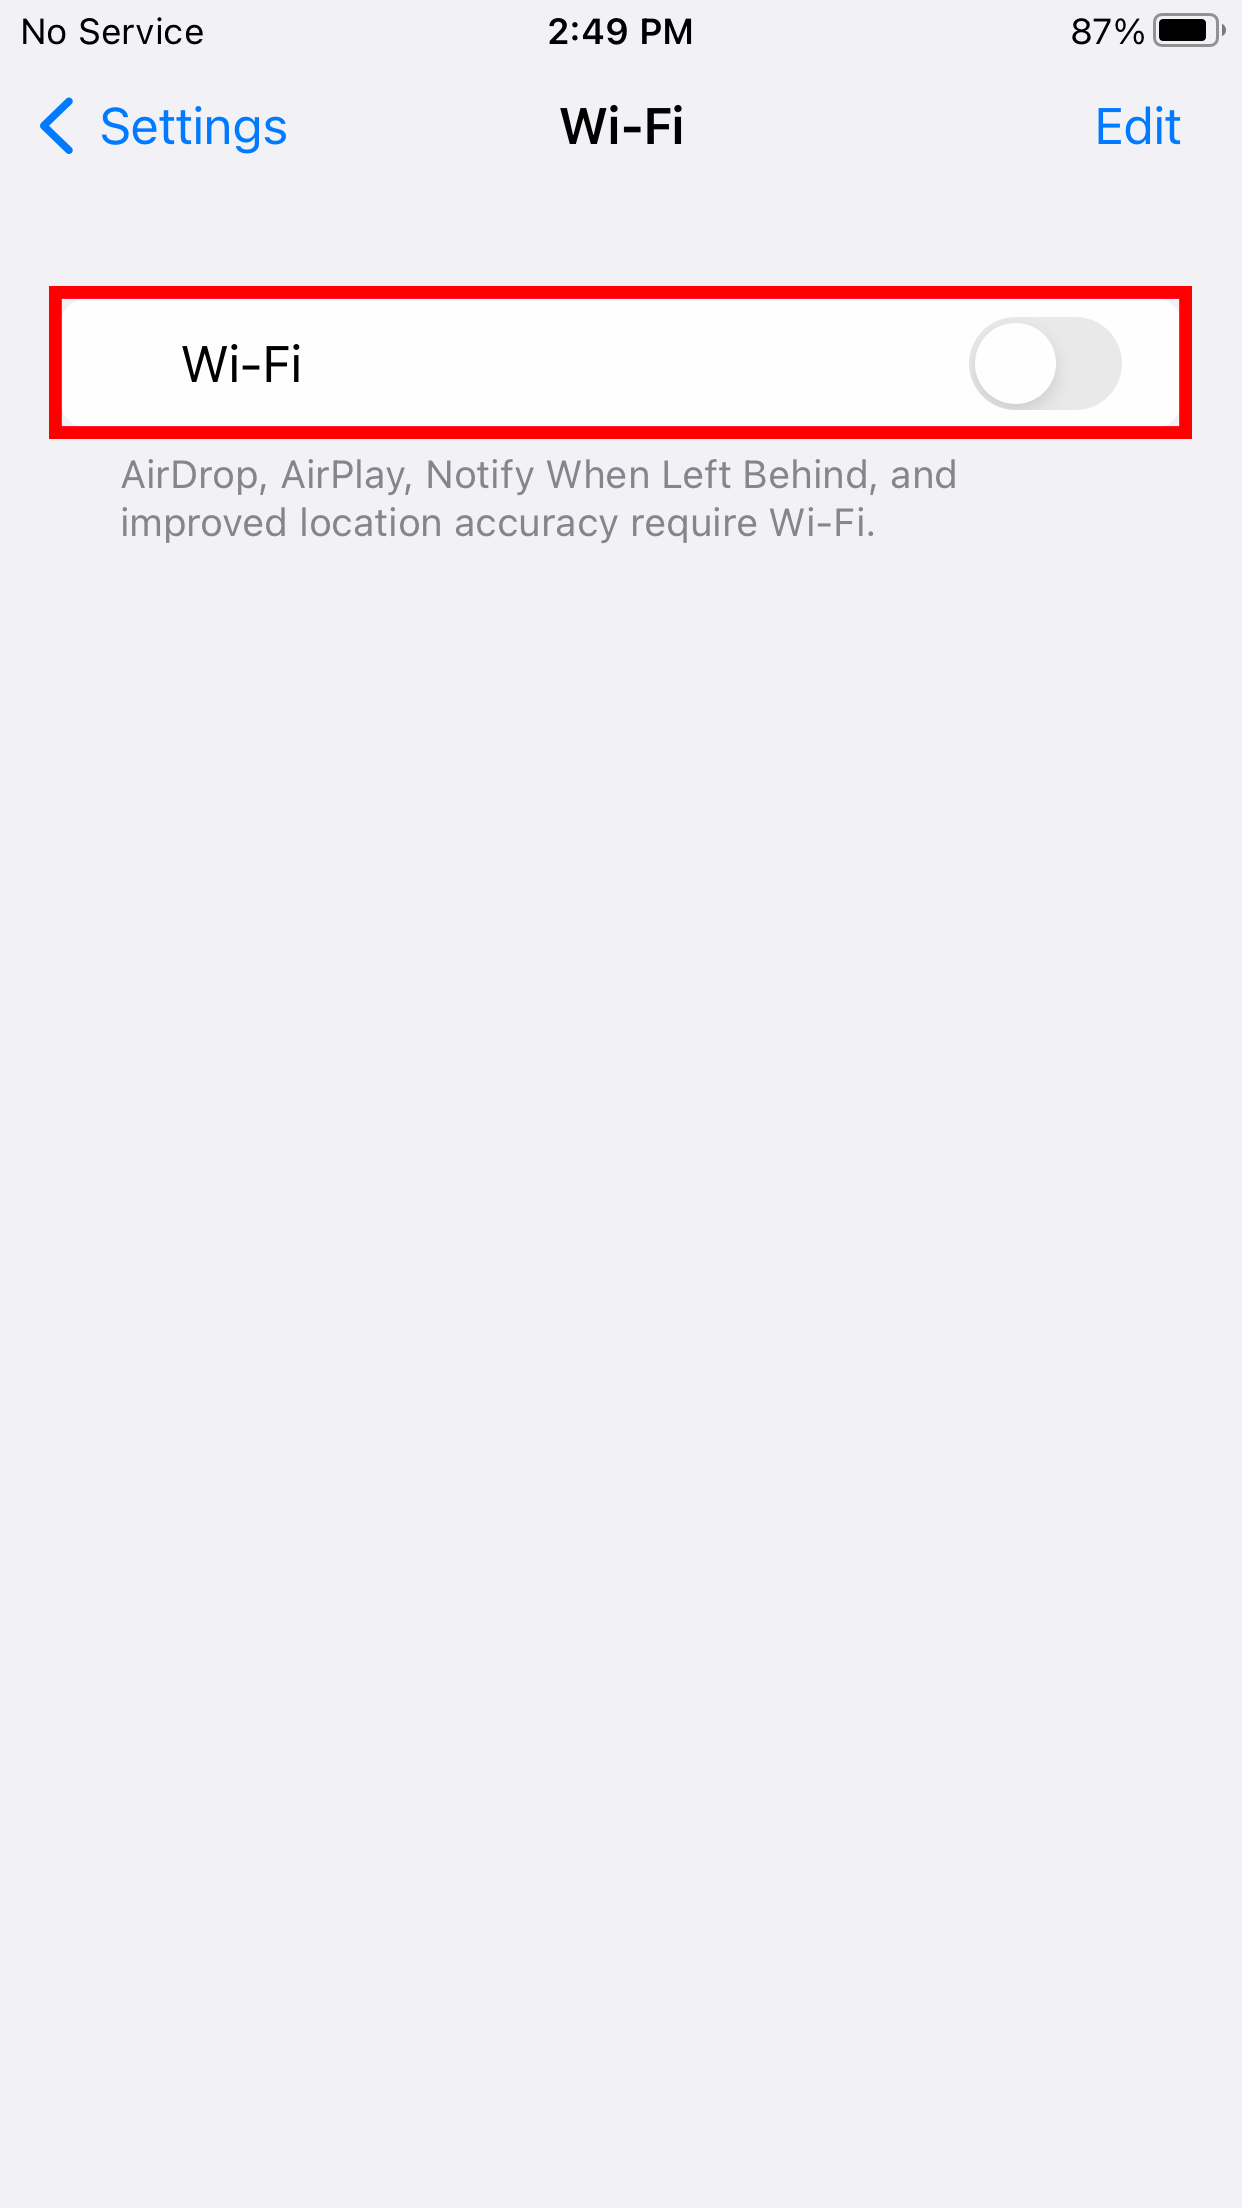
4. From the list of available Wi-Fi networks tap the MtSAC Wi-Fi network.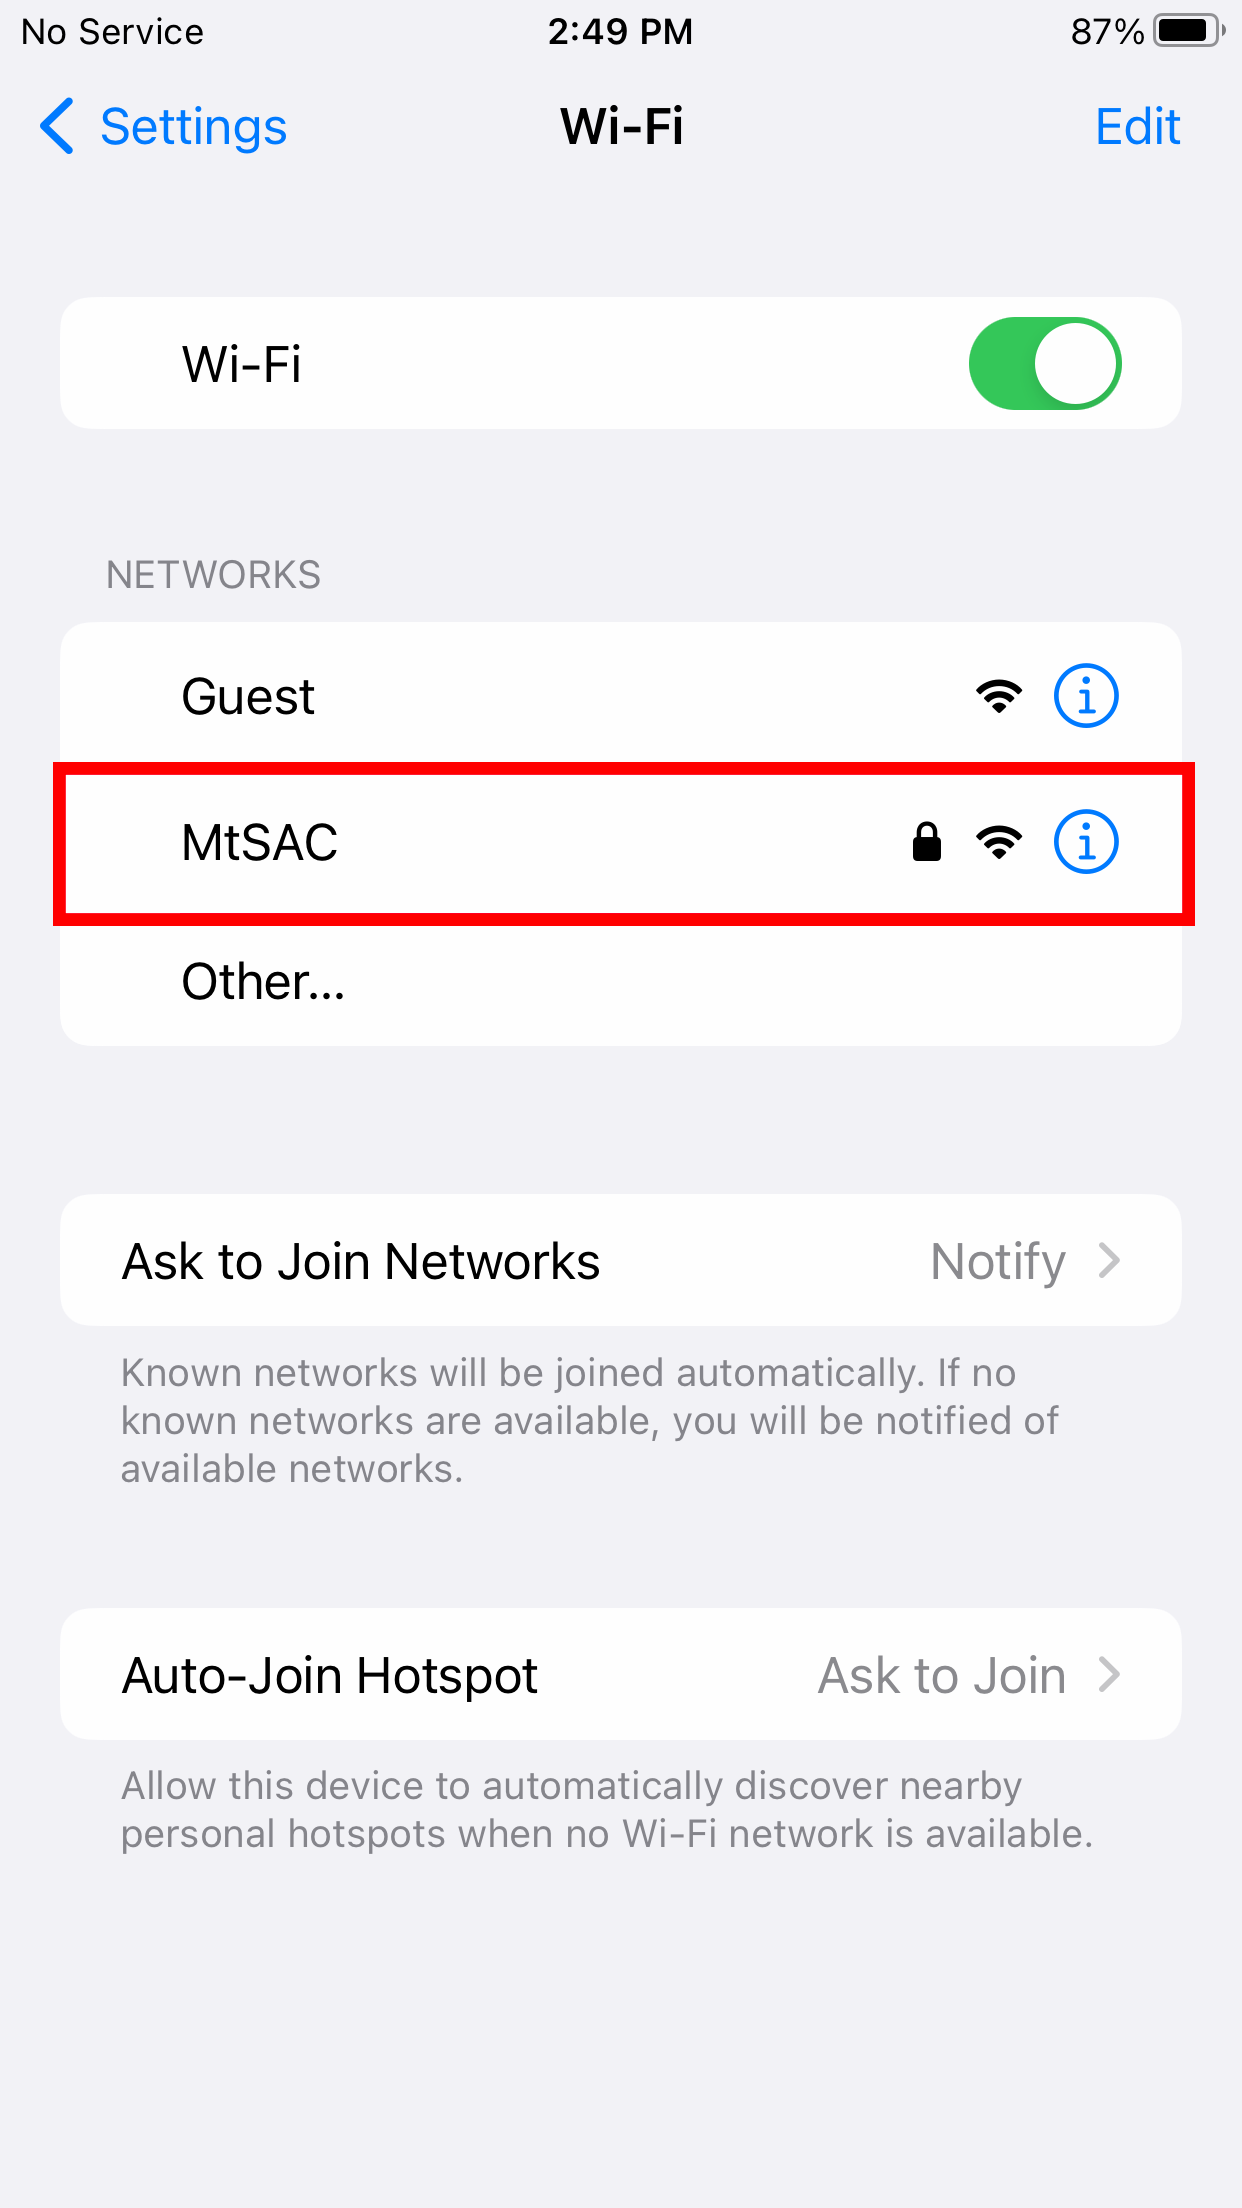
5. You will be prompted for a Username and Password. Enter you Mt. SAC Portal username and password, then tap Join.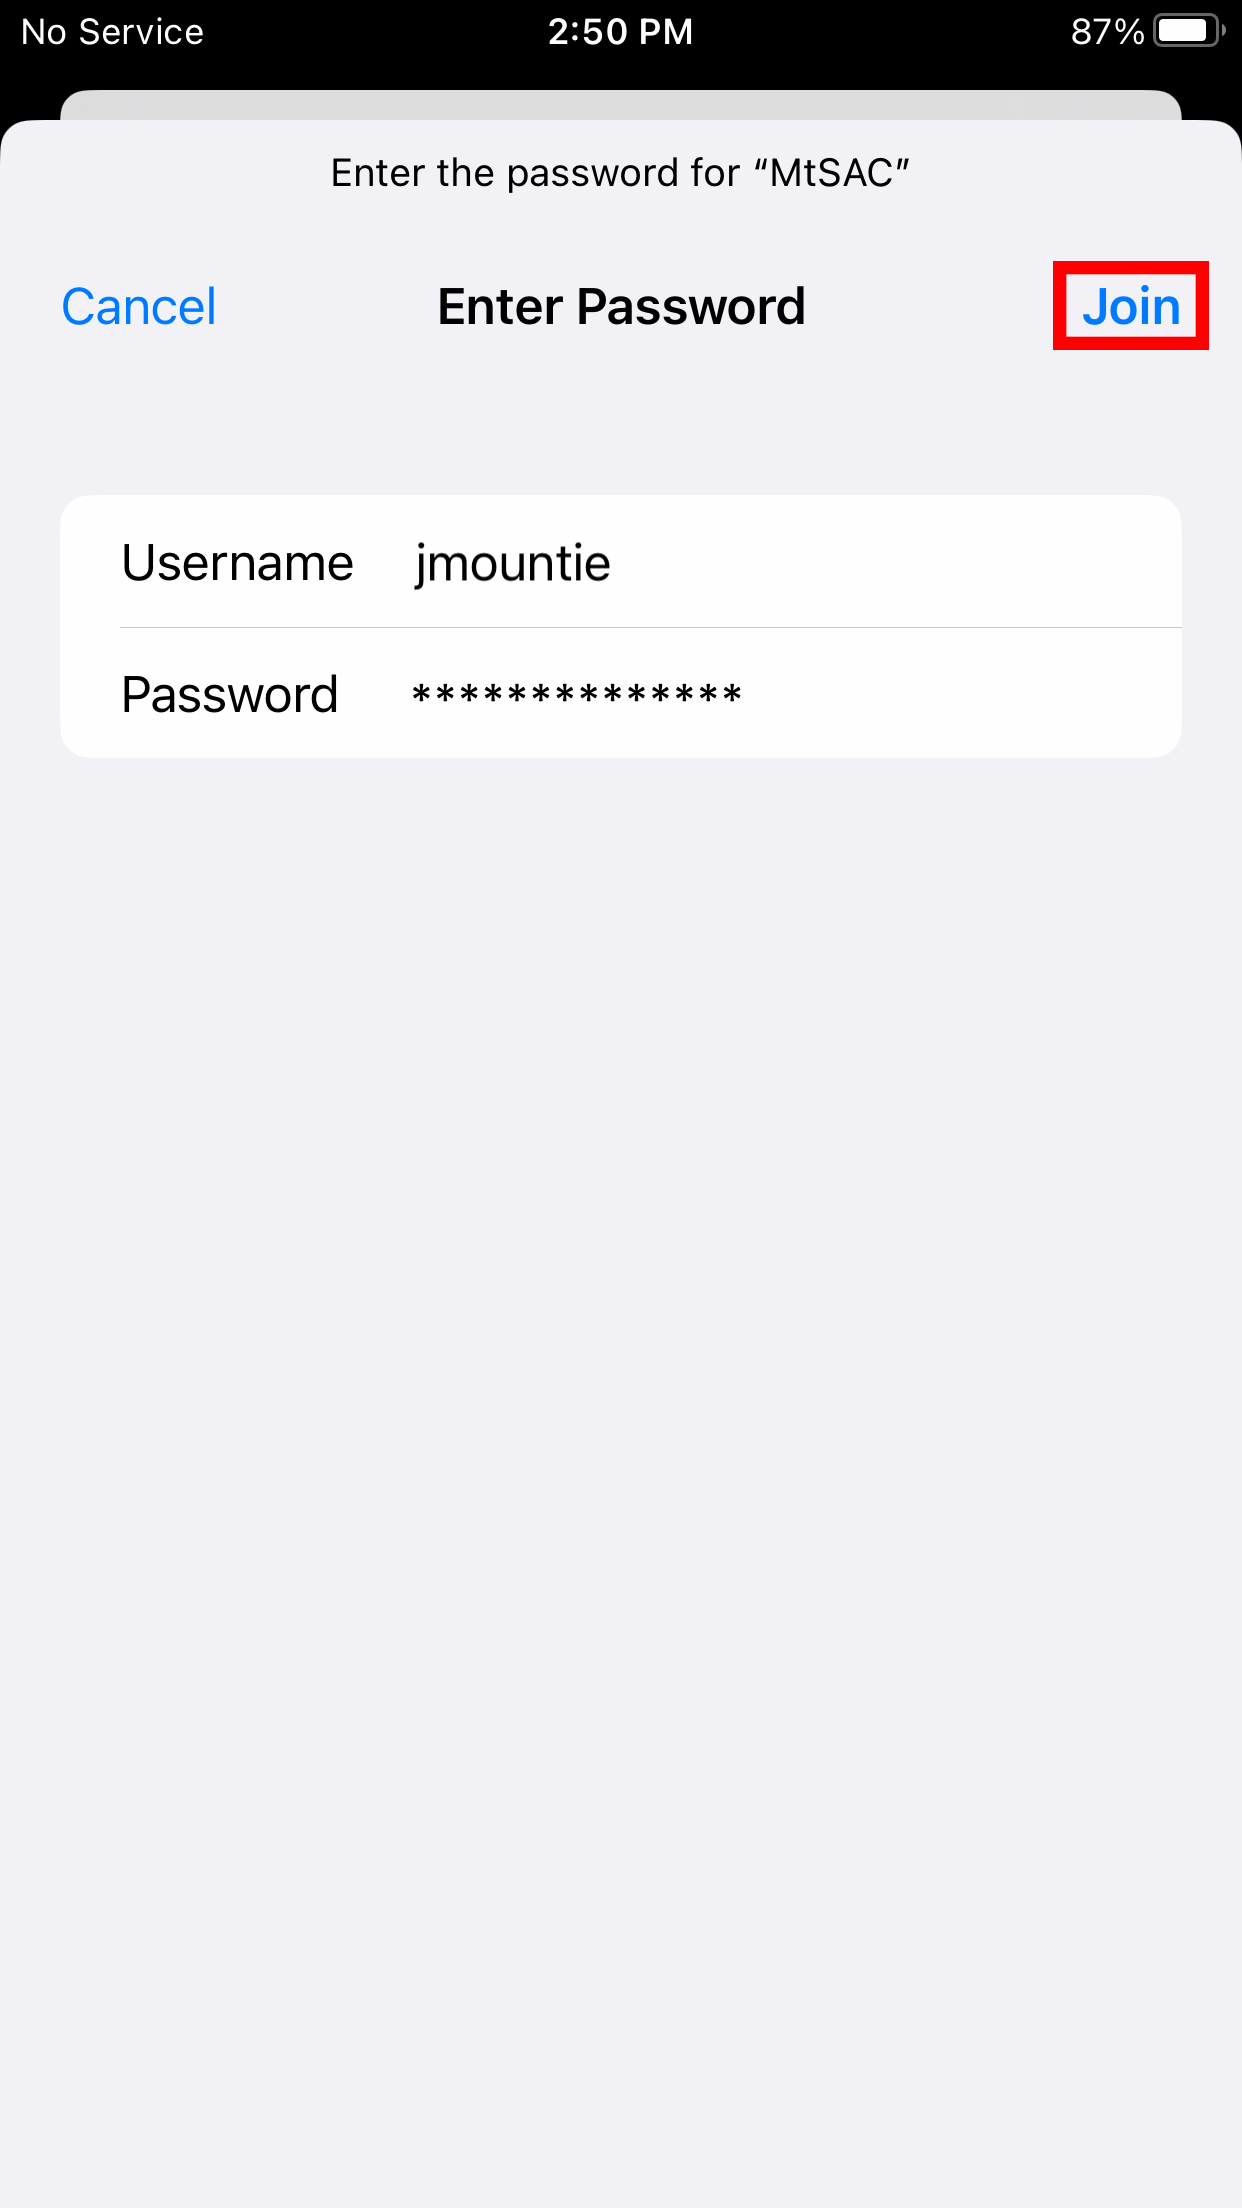
6. The Certificate window will pop-up. Tap Trust.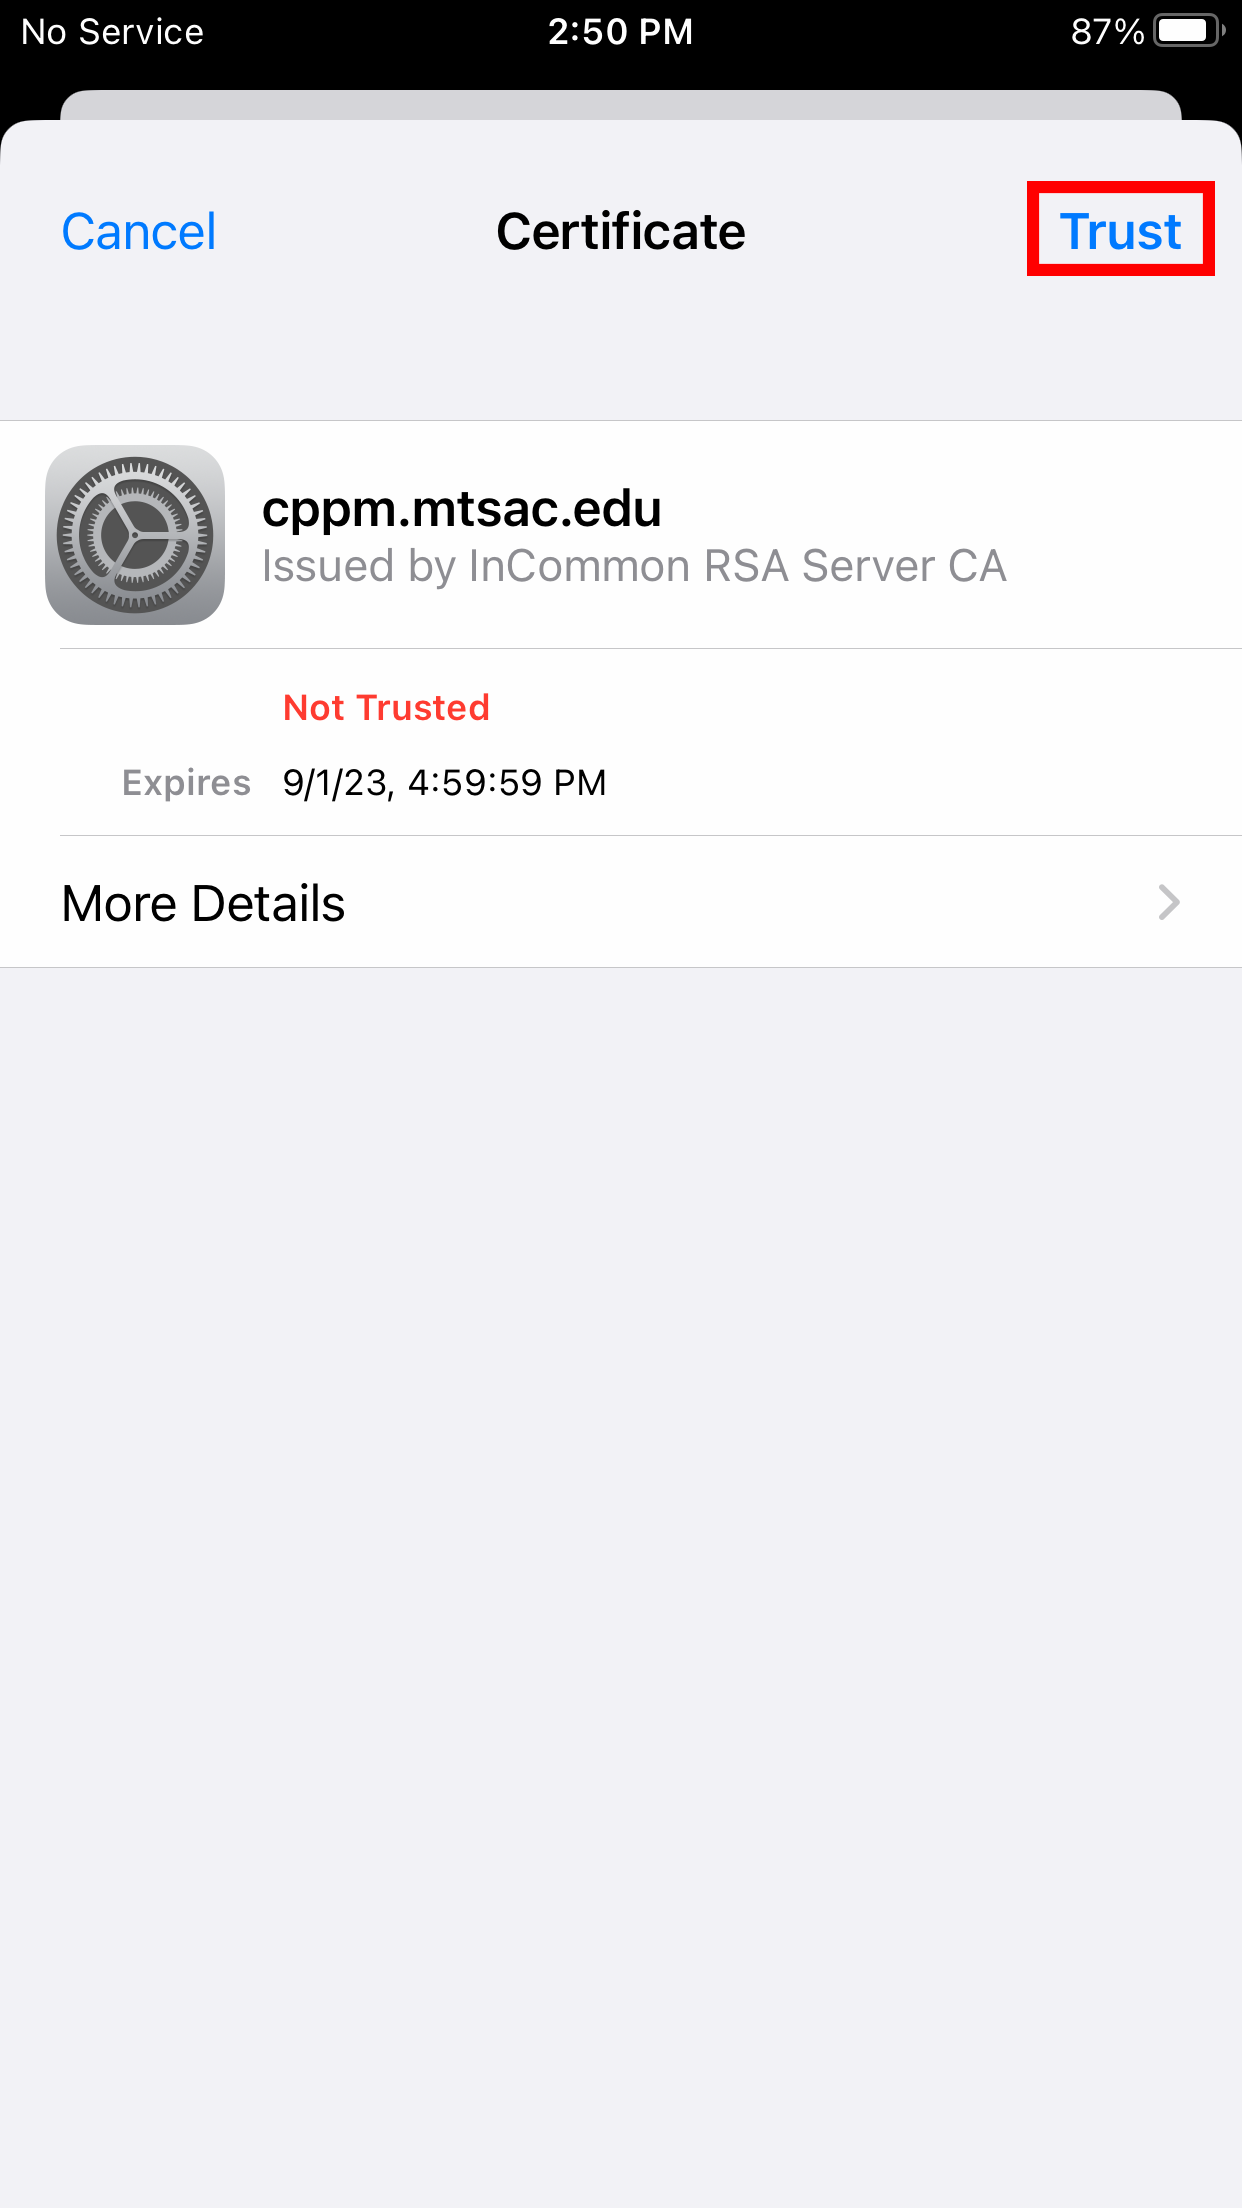
7. That's it! If you're having trouble connecting, make sure you're in range of the network and you're entering the correct settings. If your portal password has changed for any reason, you will need to "forget" the network and add it again using the steps above.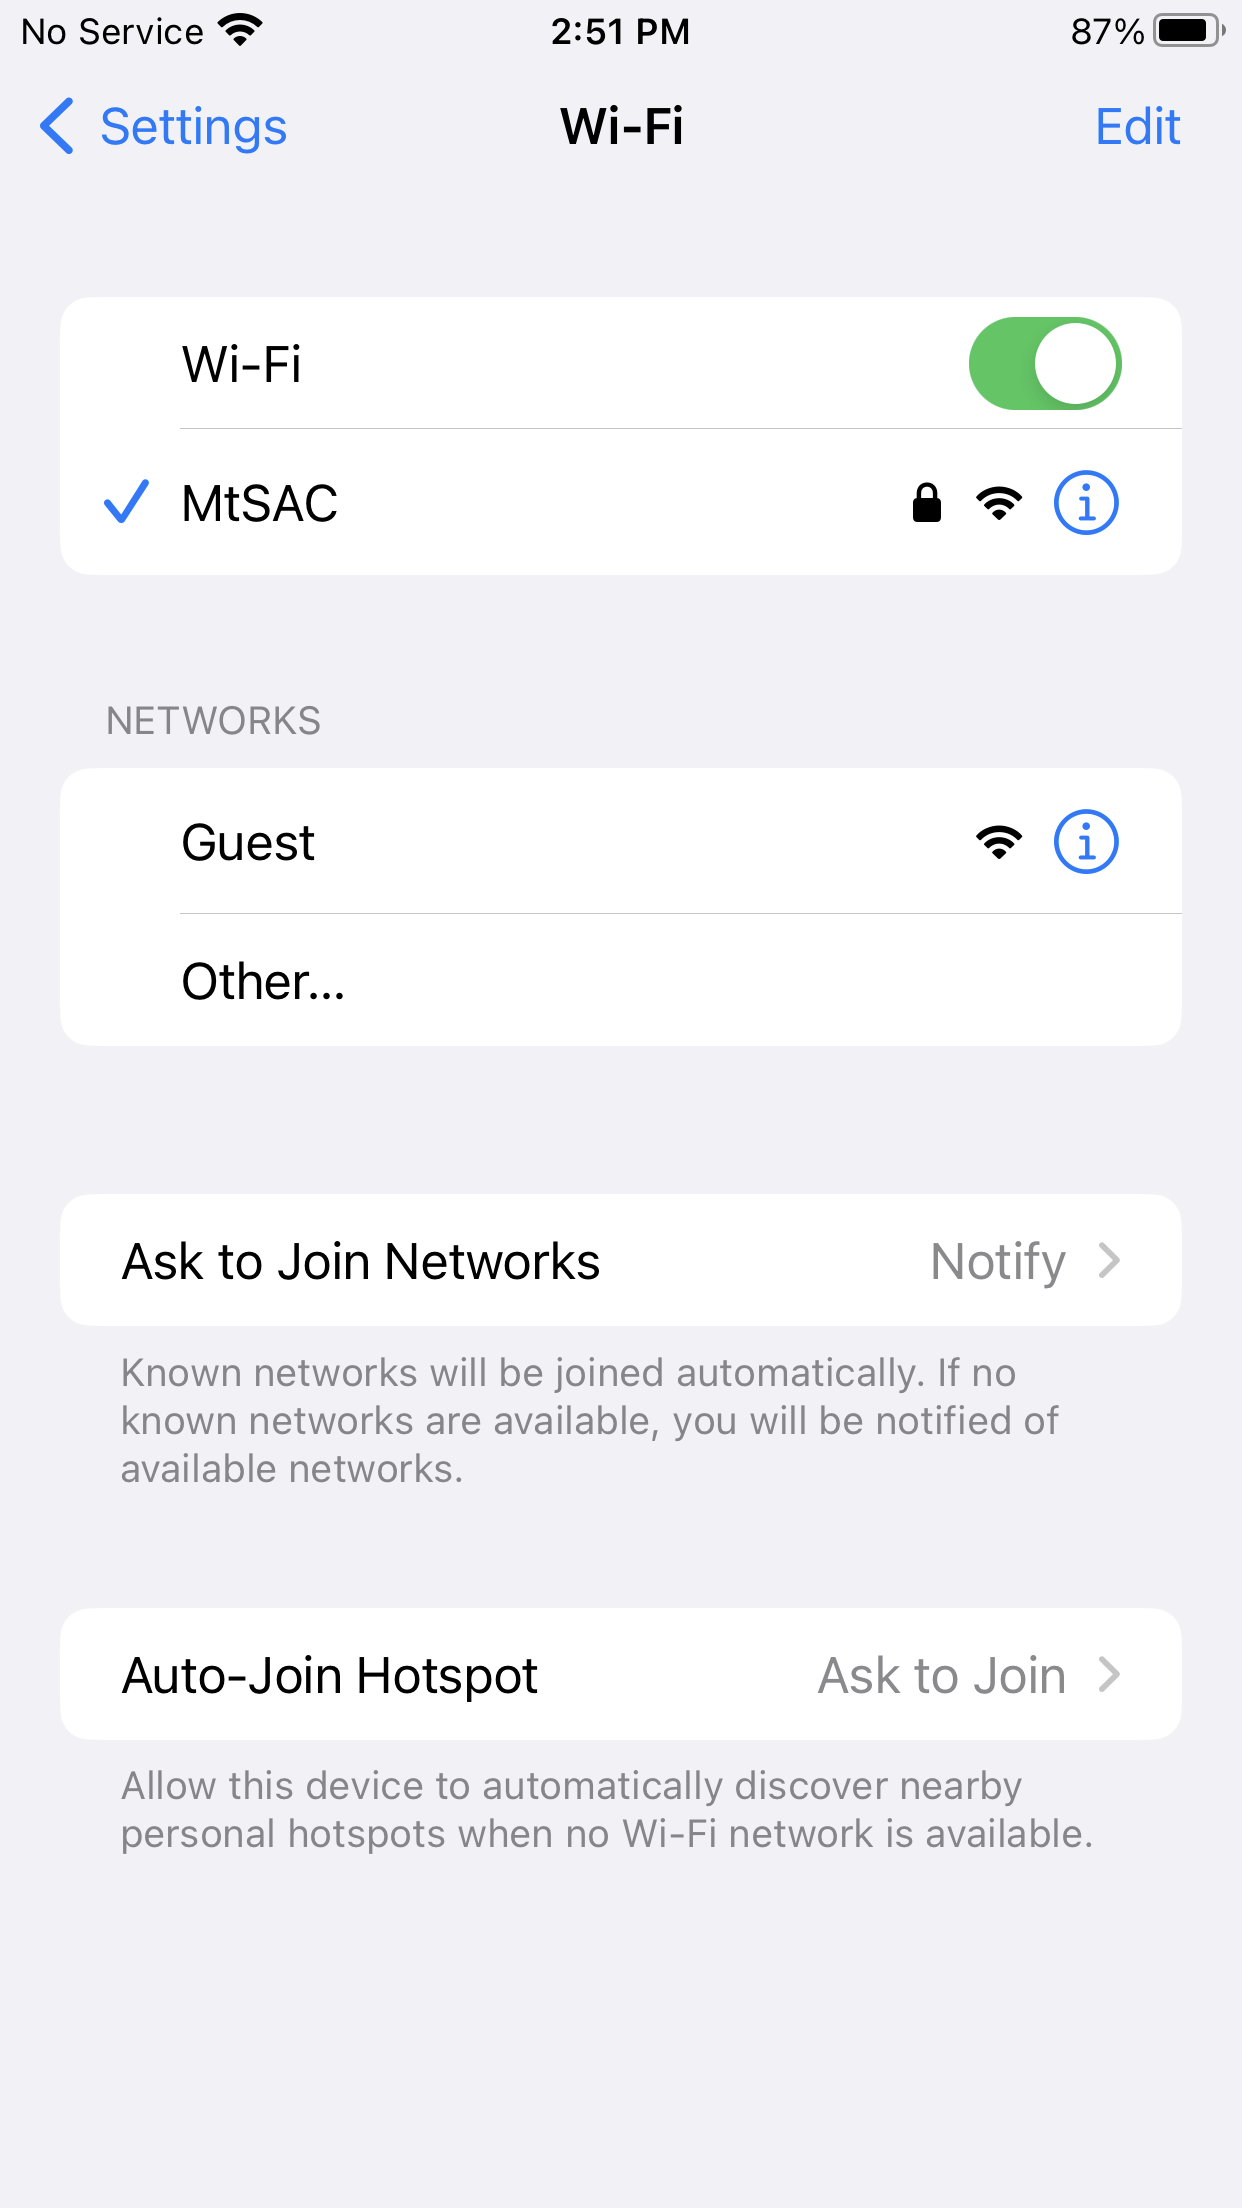
To "forget" the network, open your network settings again and tap the MtSAC network. Then tap the "Forget This Network" link. - Using a MacOS (Apple) PC
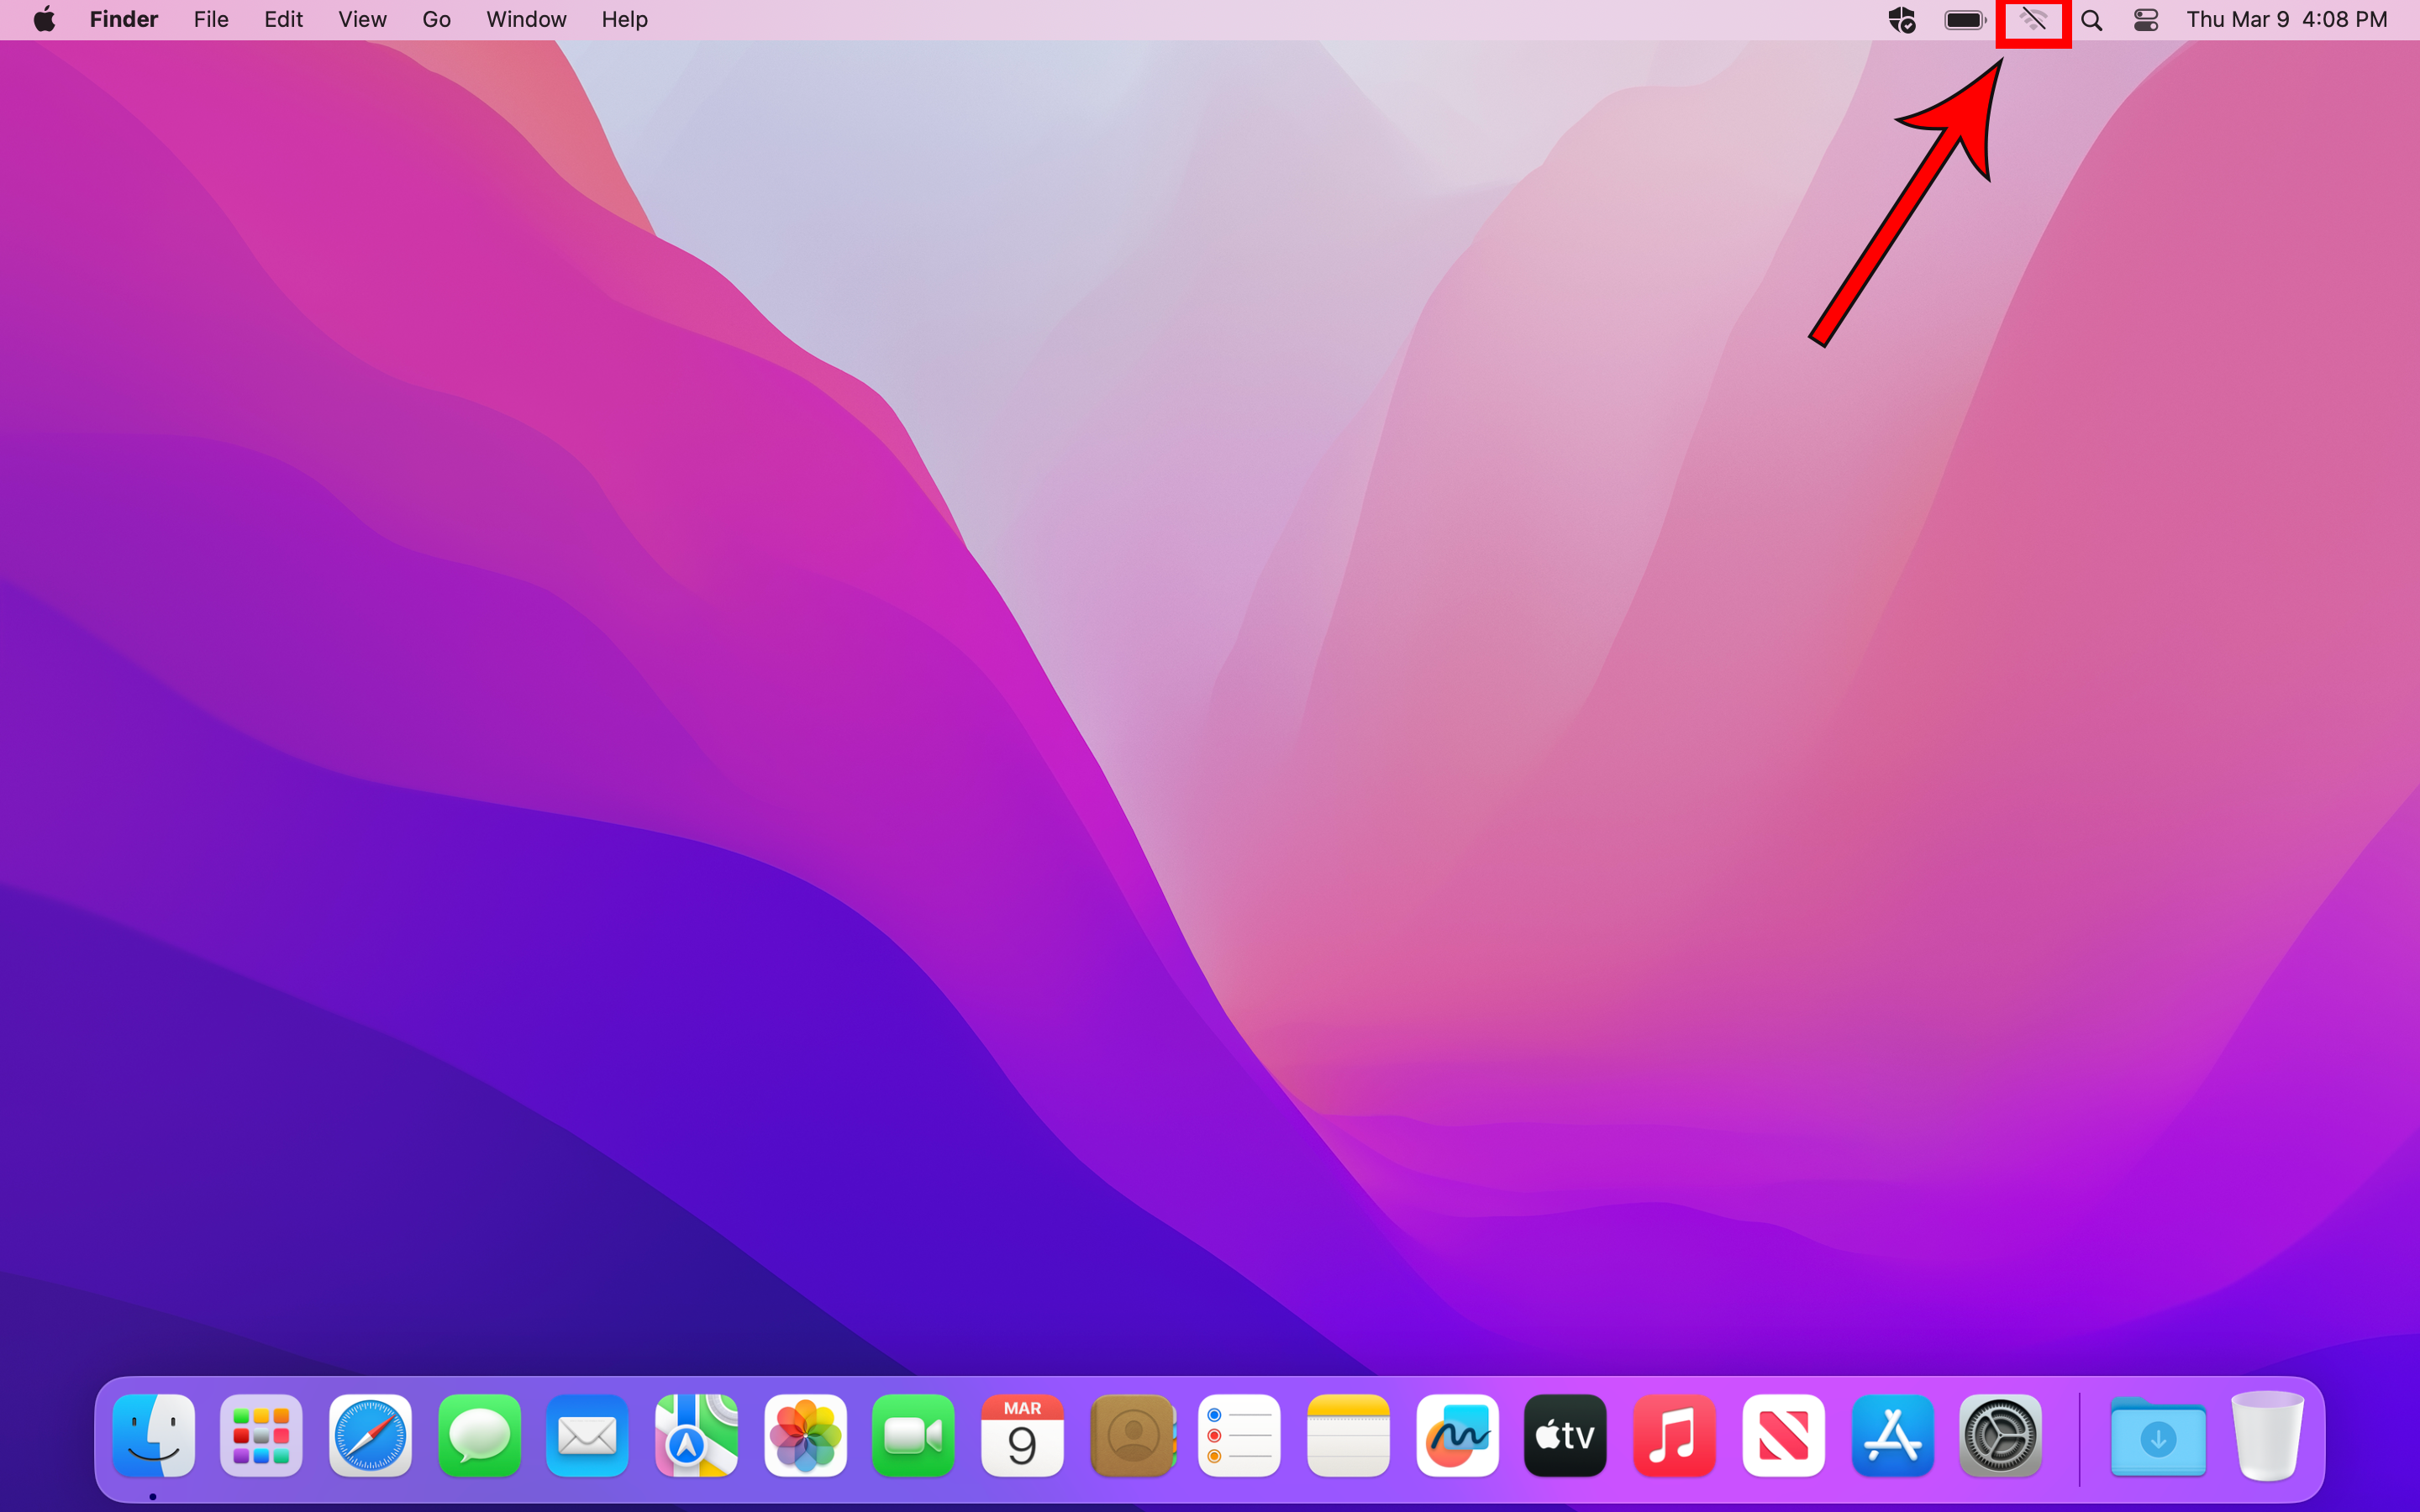
1. Click on the Wi-Fi icon on the menu bar located on the top right corner of the screen.
2. If the Wi-Fi is not turned on, tap the toggle to turn it on.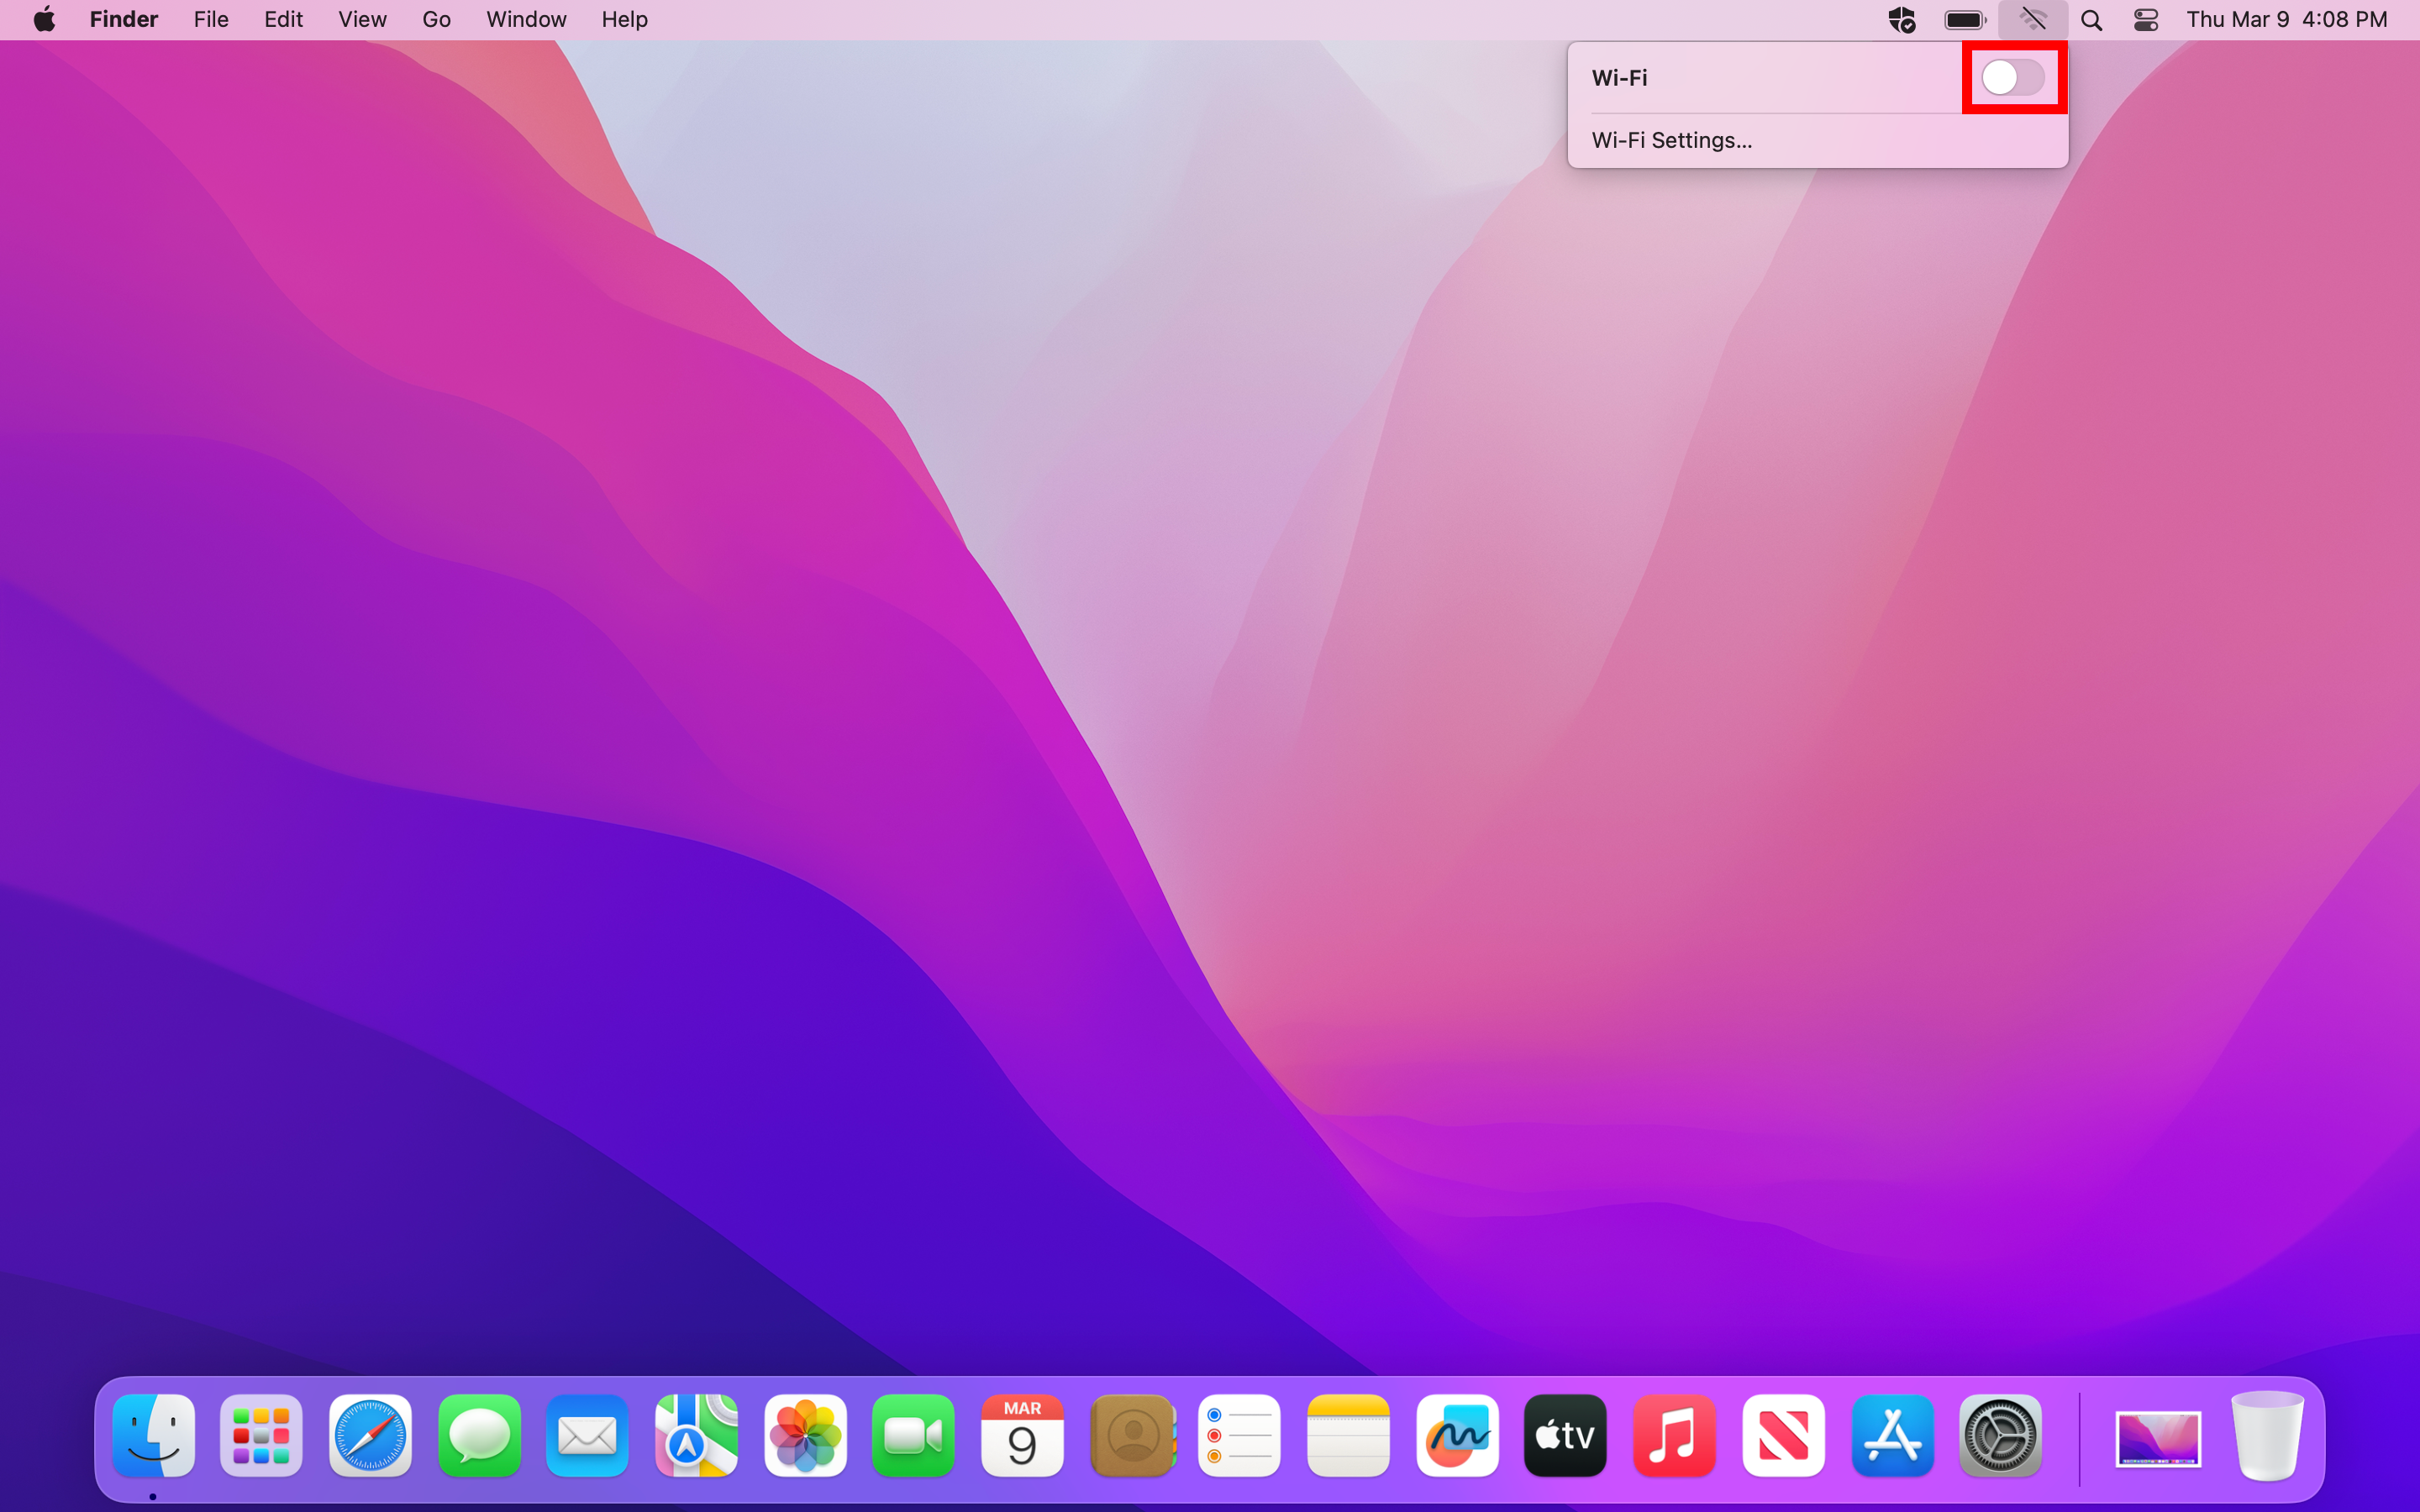
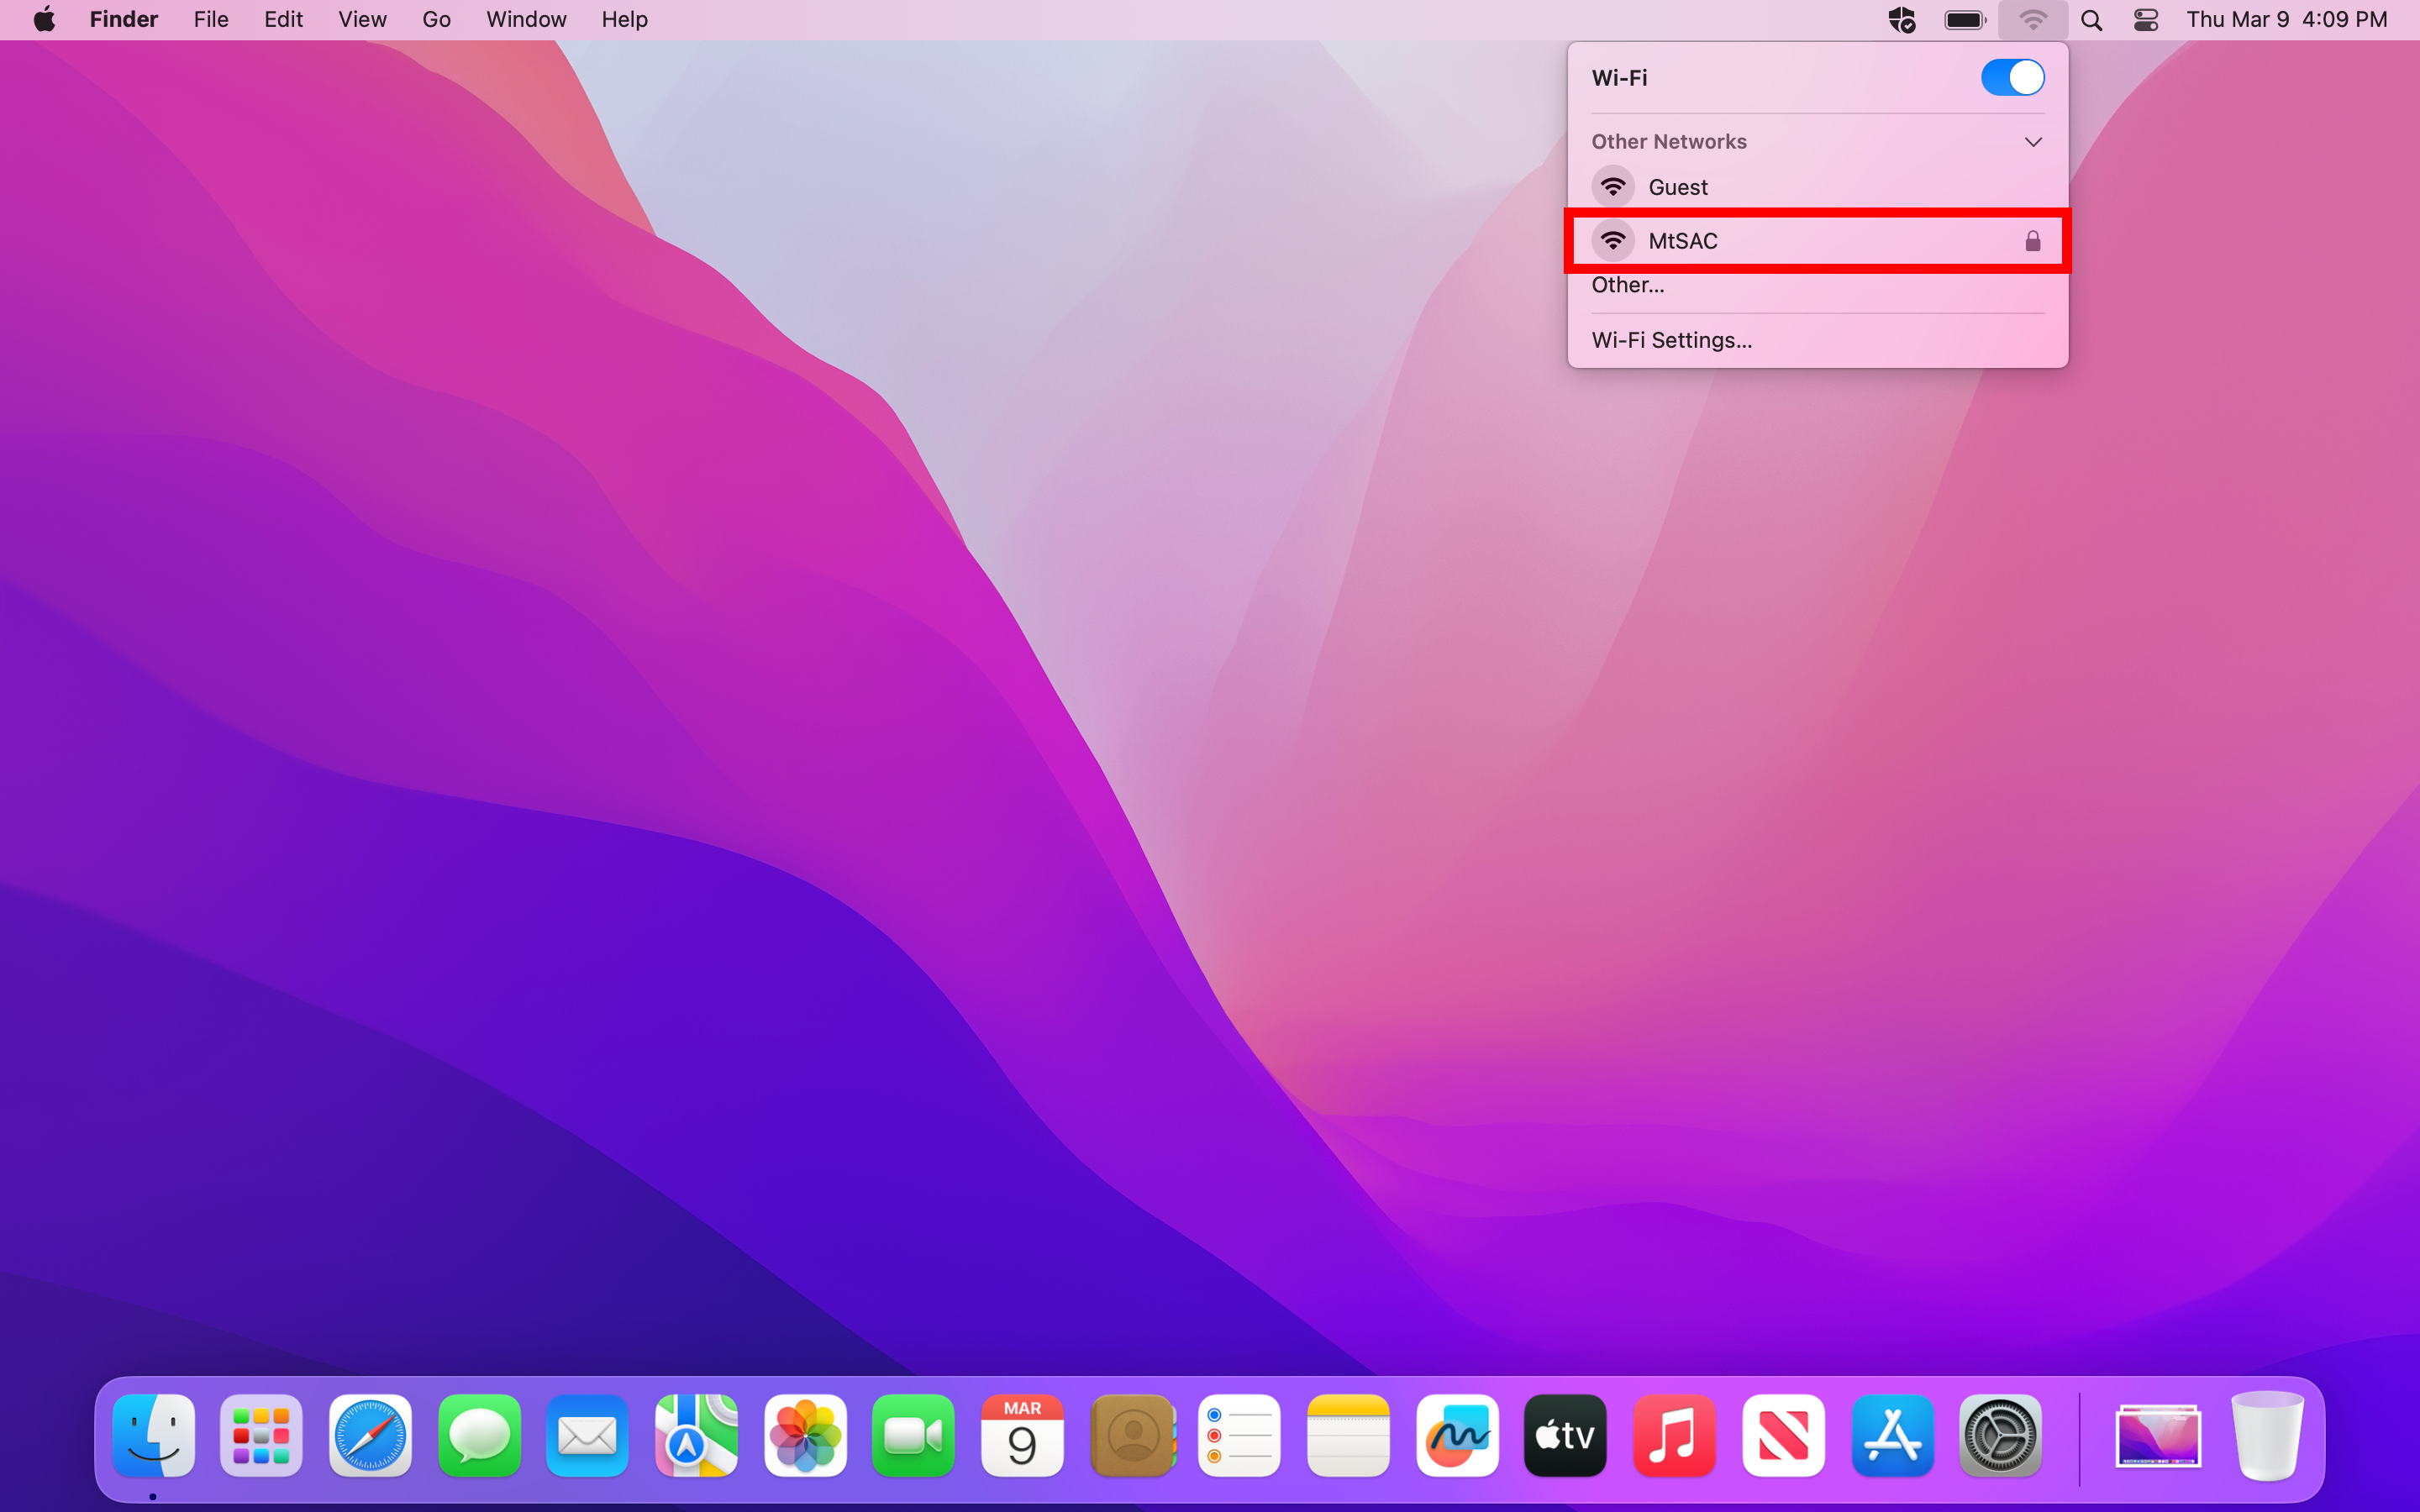
3. From the list of available Wi-Fi networks select the "MtSAC" Wi-Fi network.
4. You will be prompted for a certificate, Account Name and Password. Select the No certificate selected option and enter you Mt. SAC Portal username and password. Then click OK.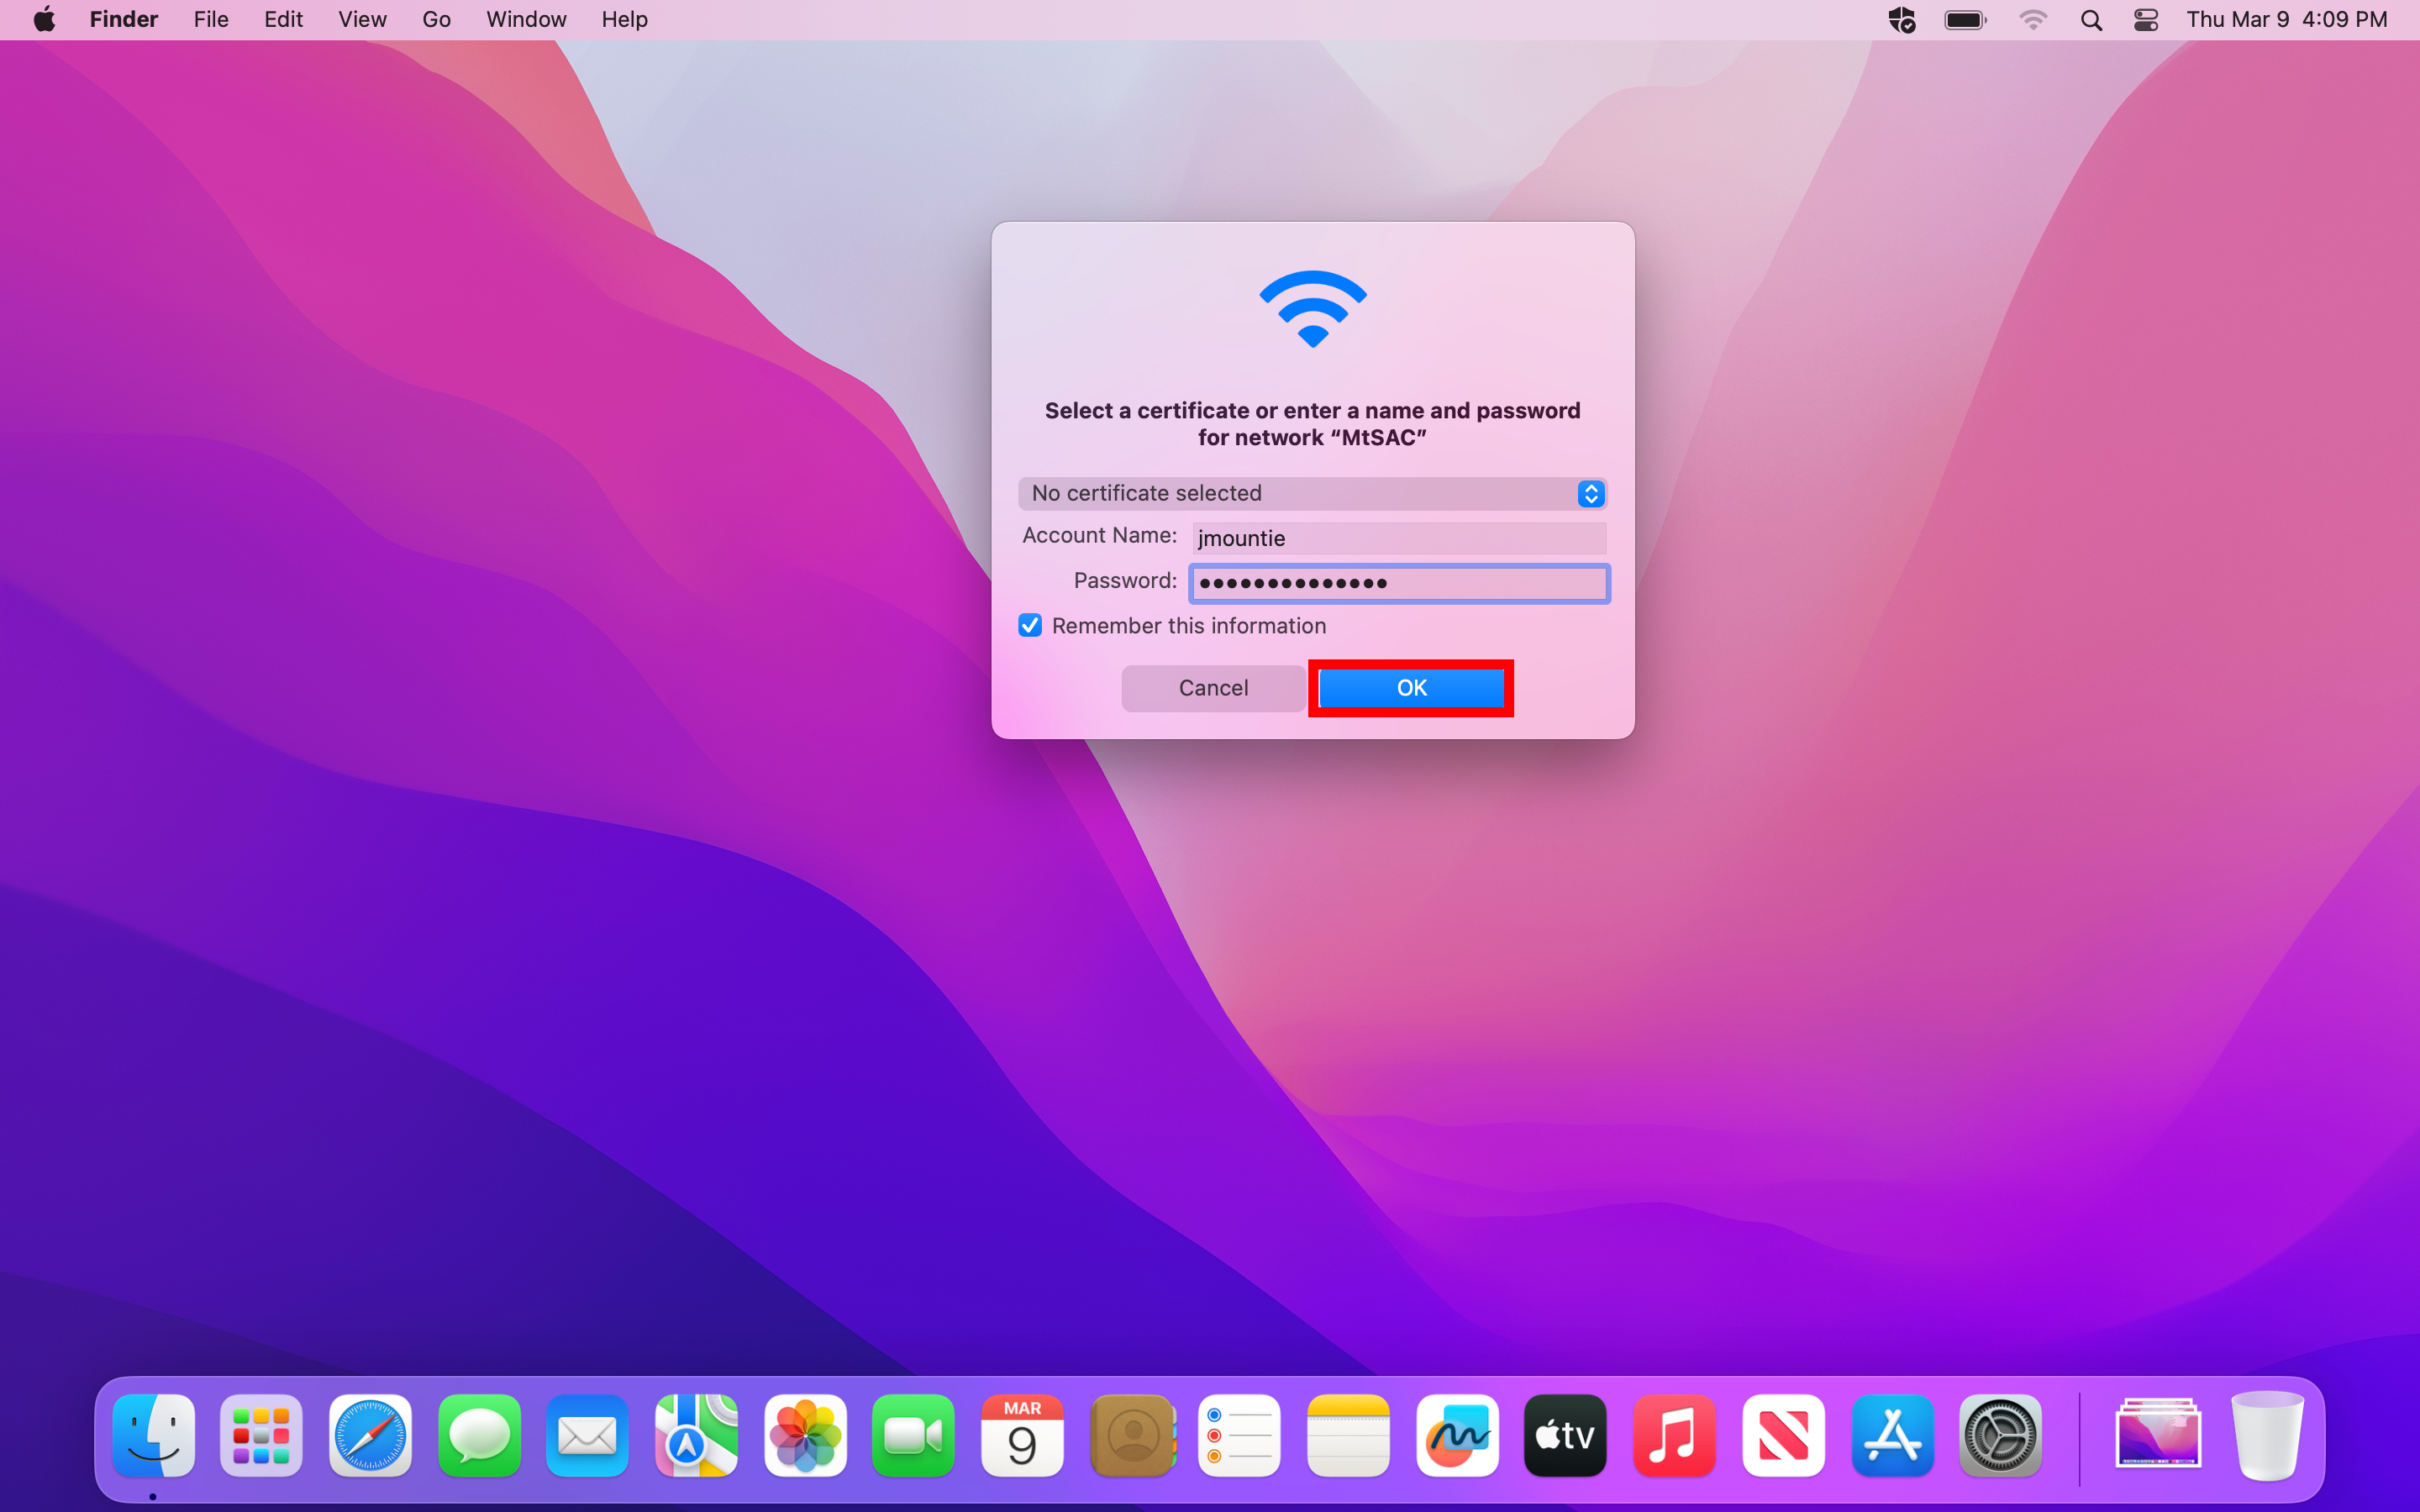
5. A Verify Certificate menu will open. Click the Continue button.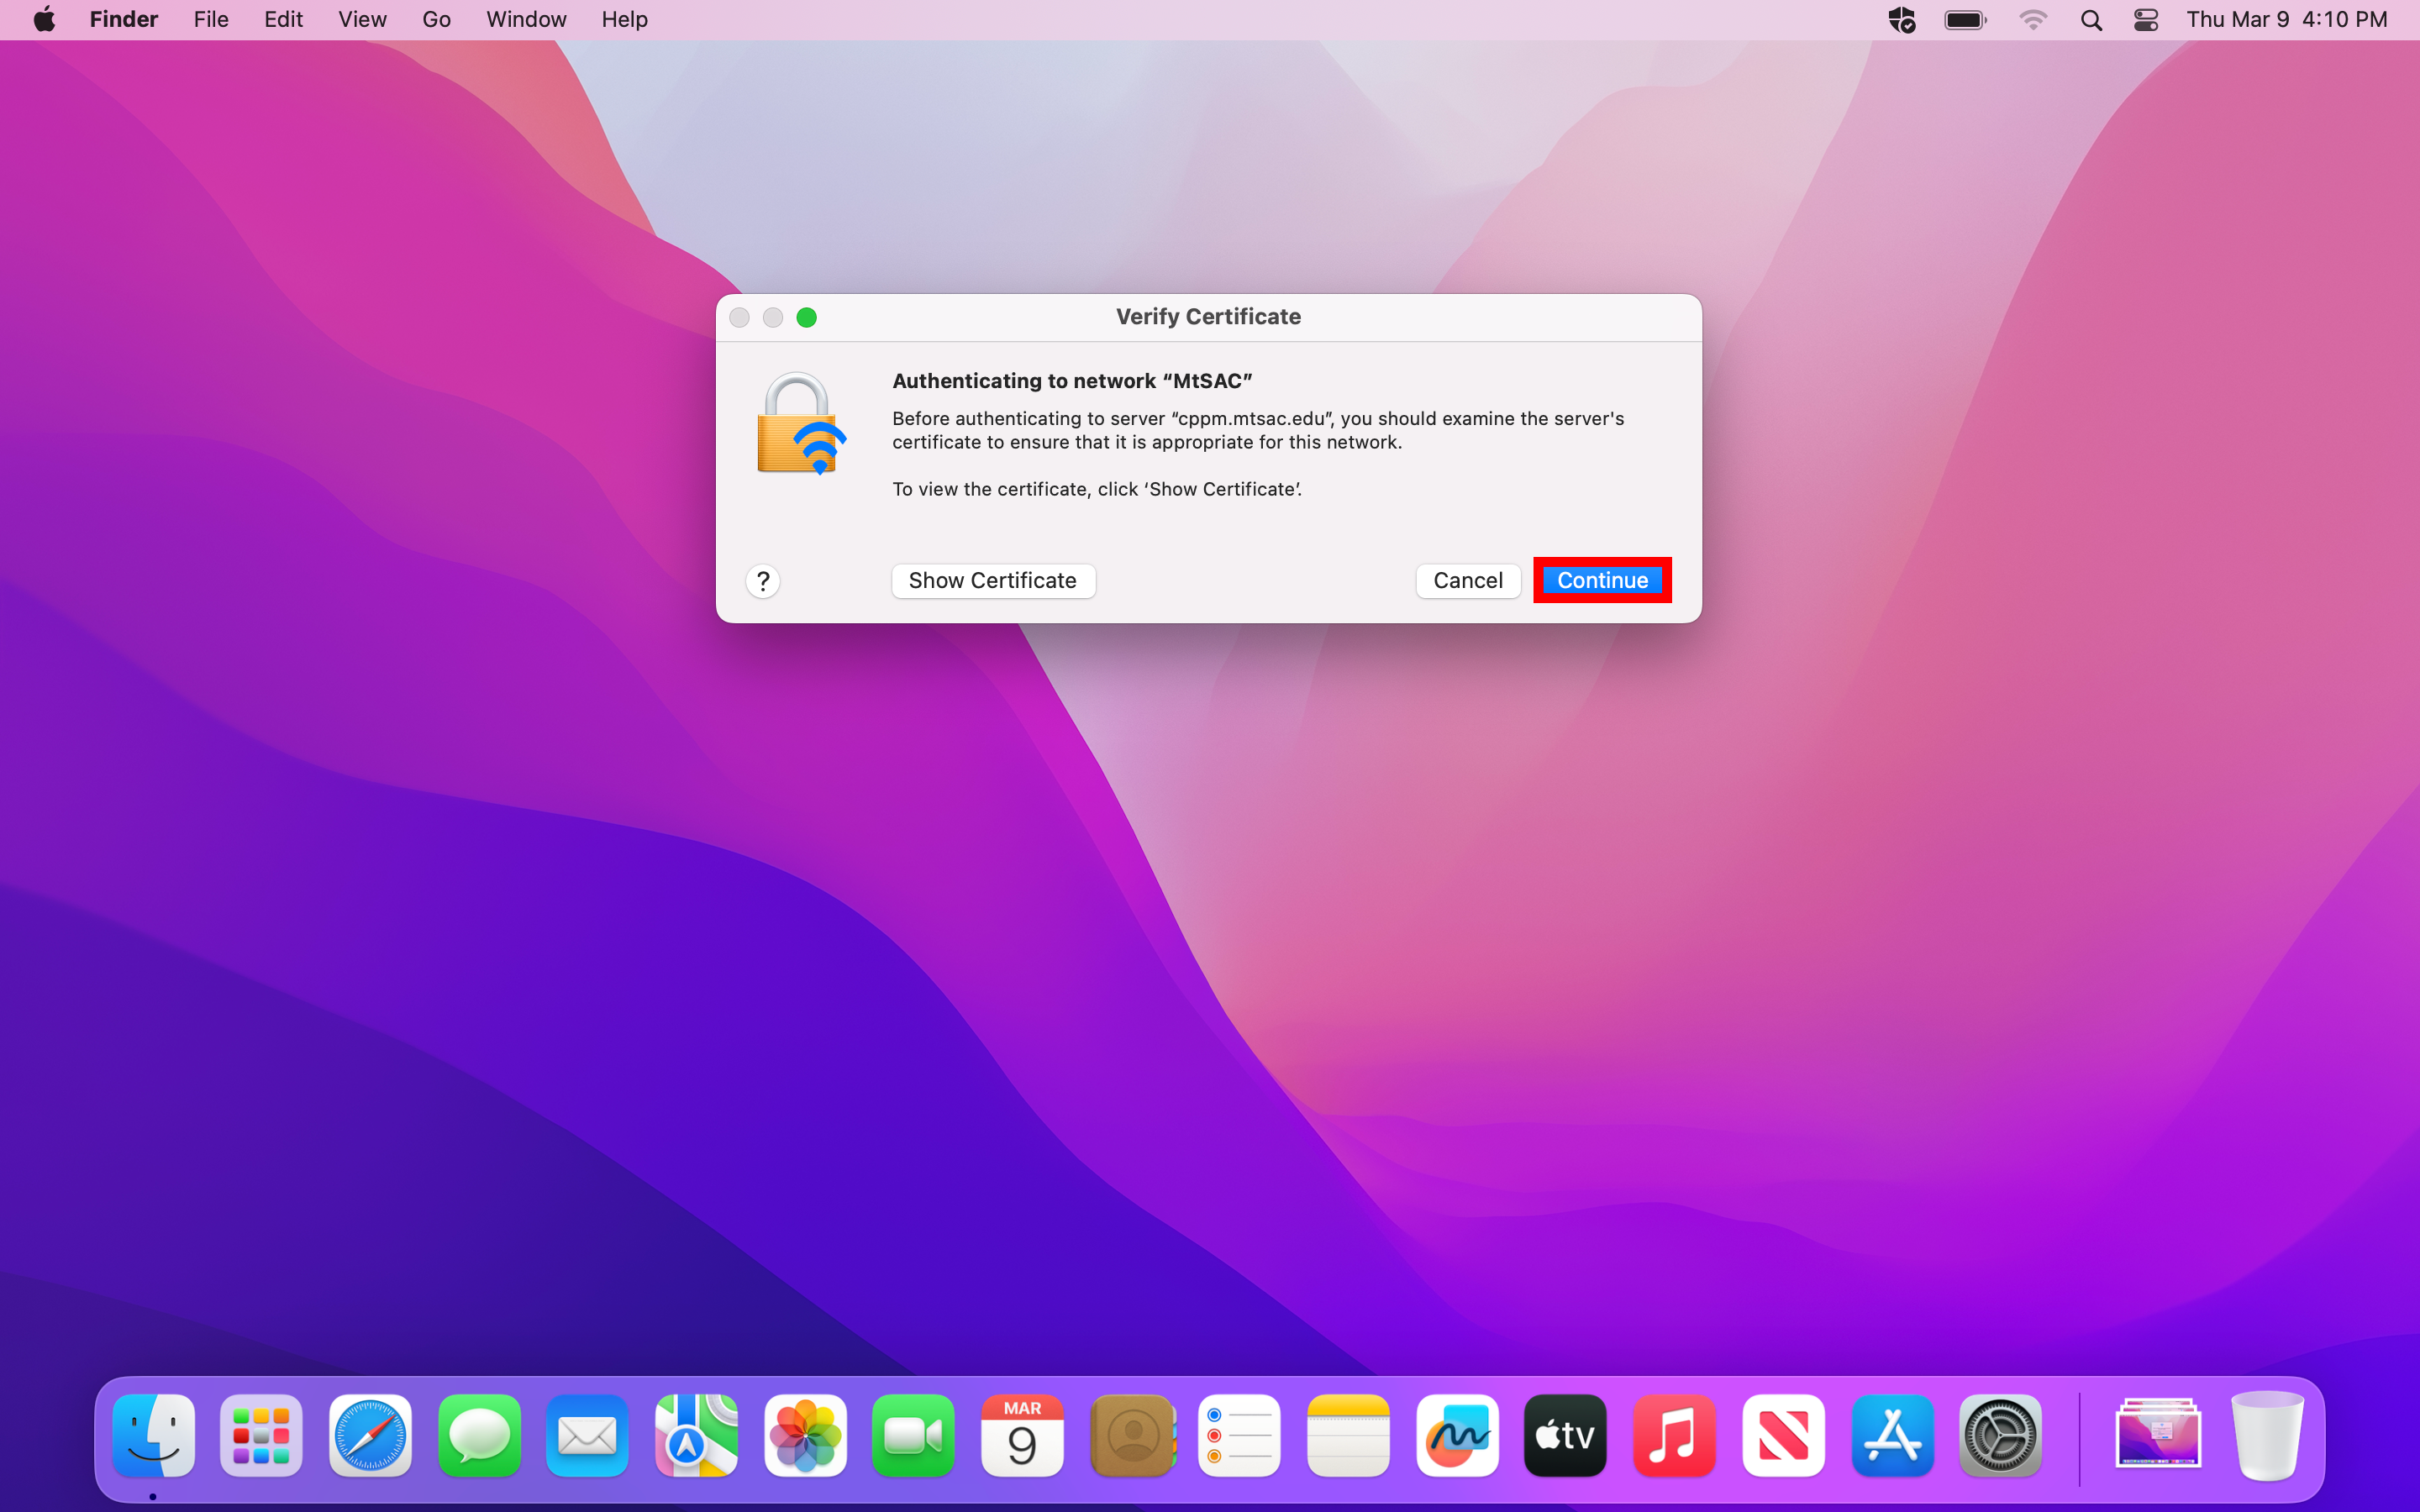
6. Finally depending on the way your Mac was setup you may need to provide your Mac's local user account name and password. Enter that information and click the Update Settings button.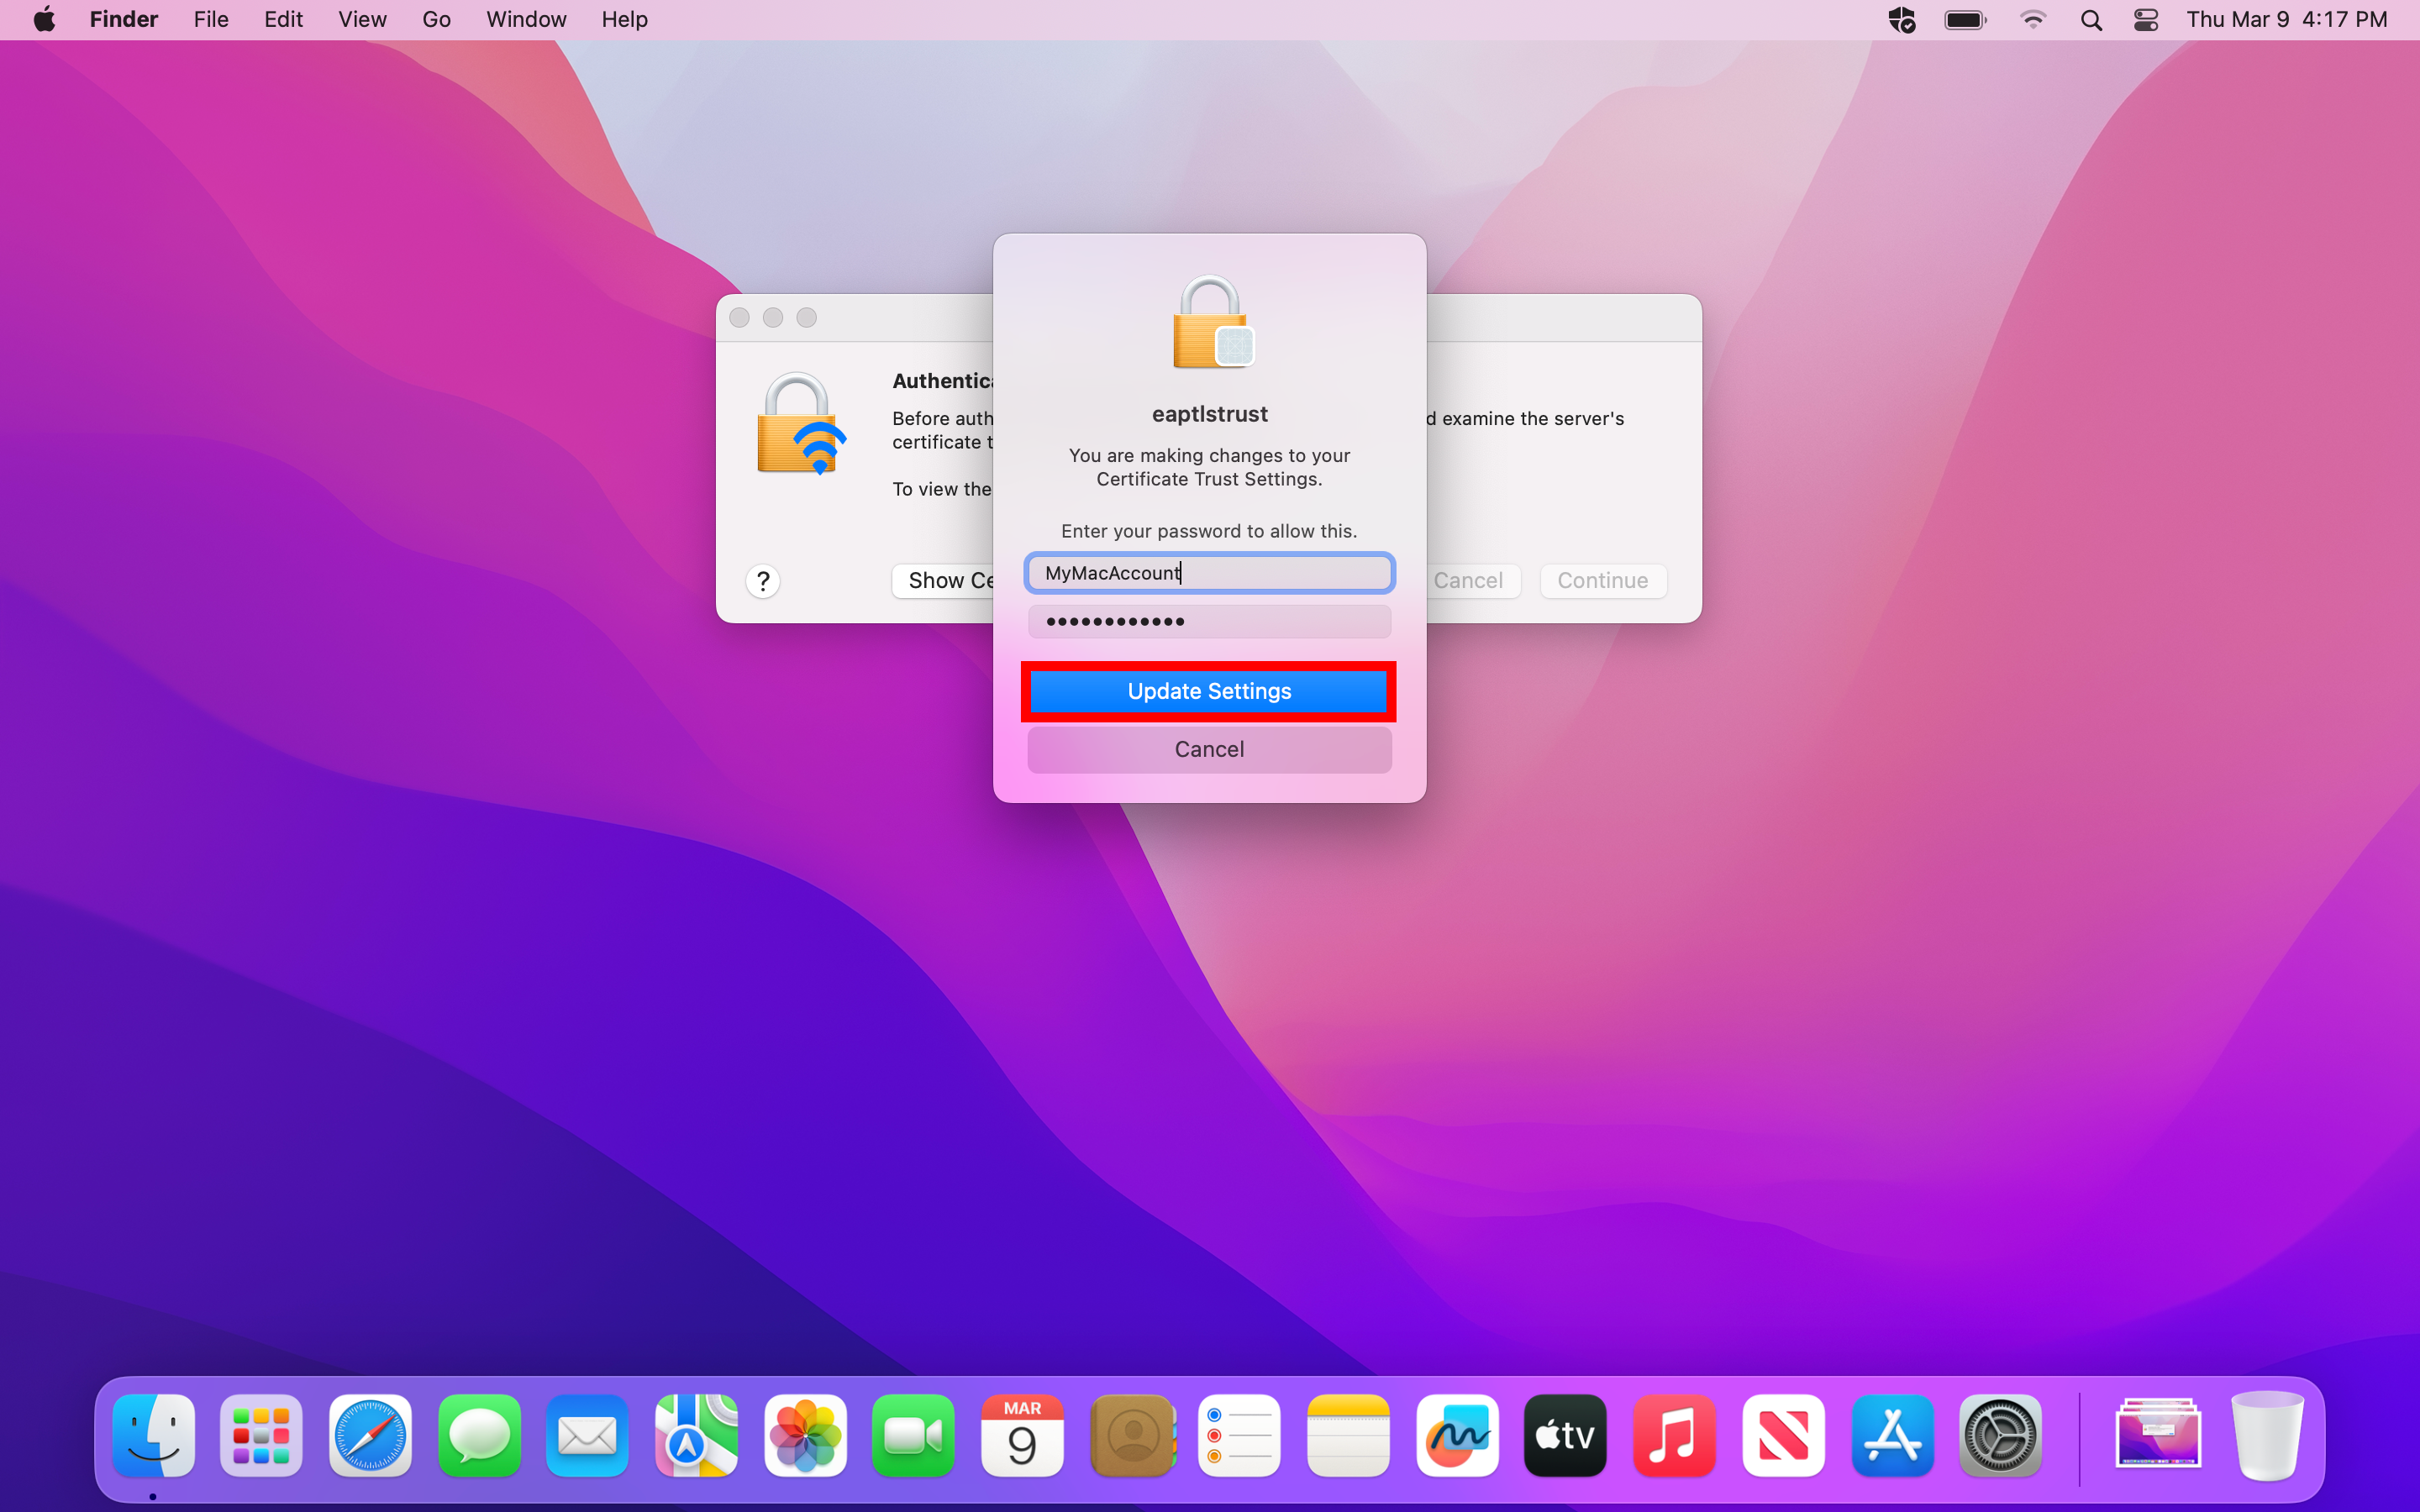
7. That's it! You should now be connected to the Wi-Fi network on your macOS device. If you're having trouble connecting, make sure you're in range of the network and that you're entering the correct password (if applicable). - Using a Chromebook
Note: Directions are using the ChromeOS operating system. Different versions may look different but will generally follow the same steps.
1. In the bottom right of your taskbar click the network icon to bring up network settings. If your Chromebook's Wi-Fi is turned off click the Wi-Fi icon to turn it back on.

2. You will see a list of available Wi-Fi networks. Click the "MtSAC" network.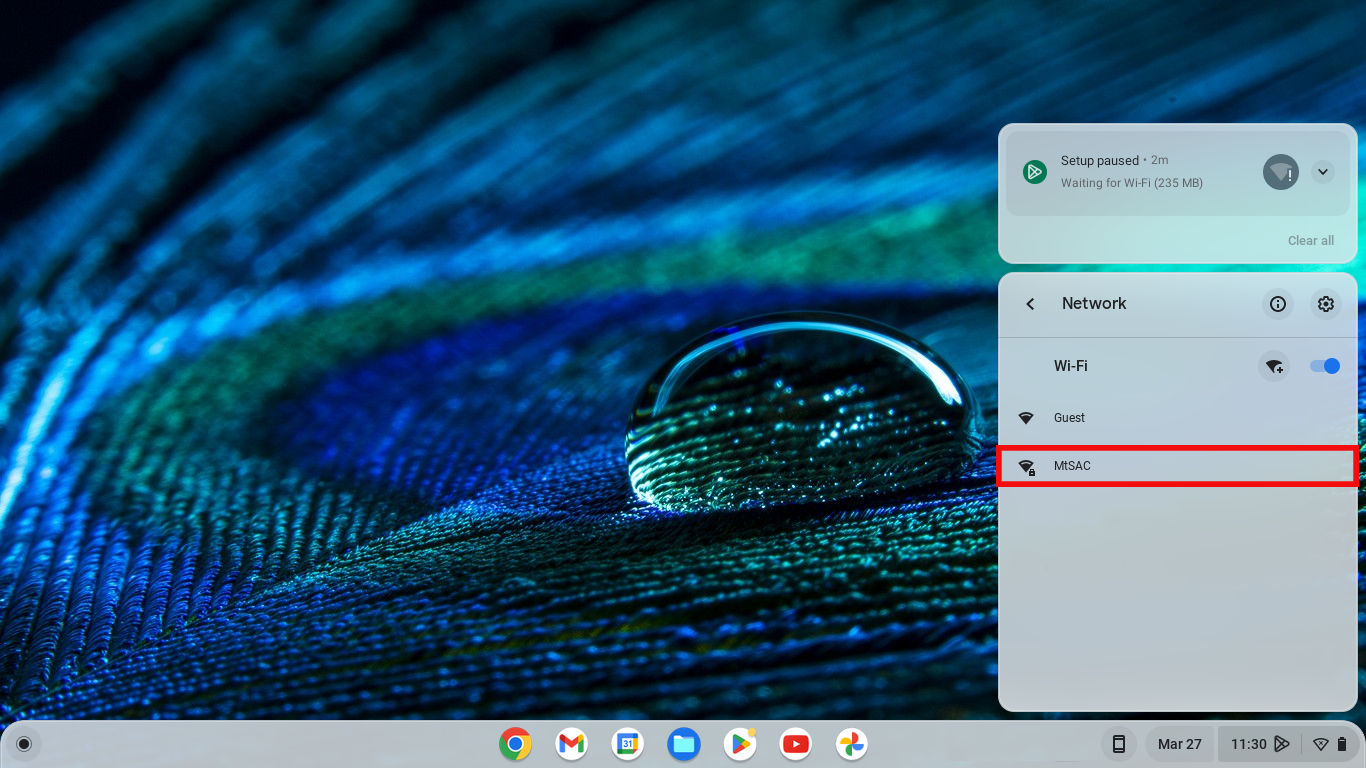
3. Enter the settings below. Your device may not have all these options, just enter the ones that are available to you. Replace "portal username" and "portal password" with YOUR Portal username and password respectively.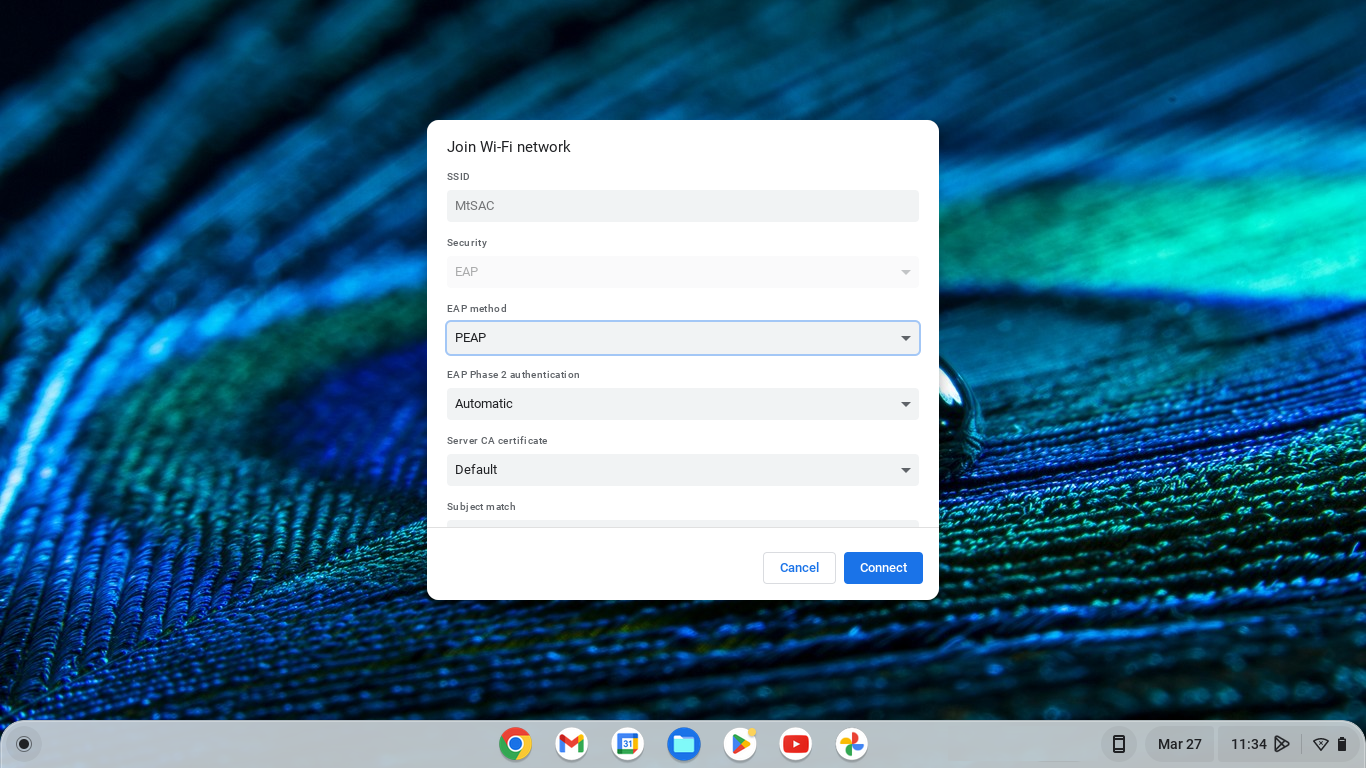
EAP method: PEAP
EAP Phase 2 authentication: Automatic
Server CA certificate: Default
Subject match: leave empty
Subject alternative name match: leave empty
Domain suffix match: leave empty
Identity: "portal username"
Password: "portal password"
Anonymous Identity: leave emptyThen click the "Connect" button. Once connected, you will see that you are a part of the "MtSAC" Wi-Fi network.
4. That's it! If you're having trouble connecting, make sure you're in range of the network and that you're entering the correct settings. If your portal password has changed for any reason, you will need to "forget" the network and add it again using the steps above.
To "forget" the network, open your network settings again by clicking the Wi-Fi icon from the taskbar. Then click on the network name to open the Wi-Fi networks menu.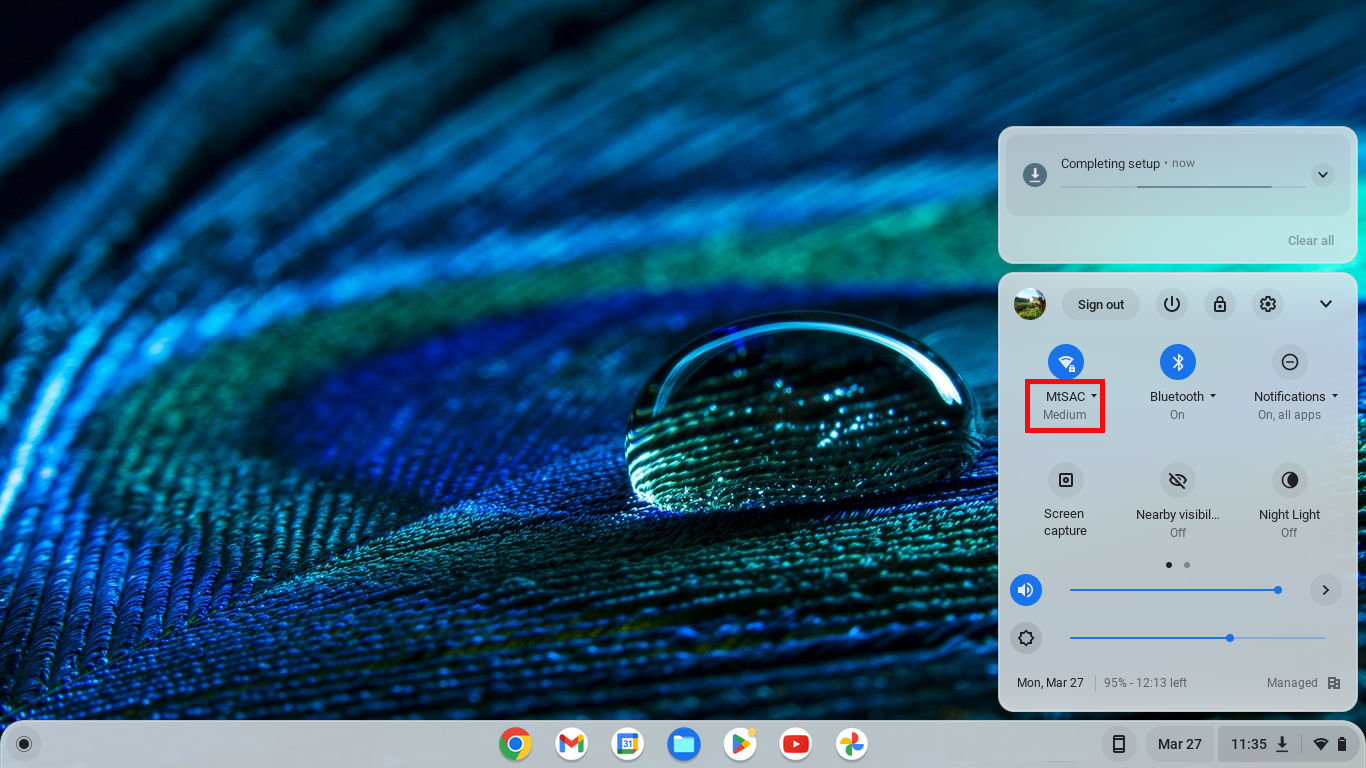
Click on the Gear icon from the top right of the menu to open.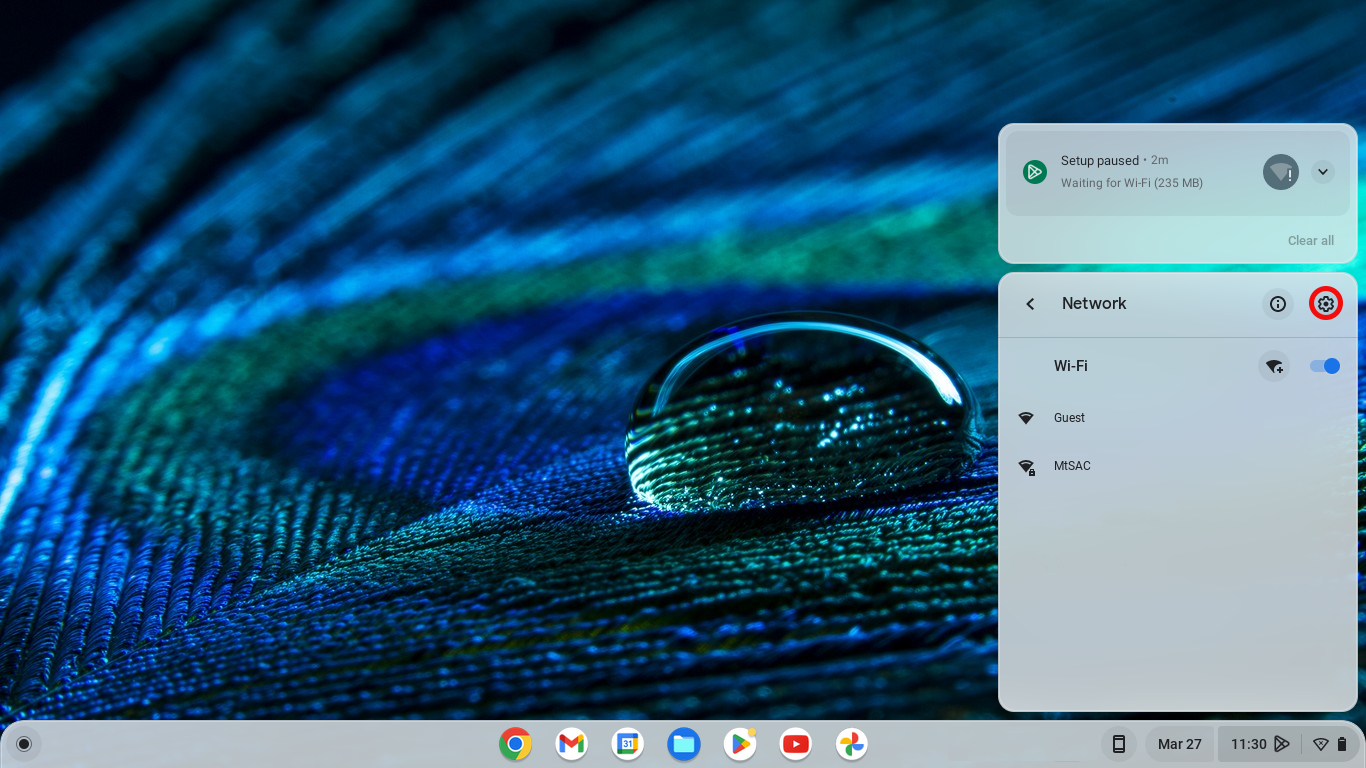
Then just click on the "Forget" button to forget the network.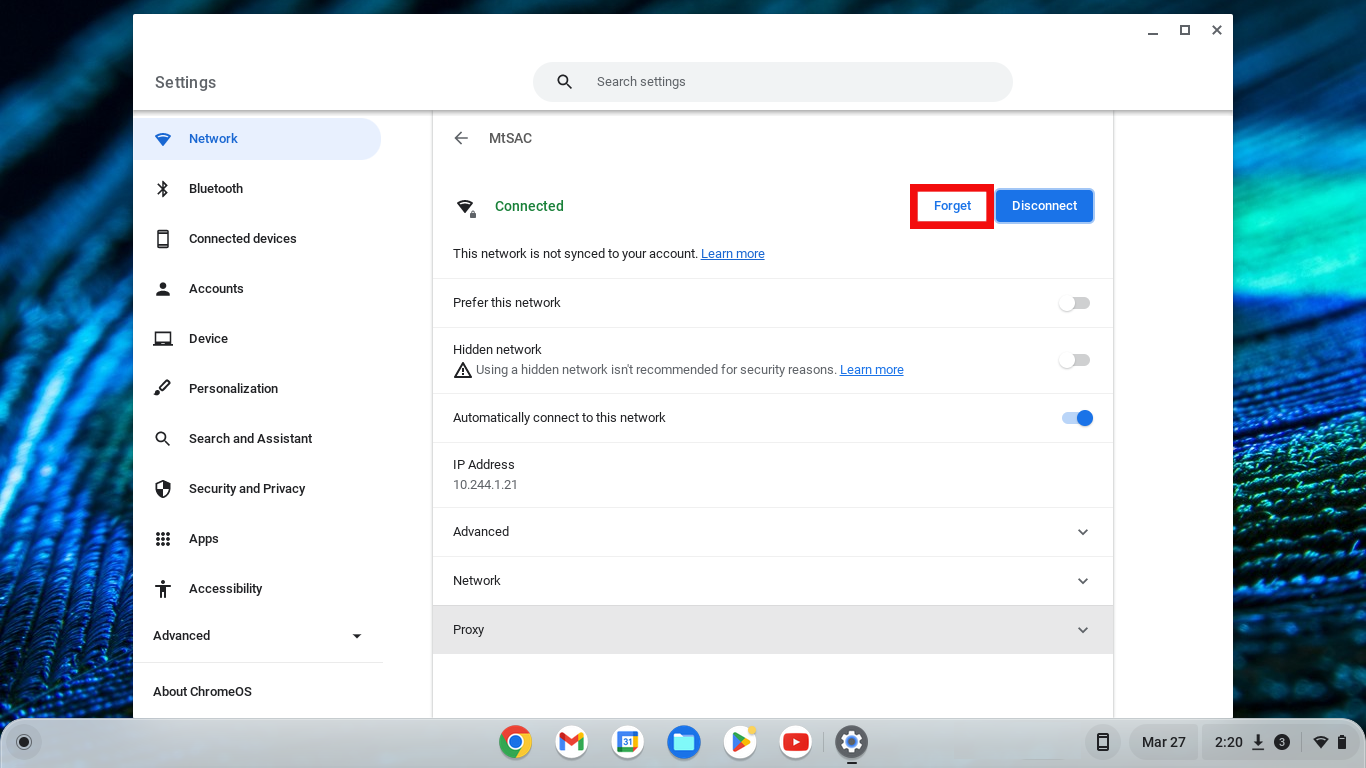
- Using an Android Smartphone or Tablet
Visitors and Guests: How to connect to the "Guest" Wi-Fi network
-
- Using an Android Smartphone or Tablet
Note: Directions are using the base Android 12 operating system. Different phone models and previous versions may look different but will generally follow the same steps.
1. Unlock your device and swipe down from the top of the screen to access the Quick Settings panel. Tap on the Internet icon to bring up network settings.
2. Look for the Wi-Fi toggle and tap it to turn it on.
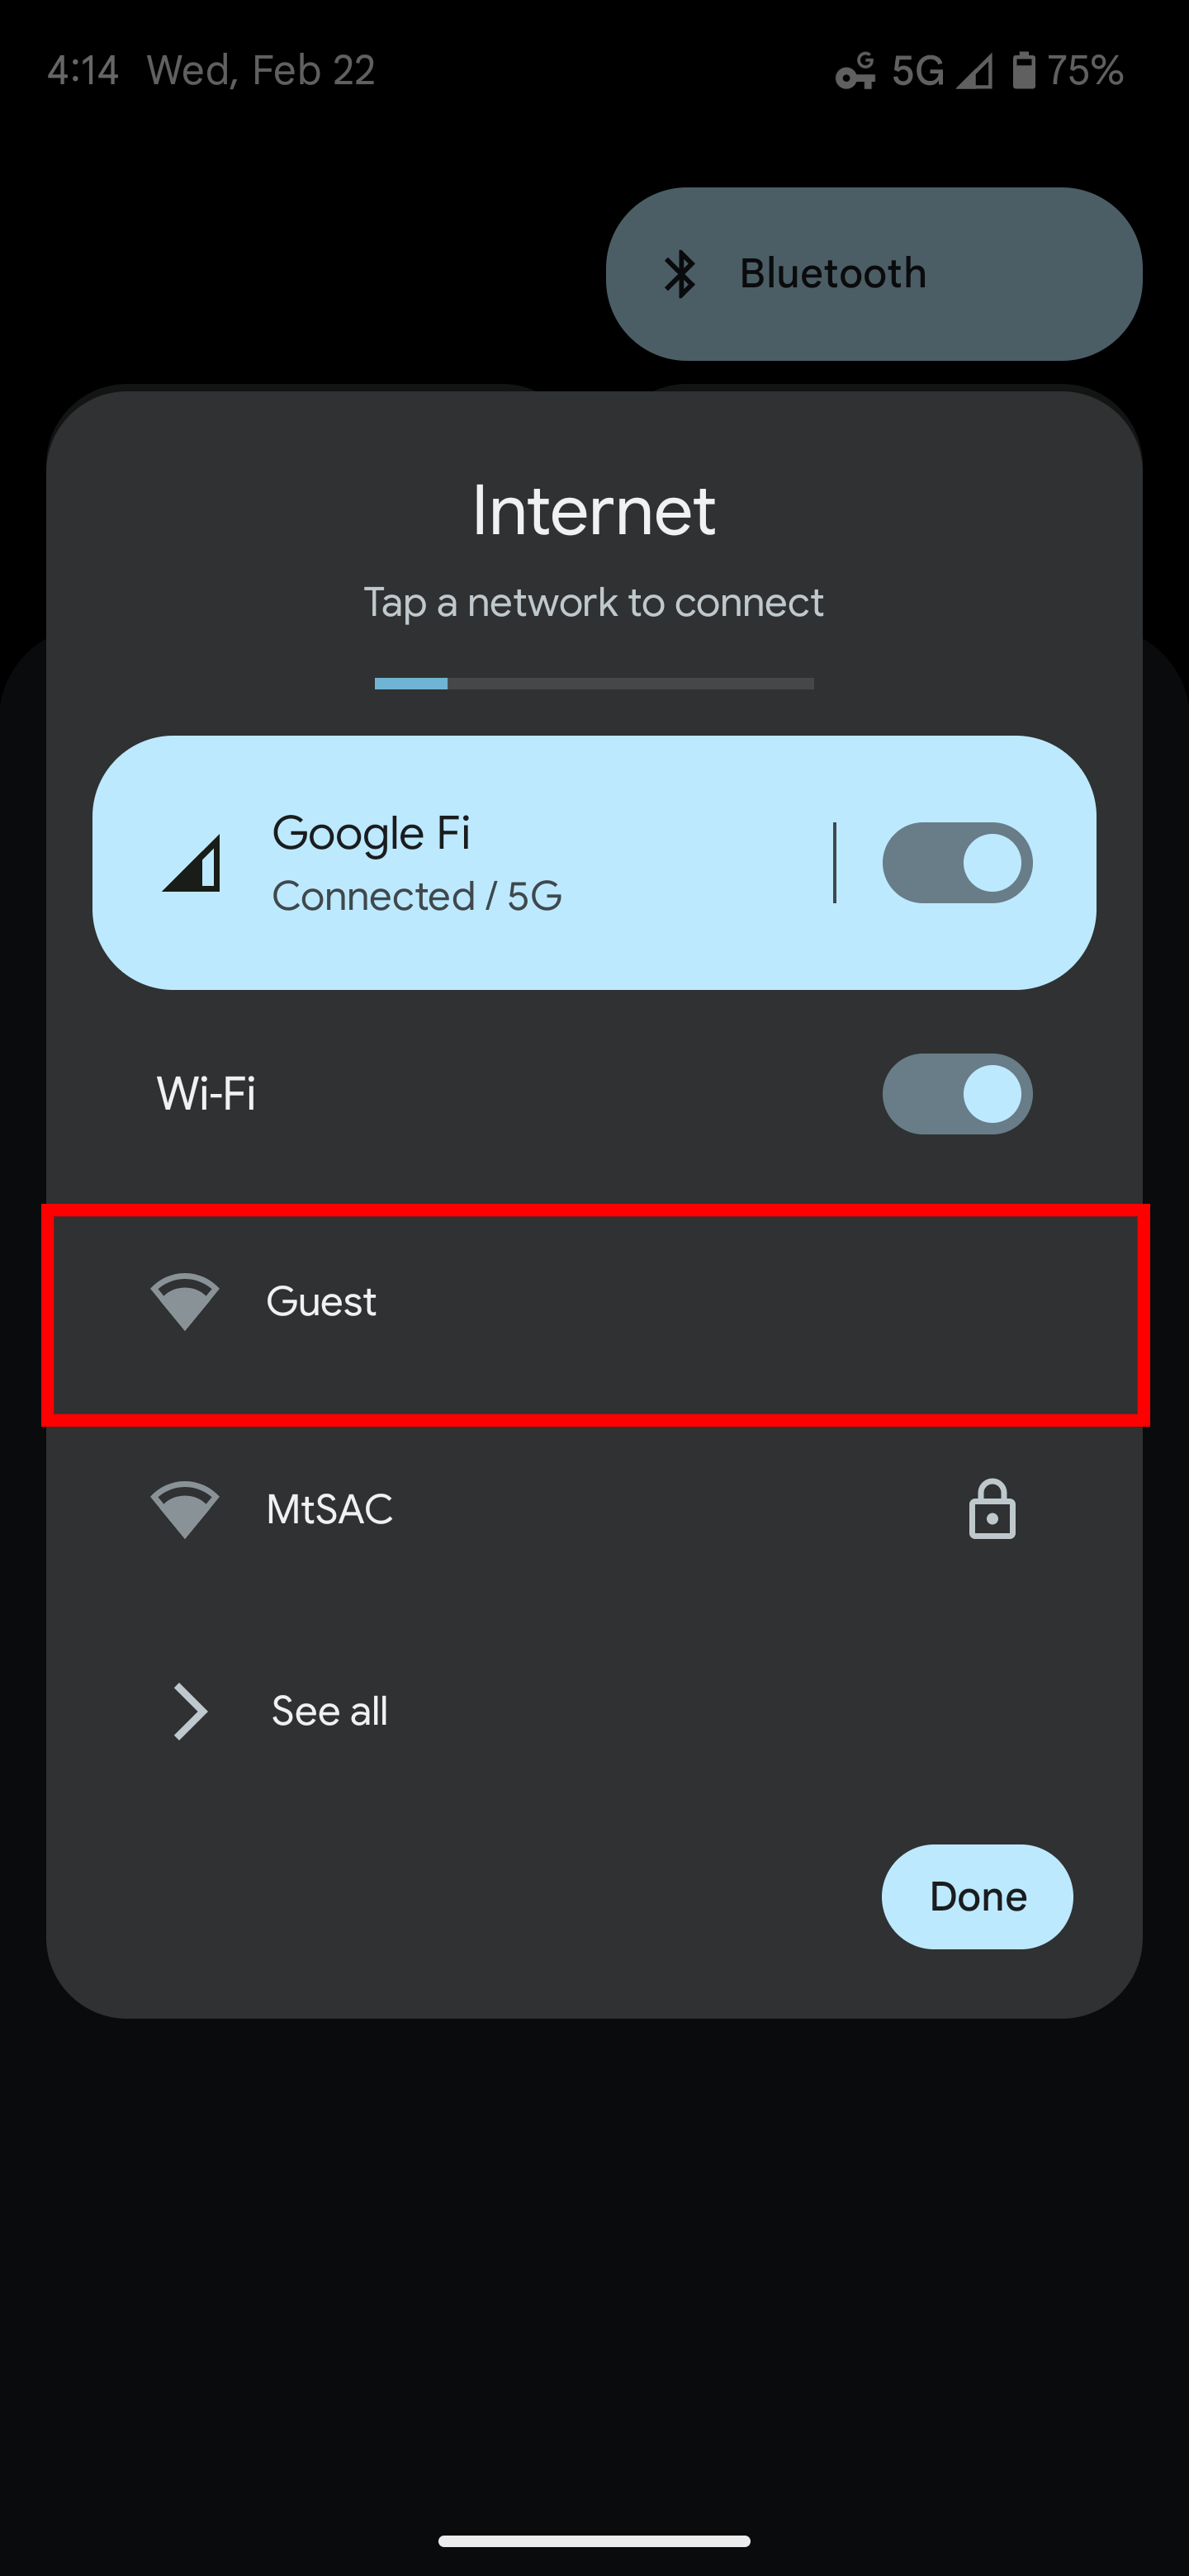
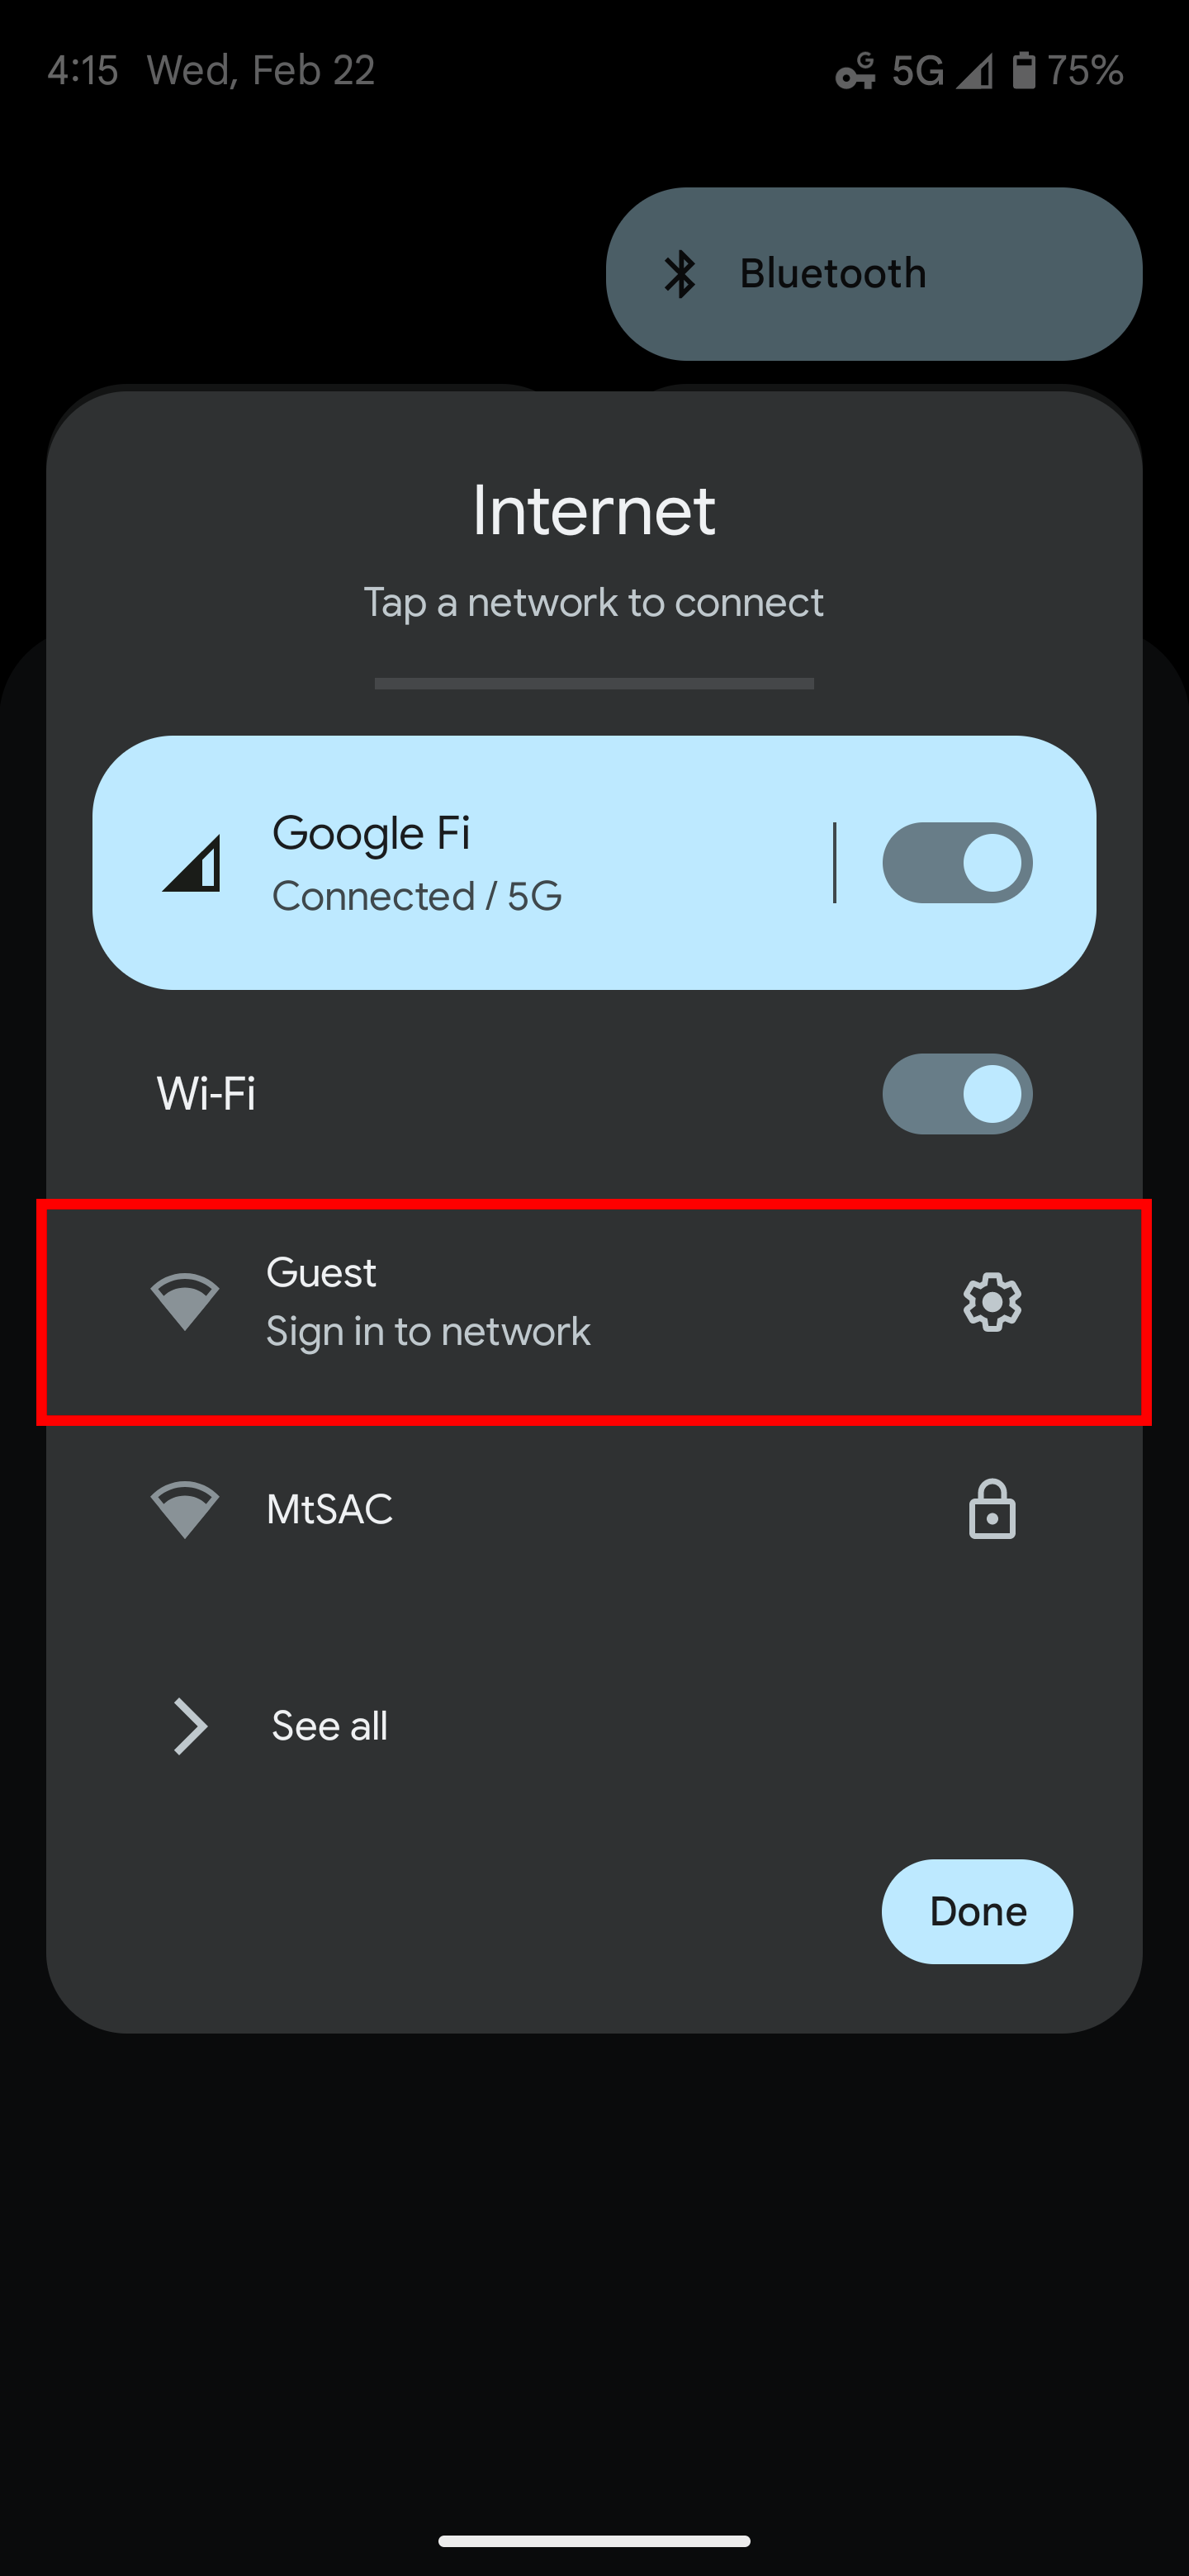
3. Once the Wi-Fi is turned on, a list of available Wi-Fi networks will appear. Tap on the Guest Wi-Fi network.
4. You will connect to the network and be prompted to sign in. Tap the Guest network to open the Guest network settings.
5. From the Guest network settings menu tap the Sign in icon.
6. You will be presented with the Terms of Use. You will need to check the Confirm box to accept the terms and tap the Register button to continue.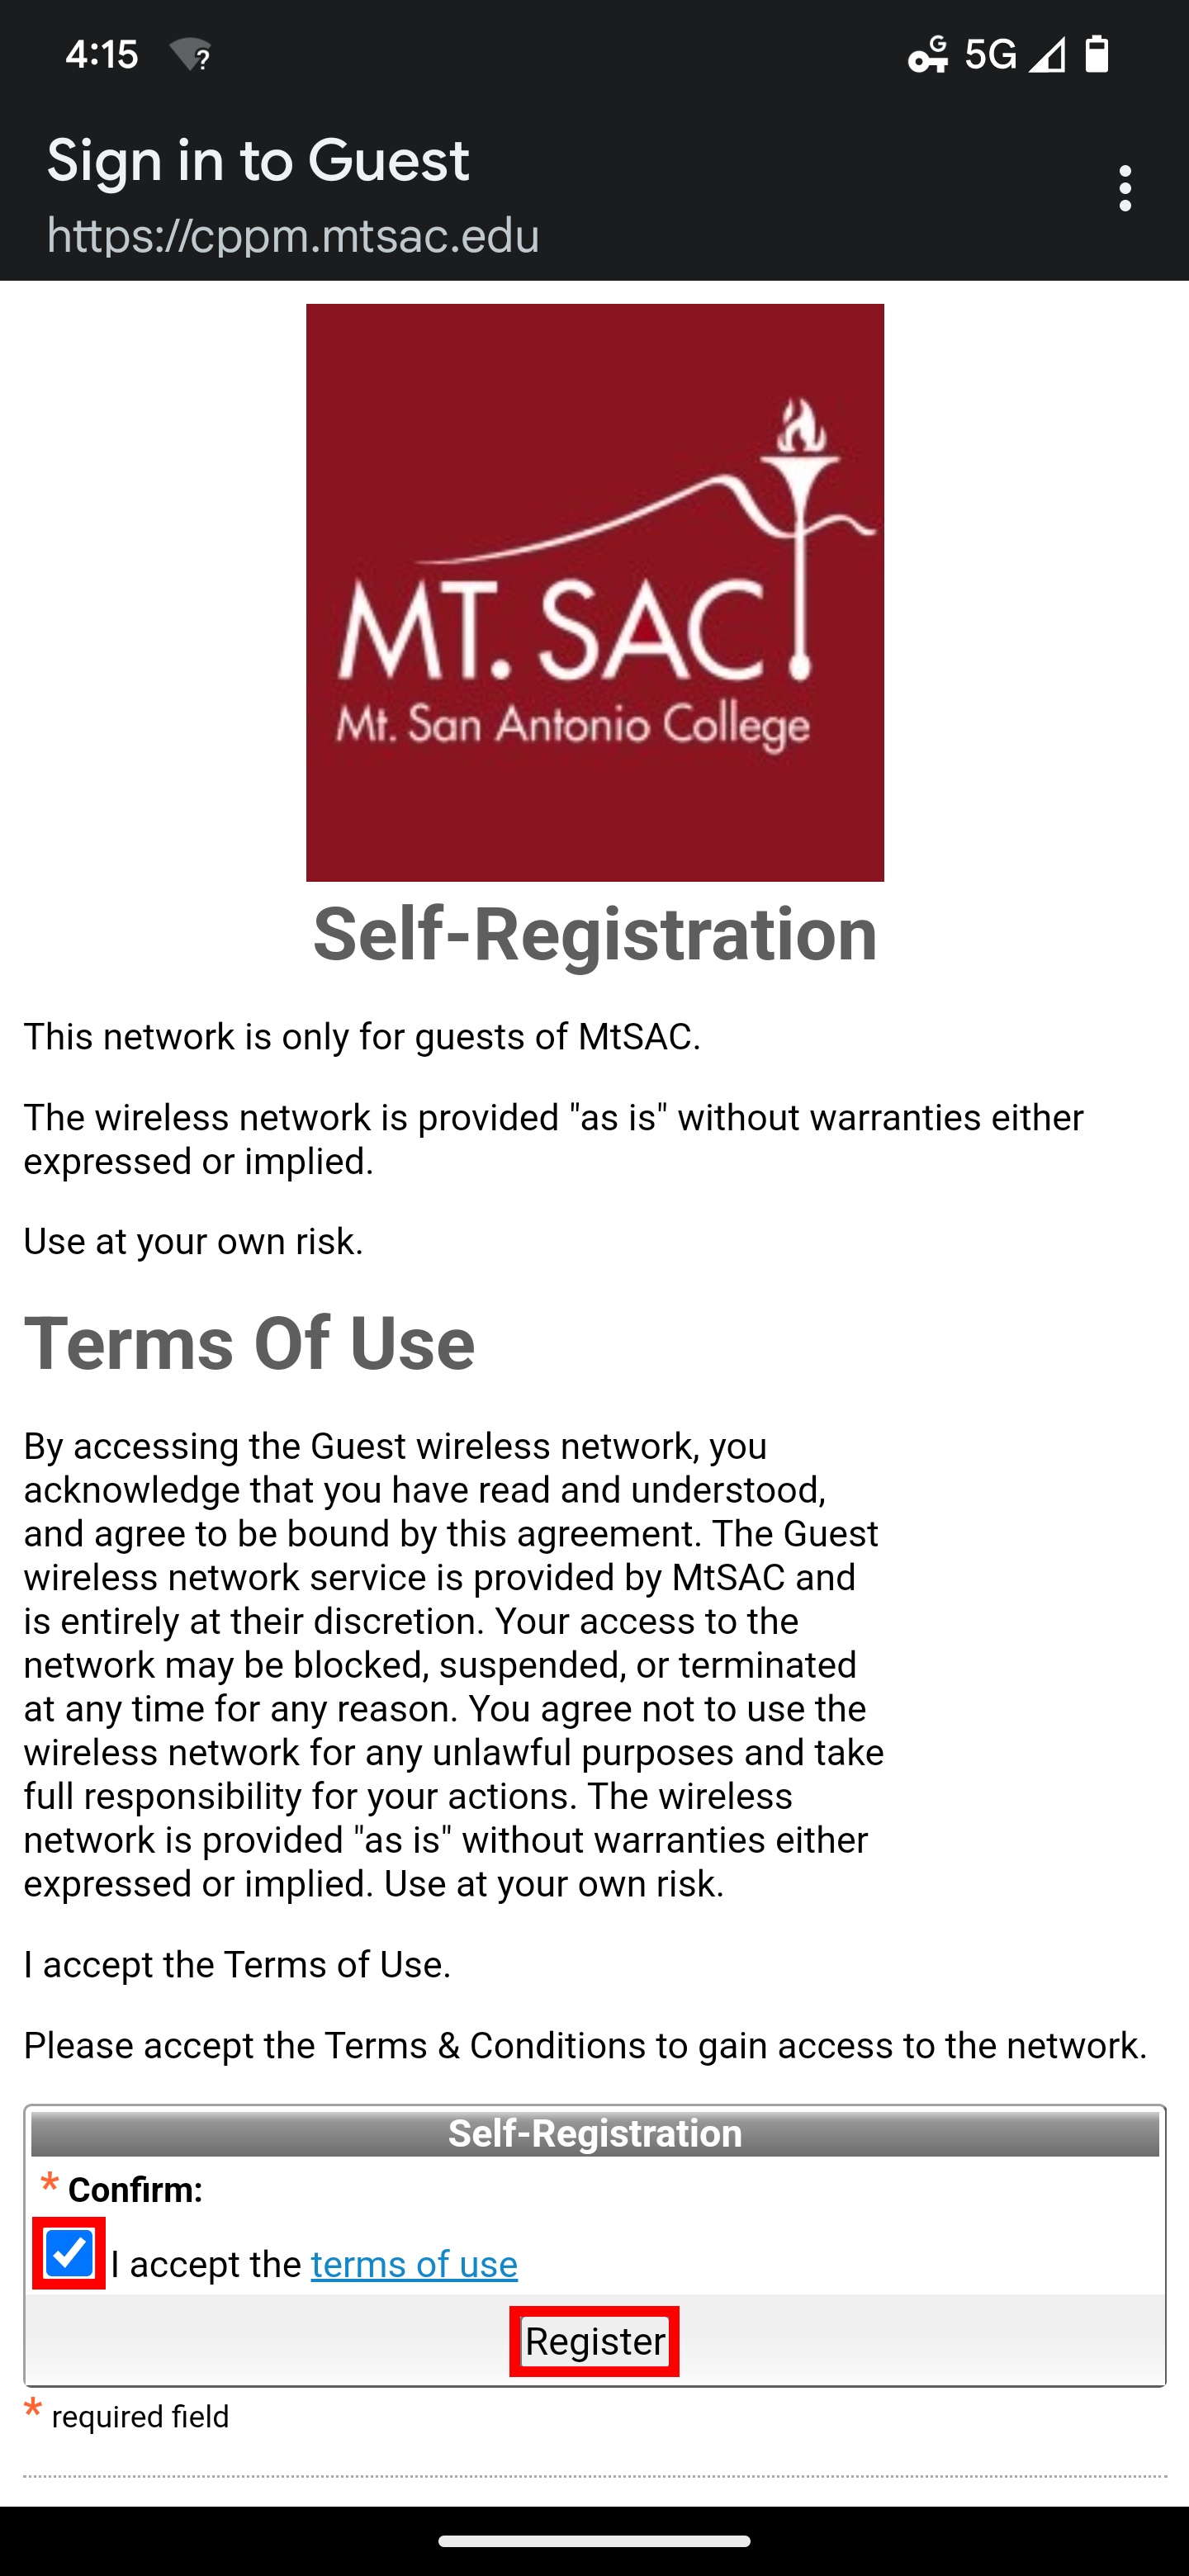
7. You will be assigned a generated Account Username and Guest Password. Your activation and expiration time will also be displayed. To finish connecting tap the Log In button.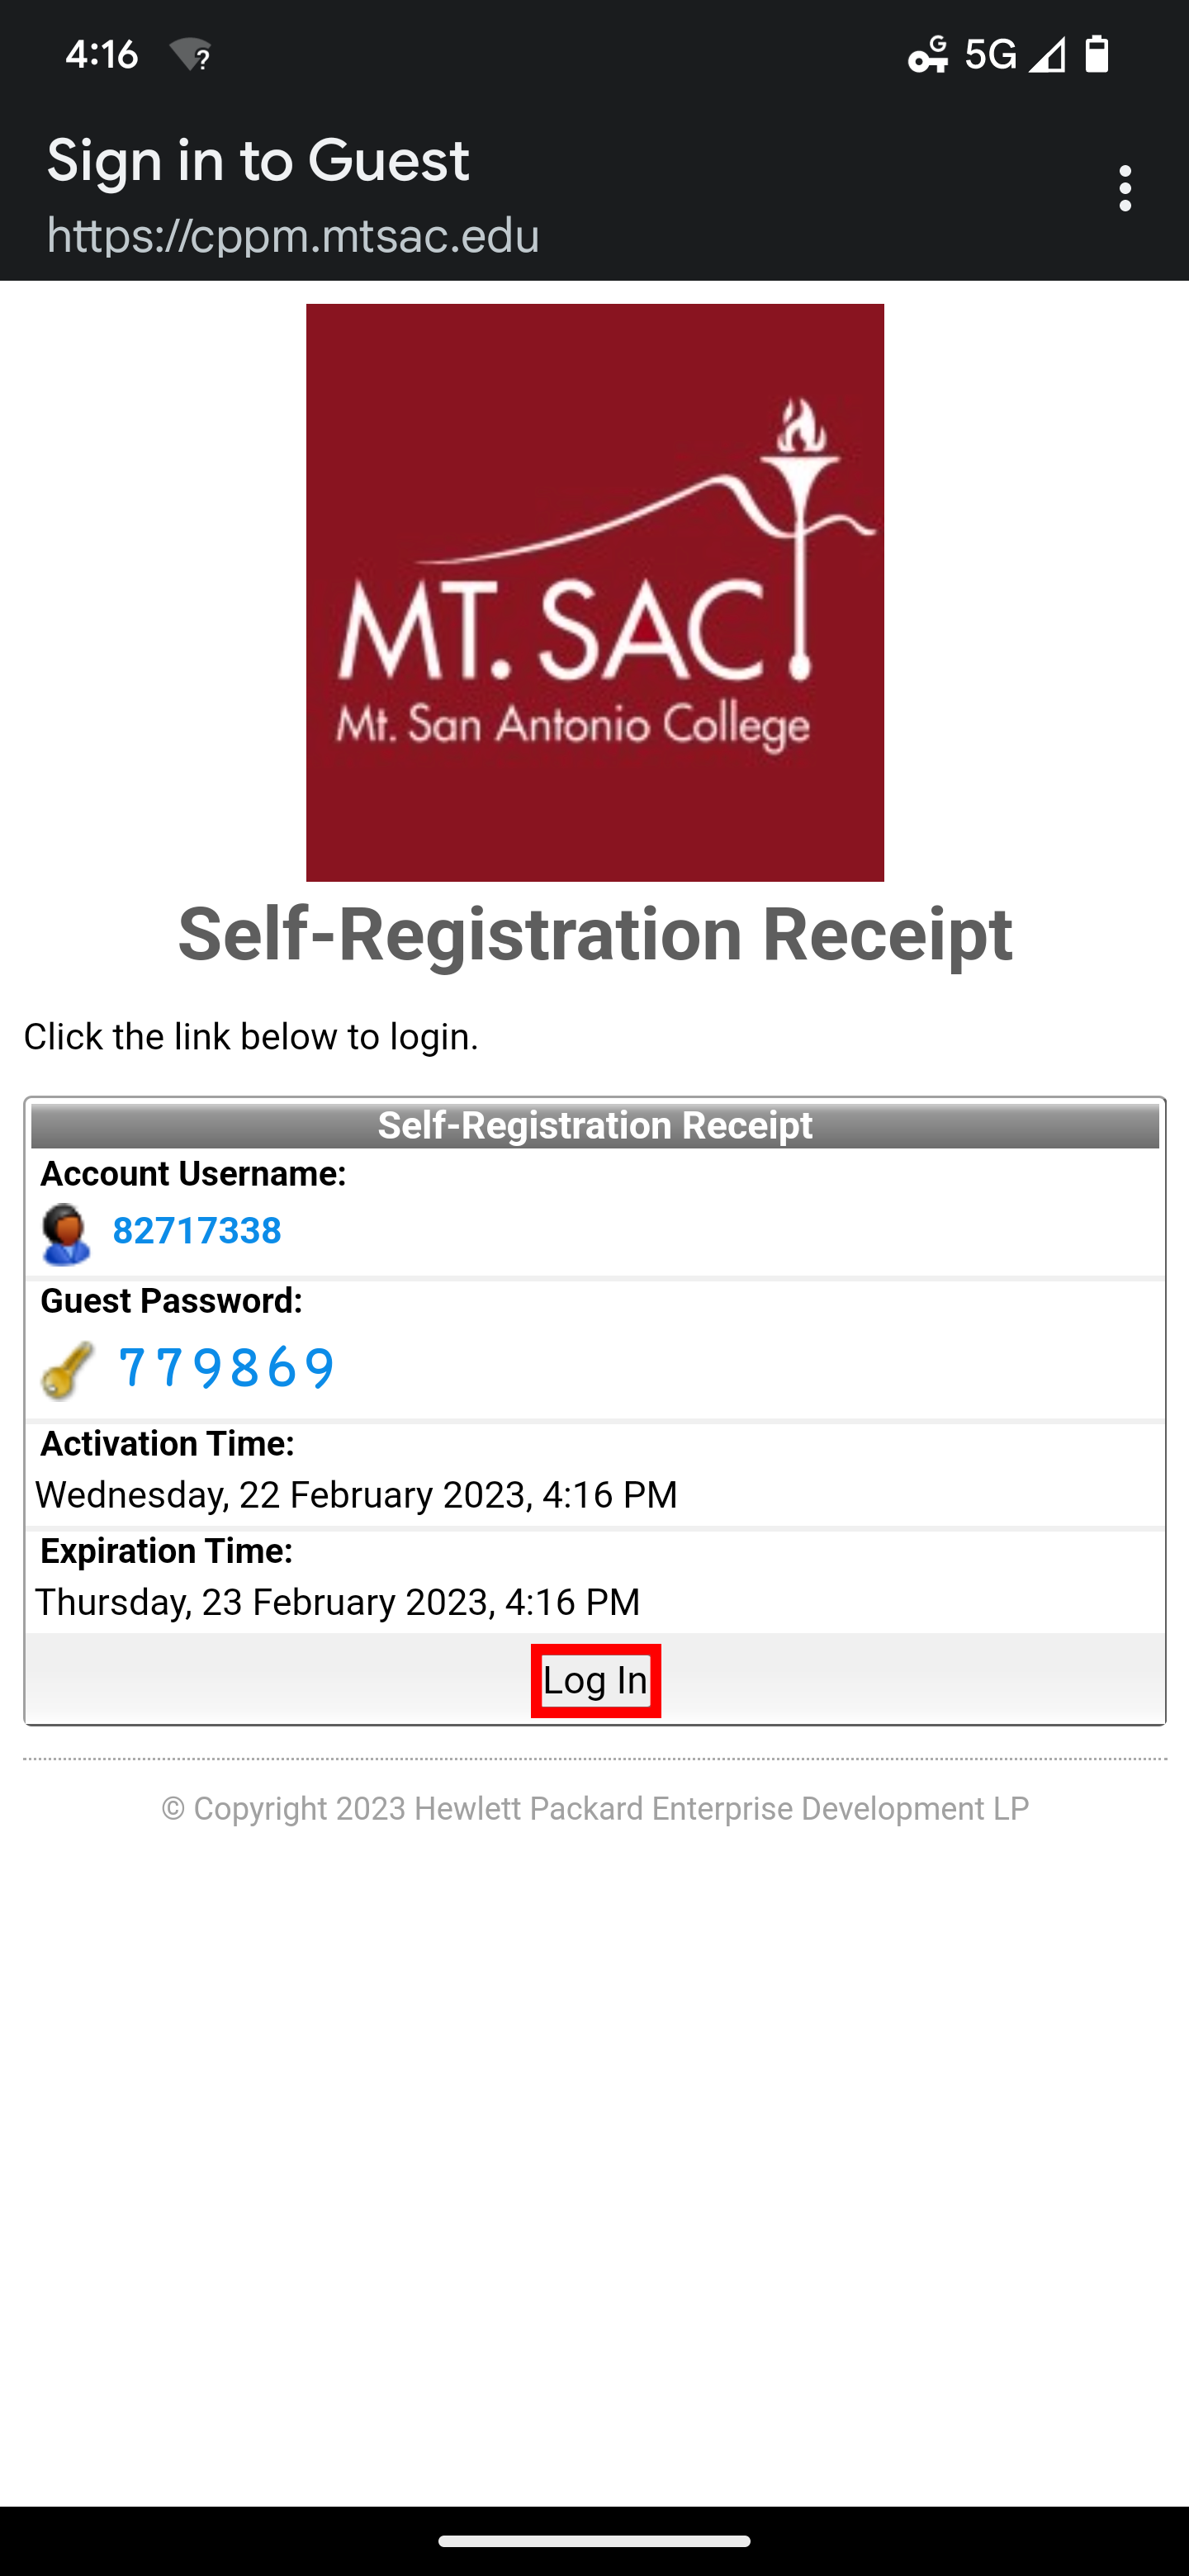
8. That's it! If you're having trouble connecting, make sure you're in range of the network and you've accepted the Terms of Use.
- Using a Windows PC
Note: Directions are using the Windows 10 operating system. Different versions may look different but will generally follow the same steps.
1. In the bottom right of your taskbar click the network icon to bring up network settings. Your network icon may look like a Globe, Monitor, or Wi-Fi Signal depending on the current status of your connection.
2. If your PC's Wi-Fi is turned off click the Wi-Fi icon to turn it back on.
3. You will see a list of available Wi-Fi networks. Click the Guest network, then click the Connect button.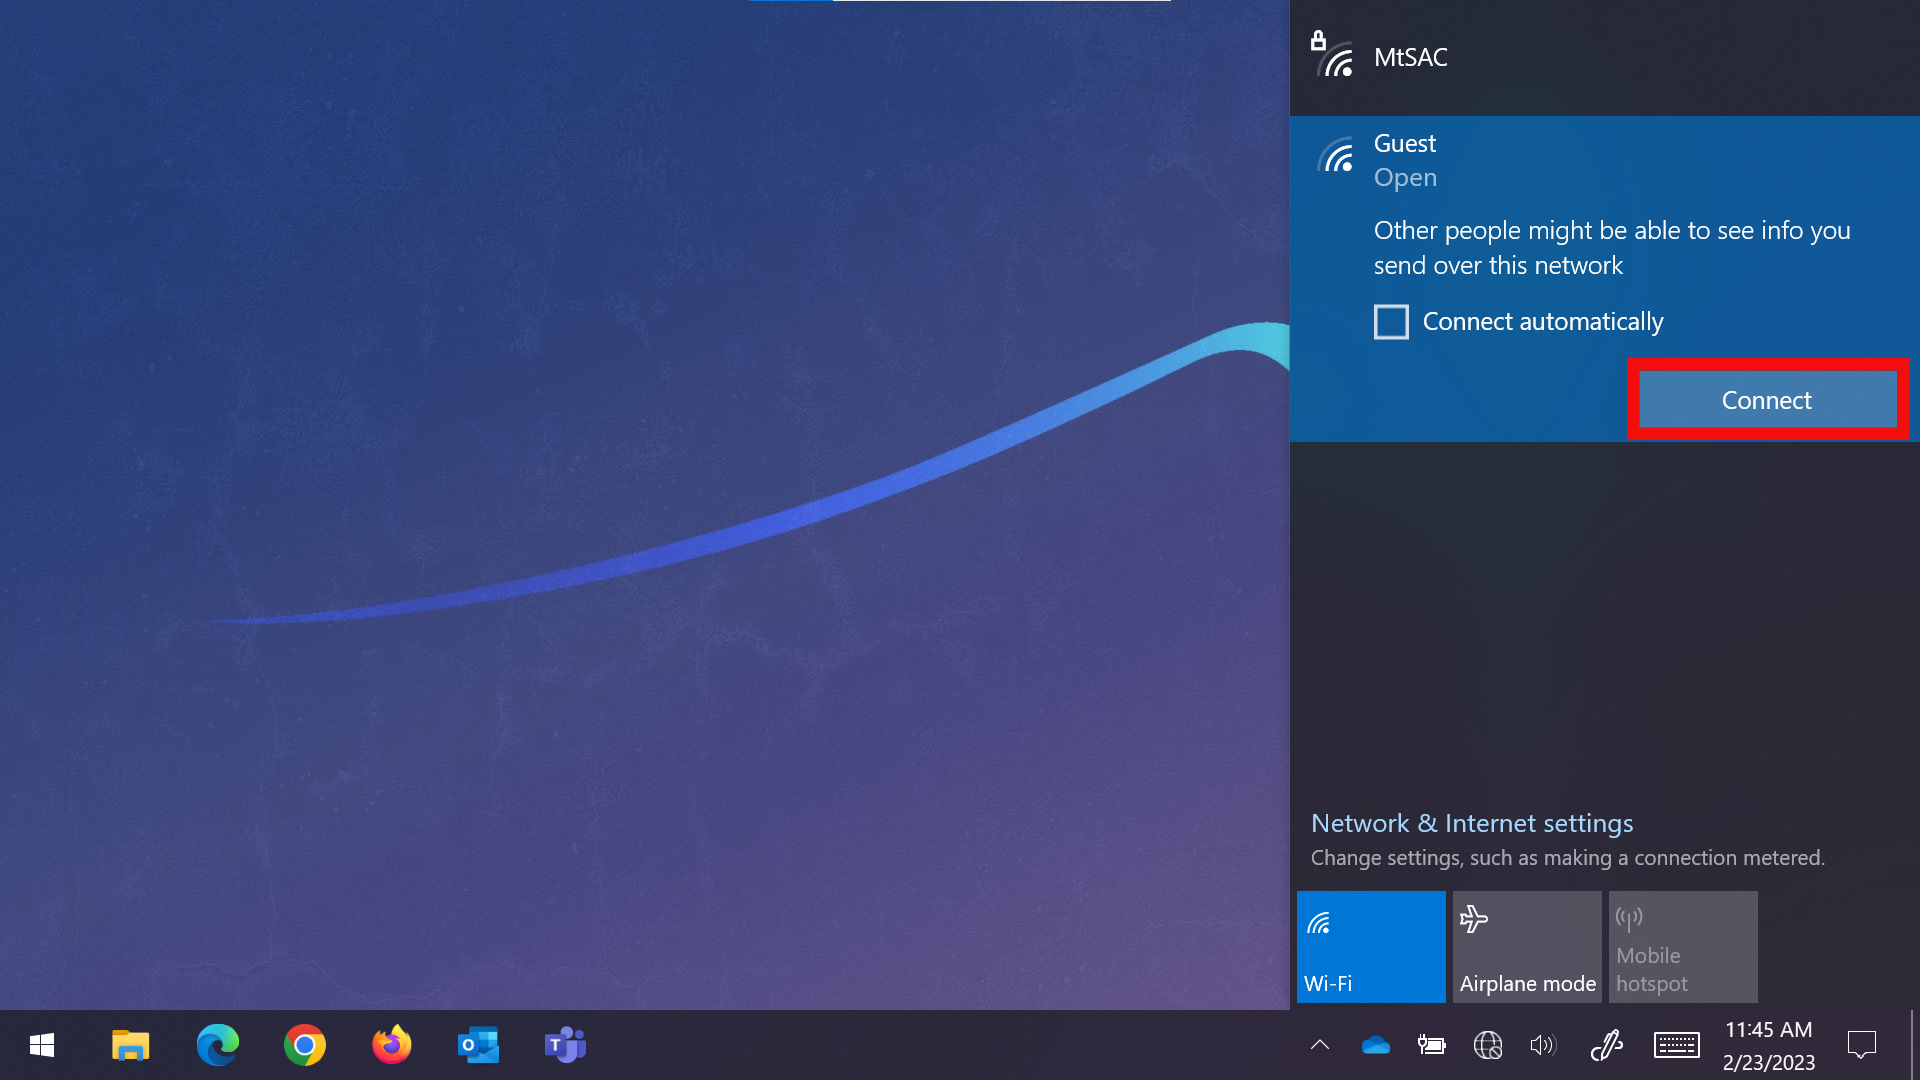
4. Your PC will connect to the Guest network and automatically open a web browser to display the Terms of Use. To continue you must accept the Terms of Use by clicking the checkbox and then clicking the Register button.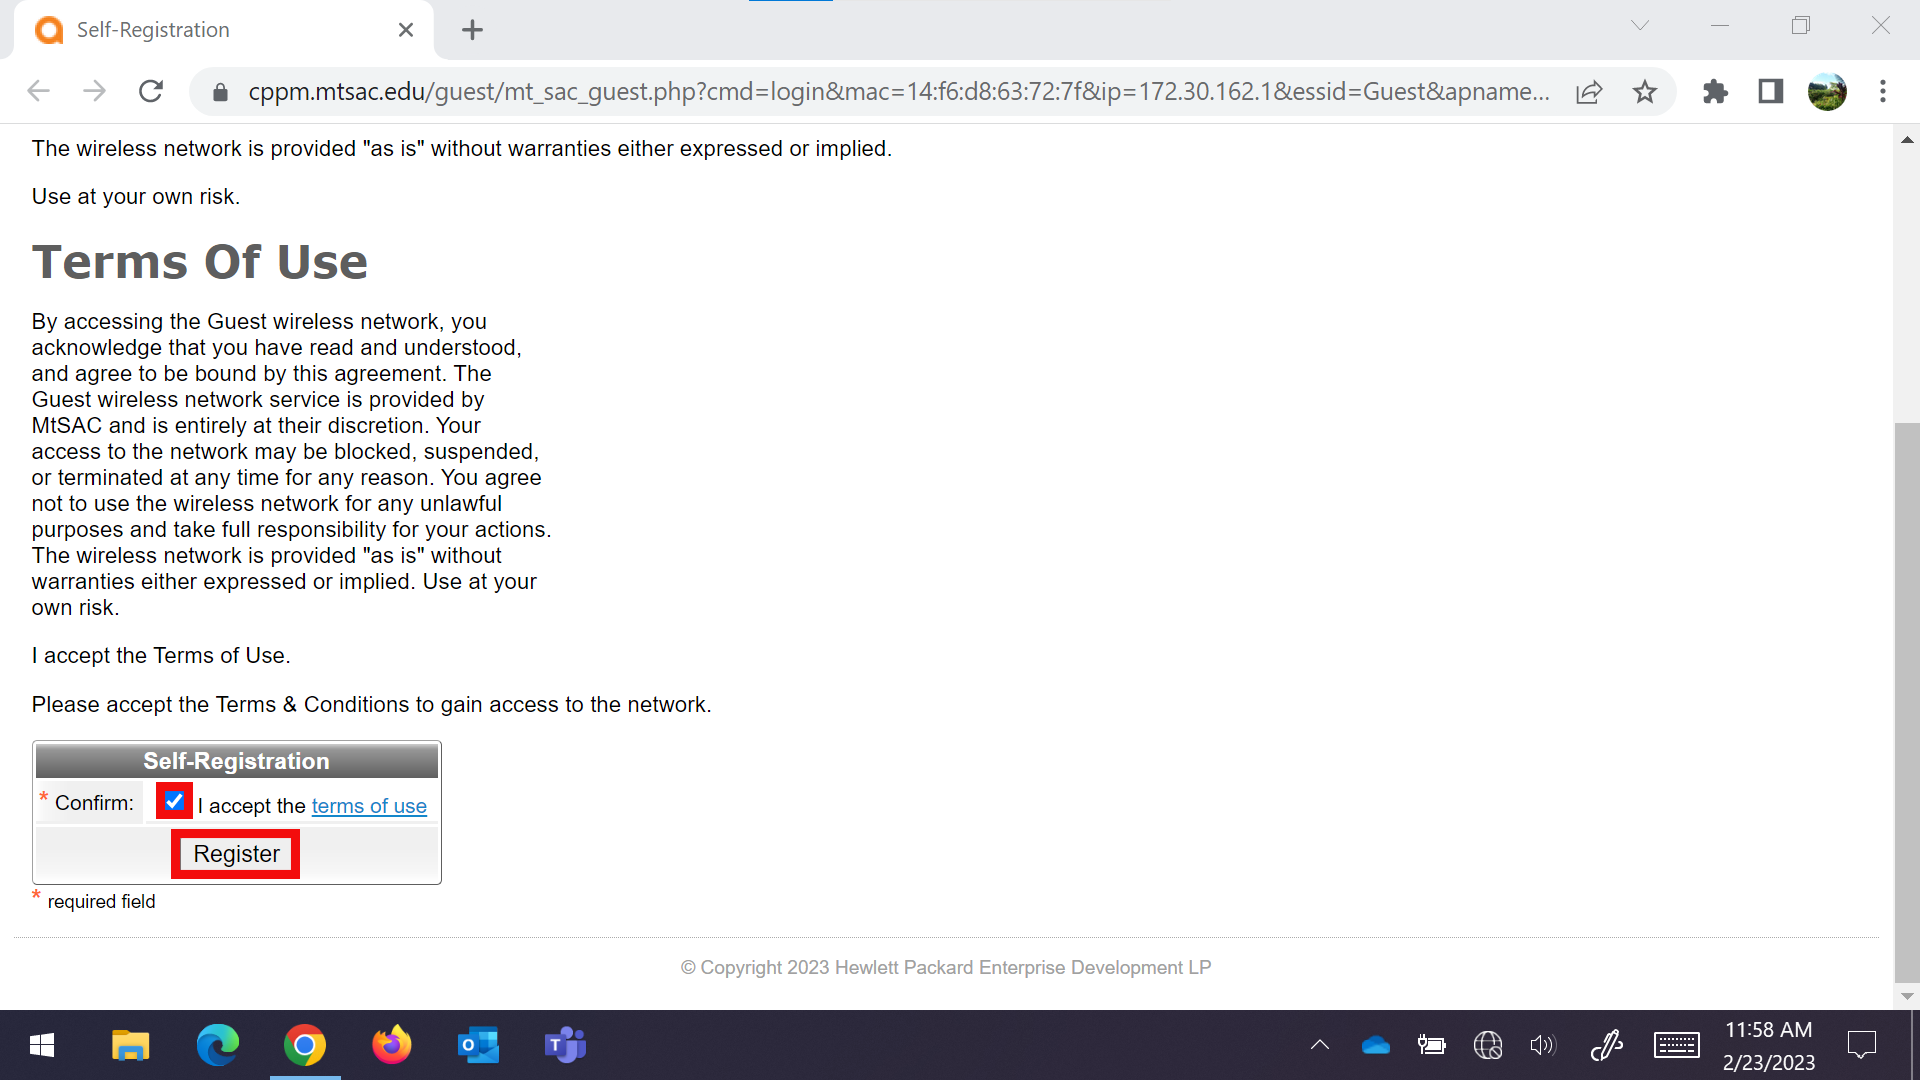
5. Your Account Username and Guest Password will be displayed. You will also see your Activation and Expiration times. To finish the process click the Log In button.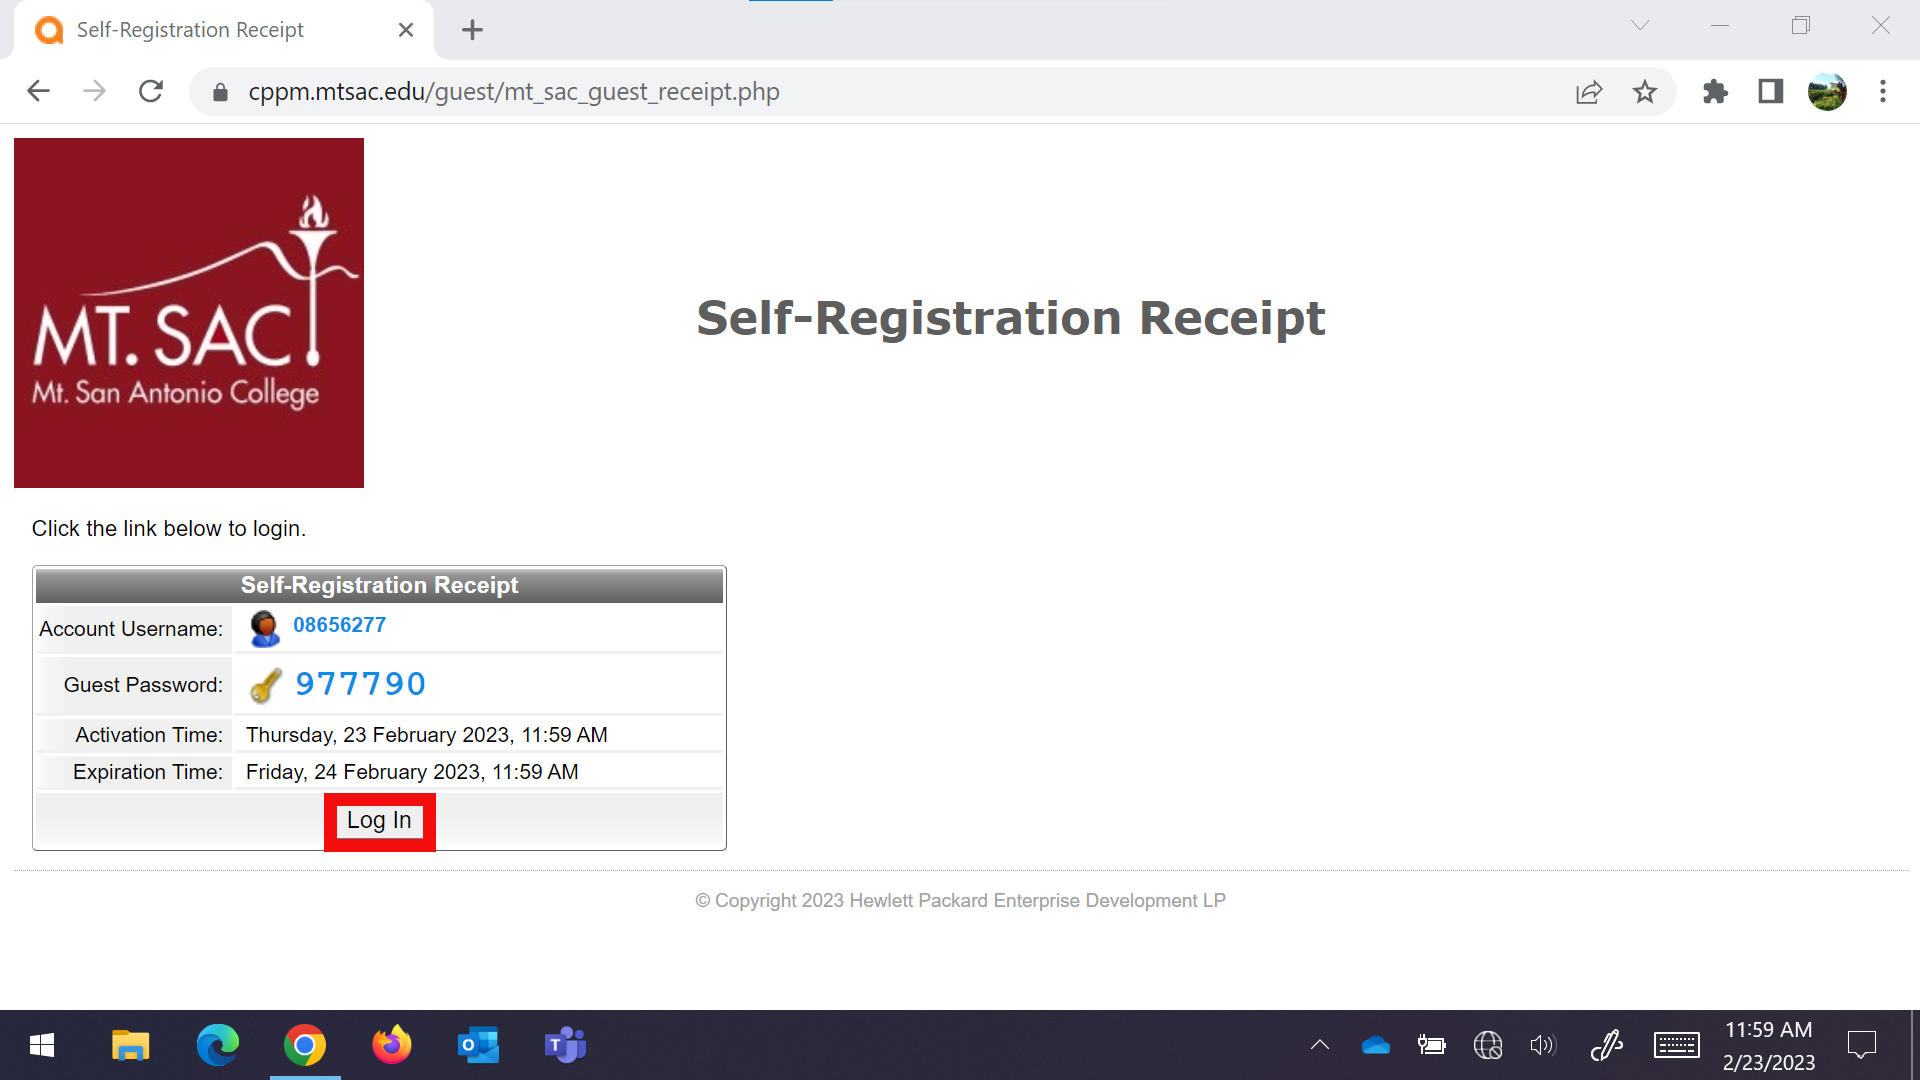
6. That's it! If you're having trouble connecting, make sure you're in range of the network and you've accepted the Terms of Use.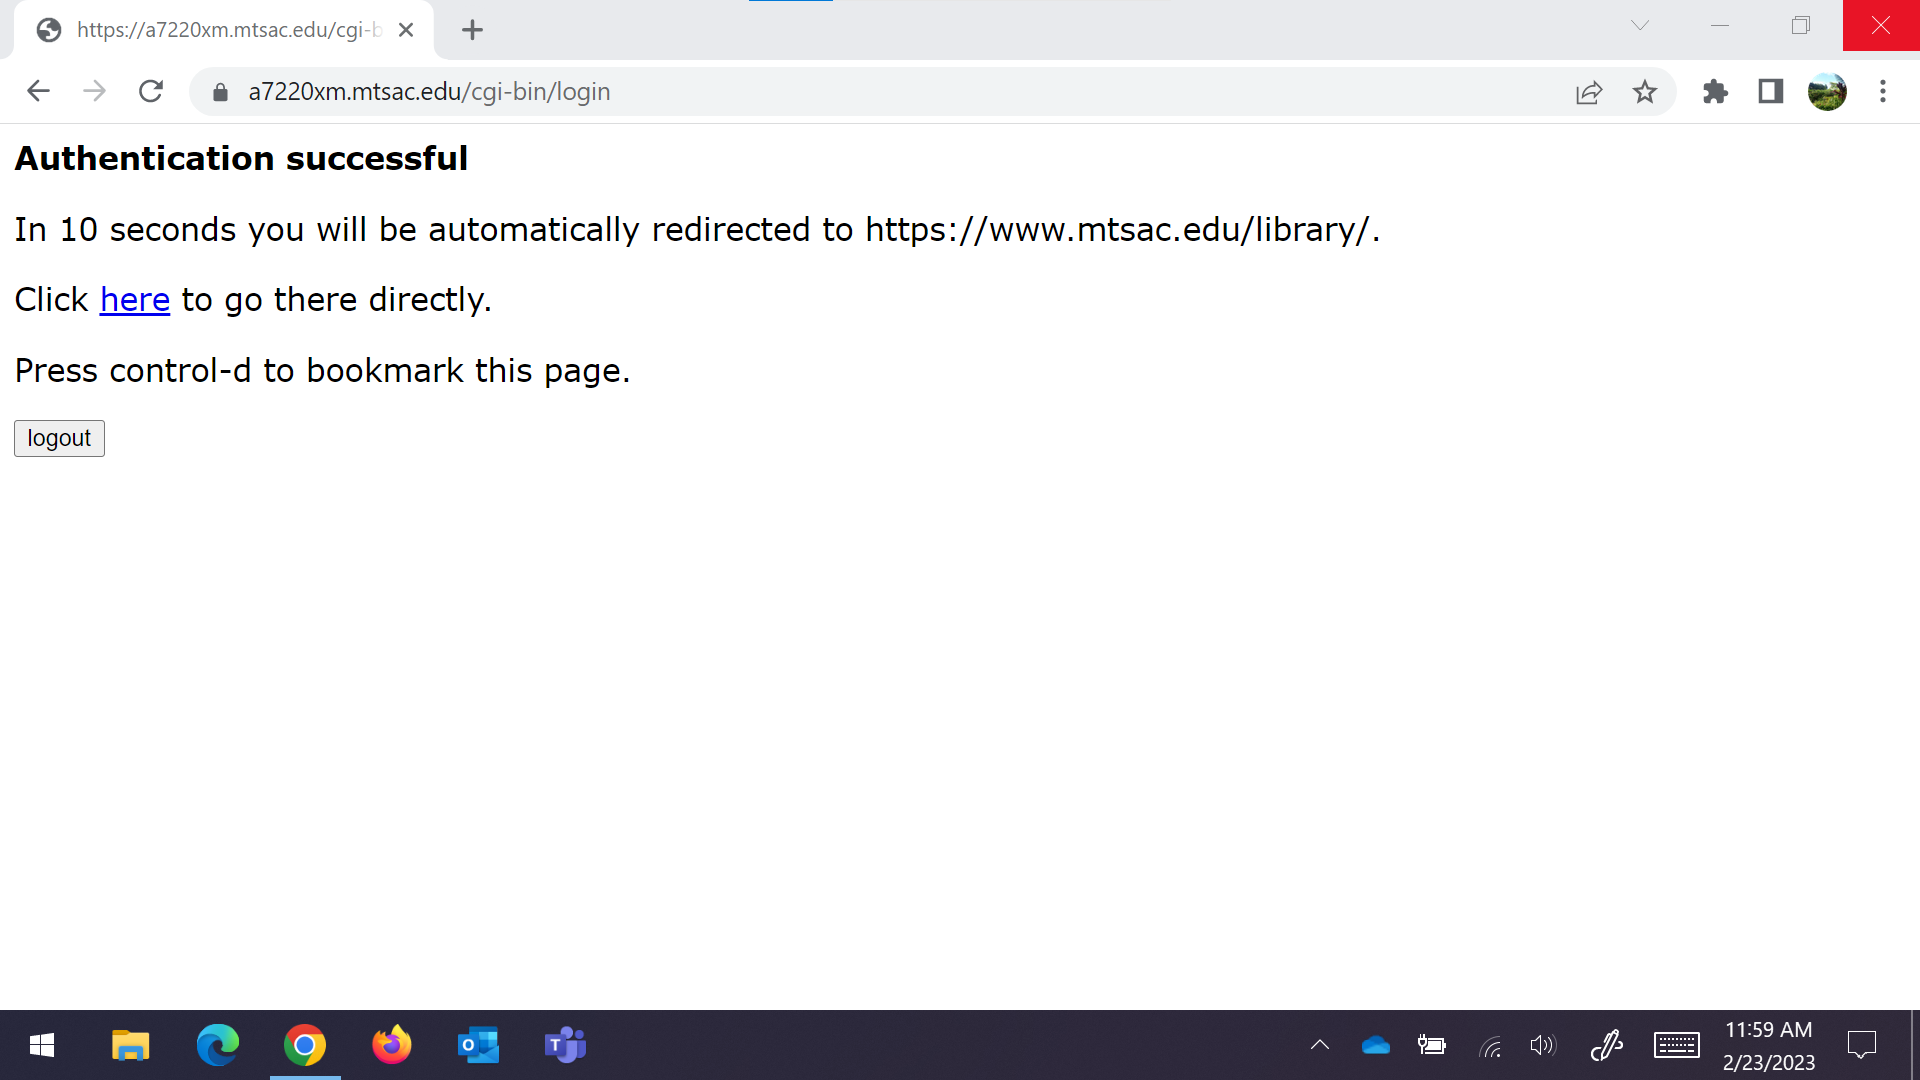
- Using an iOS (Apple) Smartphone or Tablet
Note: Directions are using the iOS 16.2 operating system. Different versions may look different but will generally follow the same steps.
1. Unlock your device and tap the Settings icon to open system settings.
2. In Settings tap Wi-Fi.
3. If the Wi-Fi is not turned on, tap the toggle to turn it on.
4. From the list of available Wi-Fi networks tap the Guest Wi-Fi network.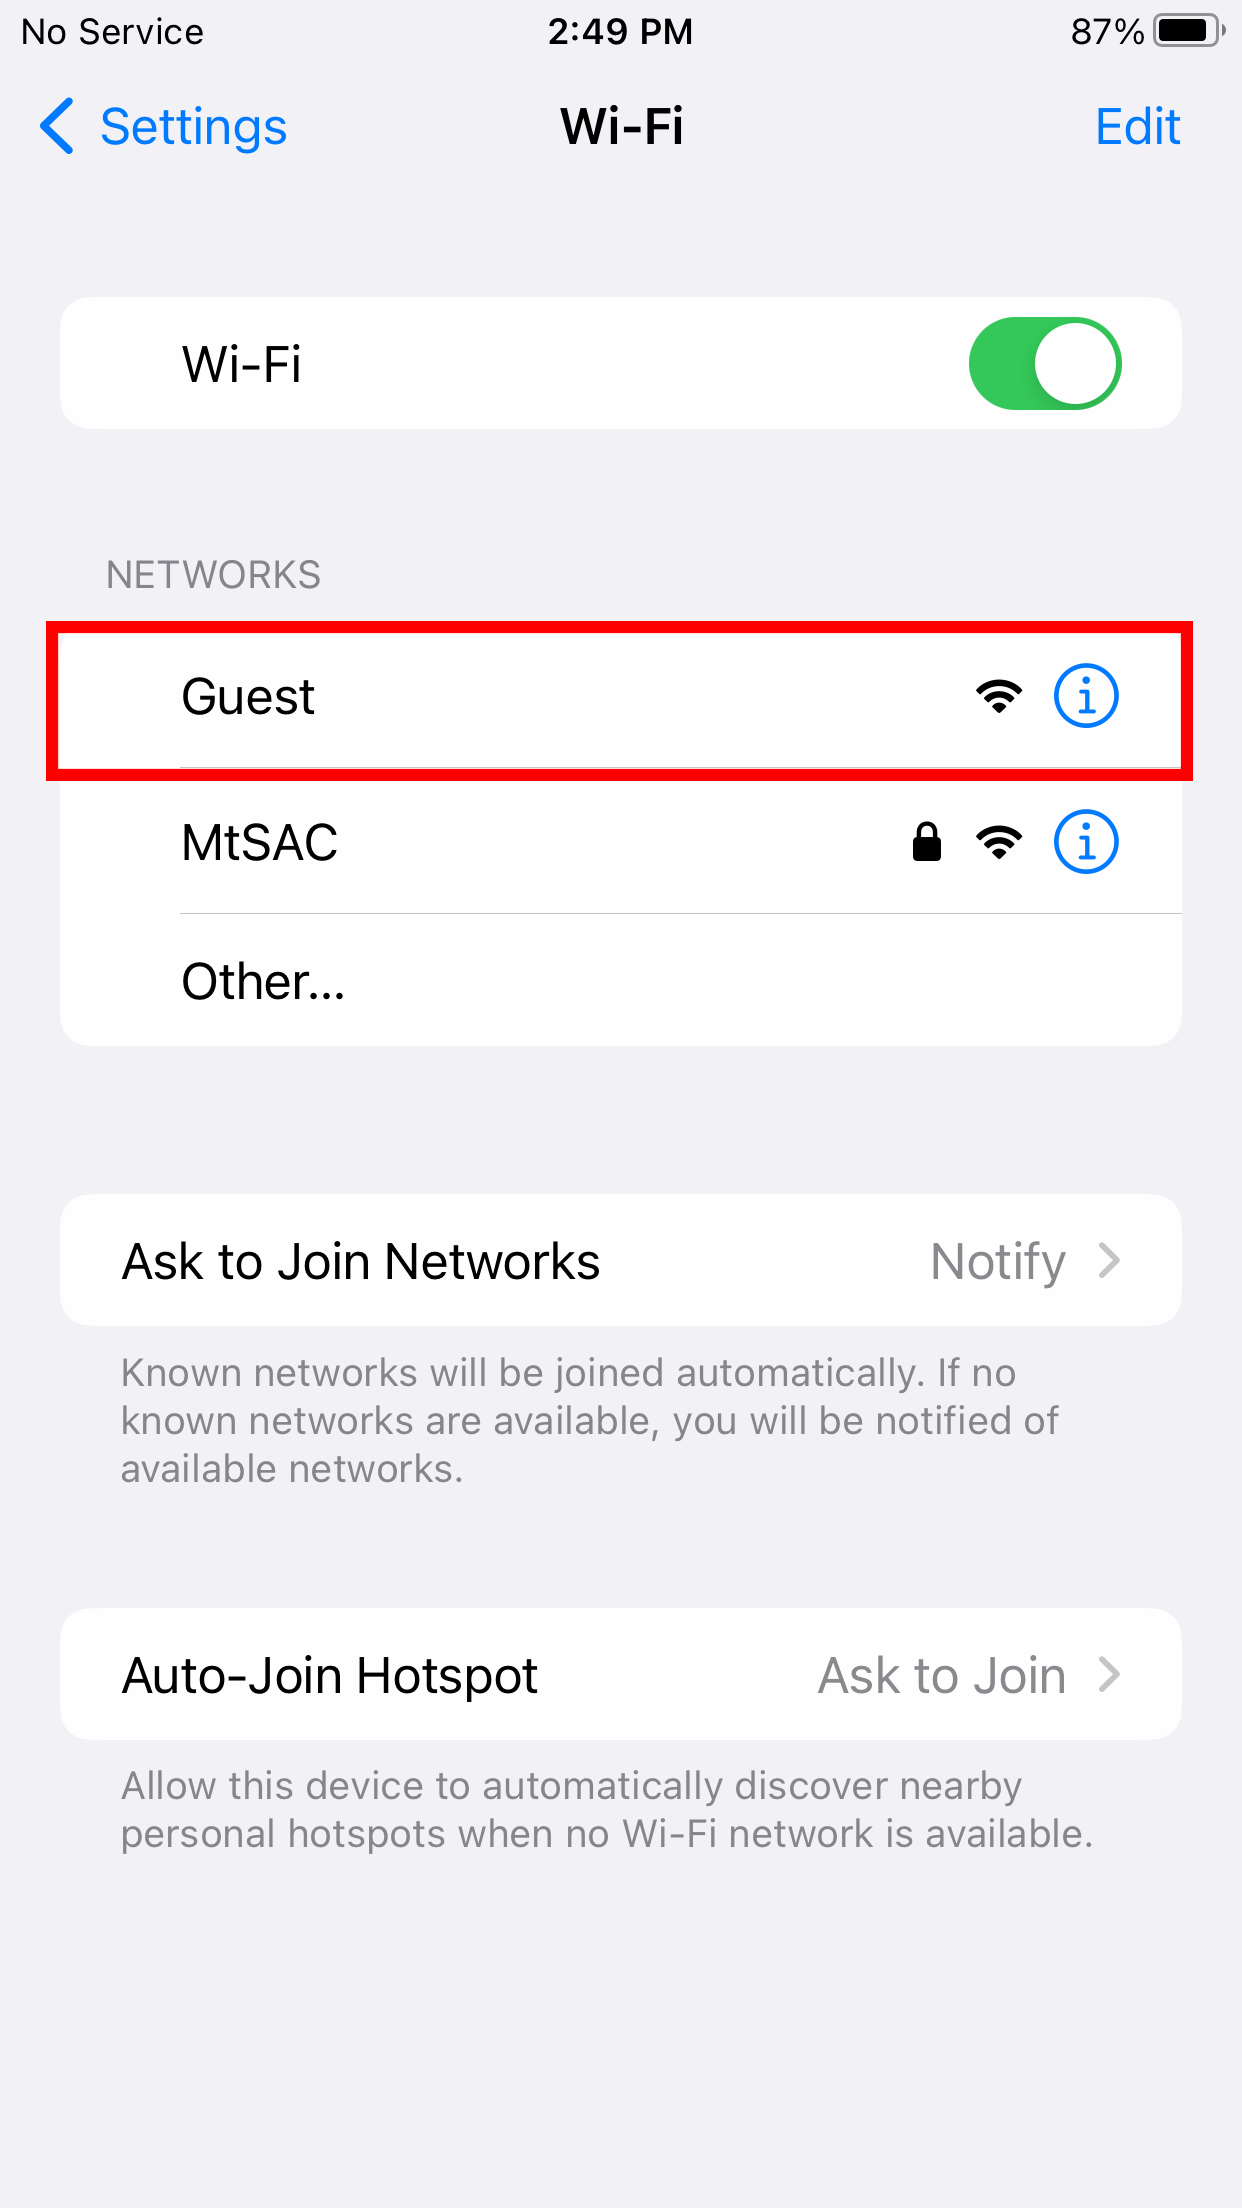
5. You will connect to the Guest network and a web browser will open displaying the Terms of Use. You will need to accept the terms by checking the box and tapping the Register button.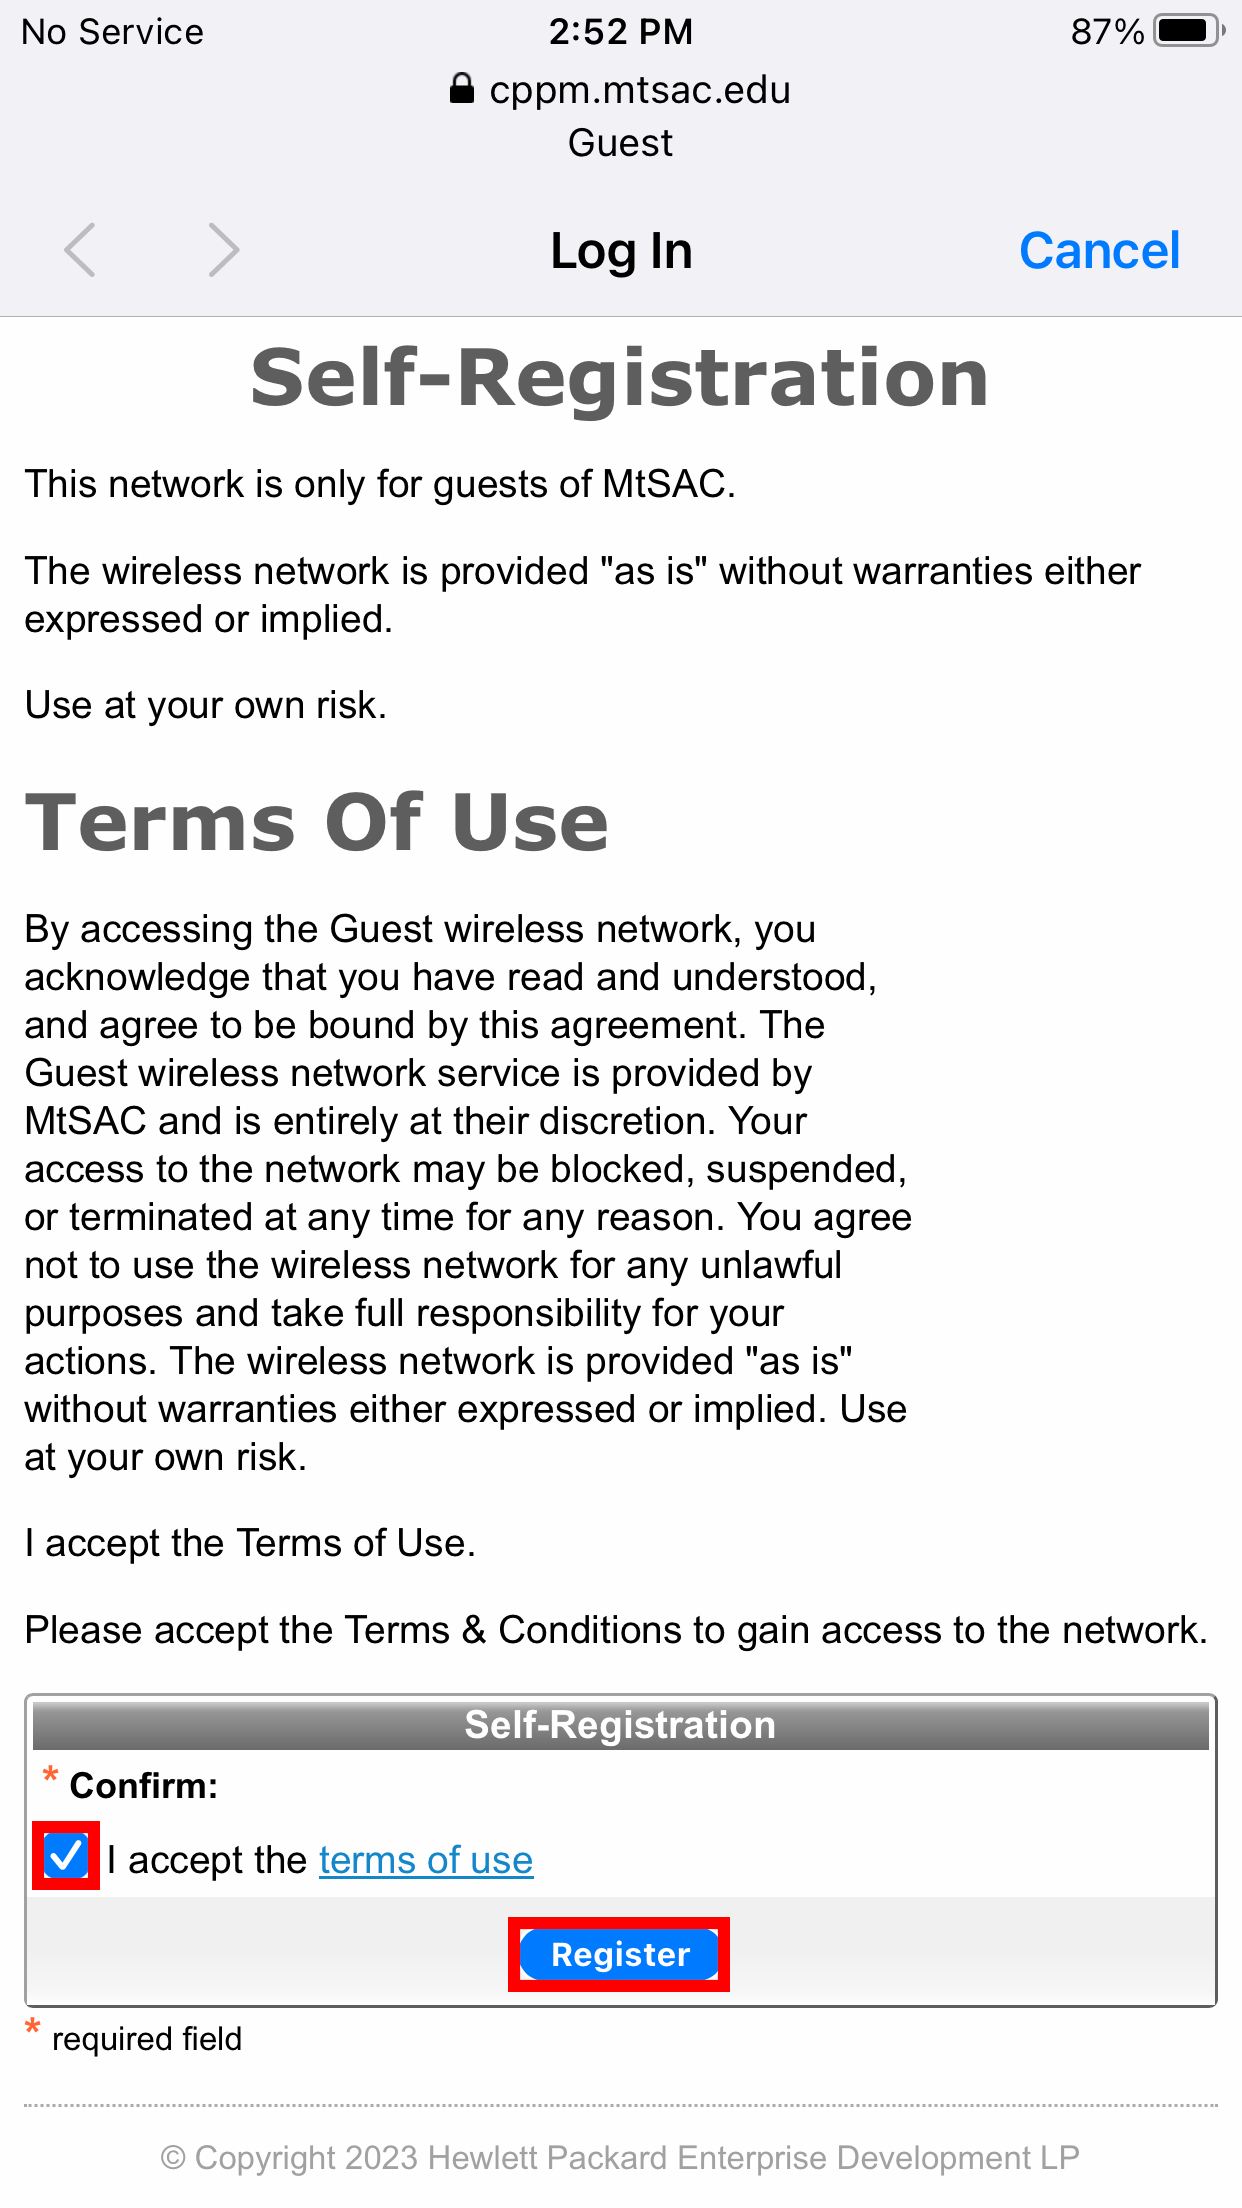
6. You will be assigned a generated Account Username and Guest Password. Your activation and expiration time will also be displayed. To finish connecting tap the Log In button.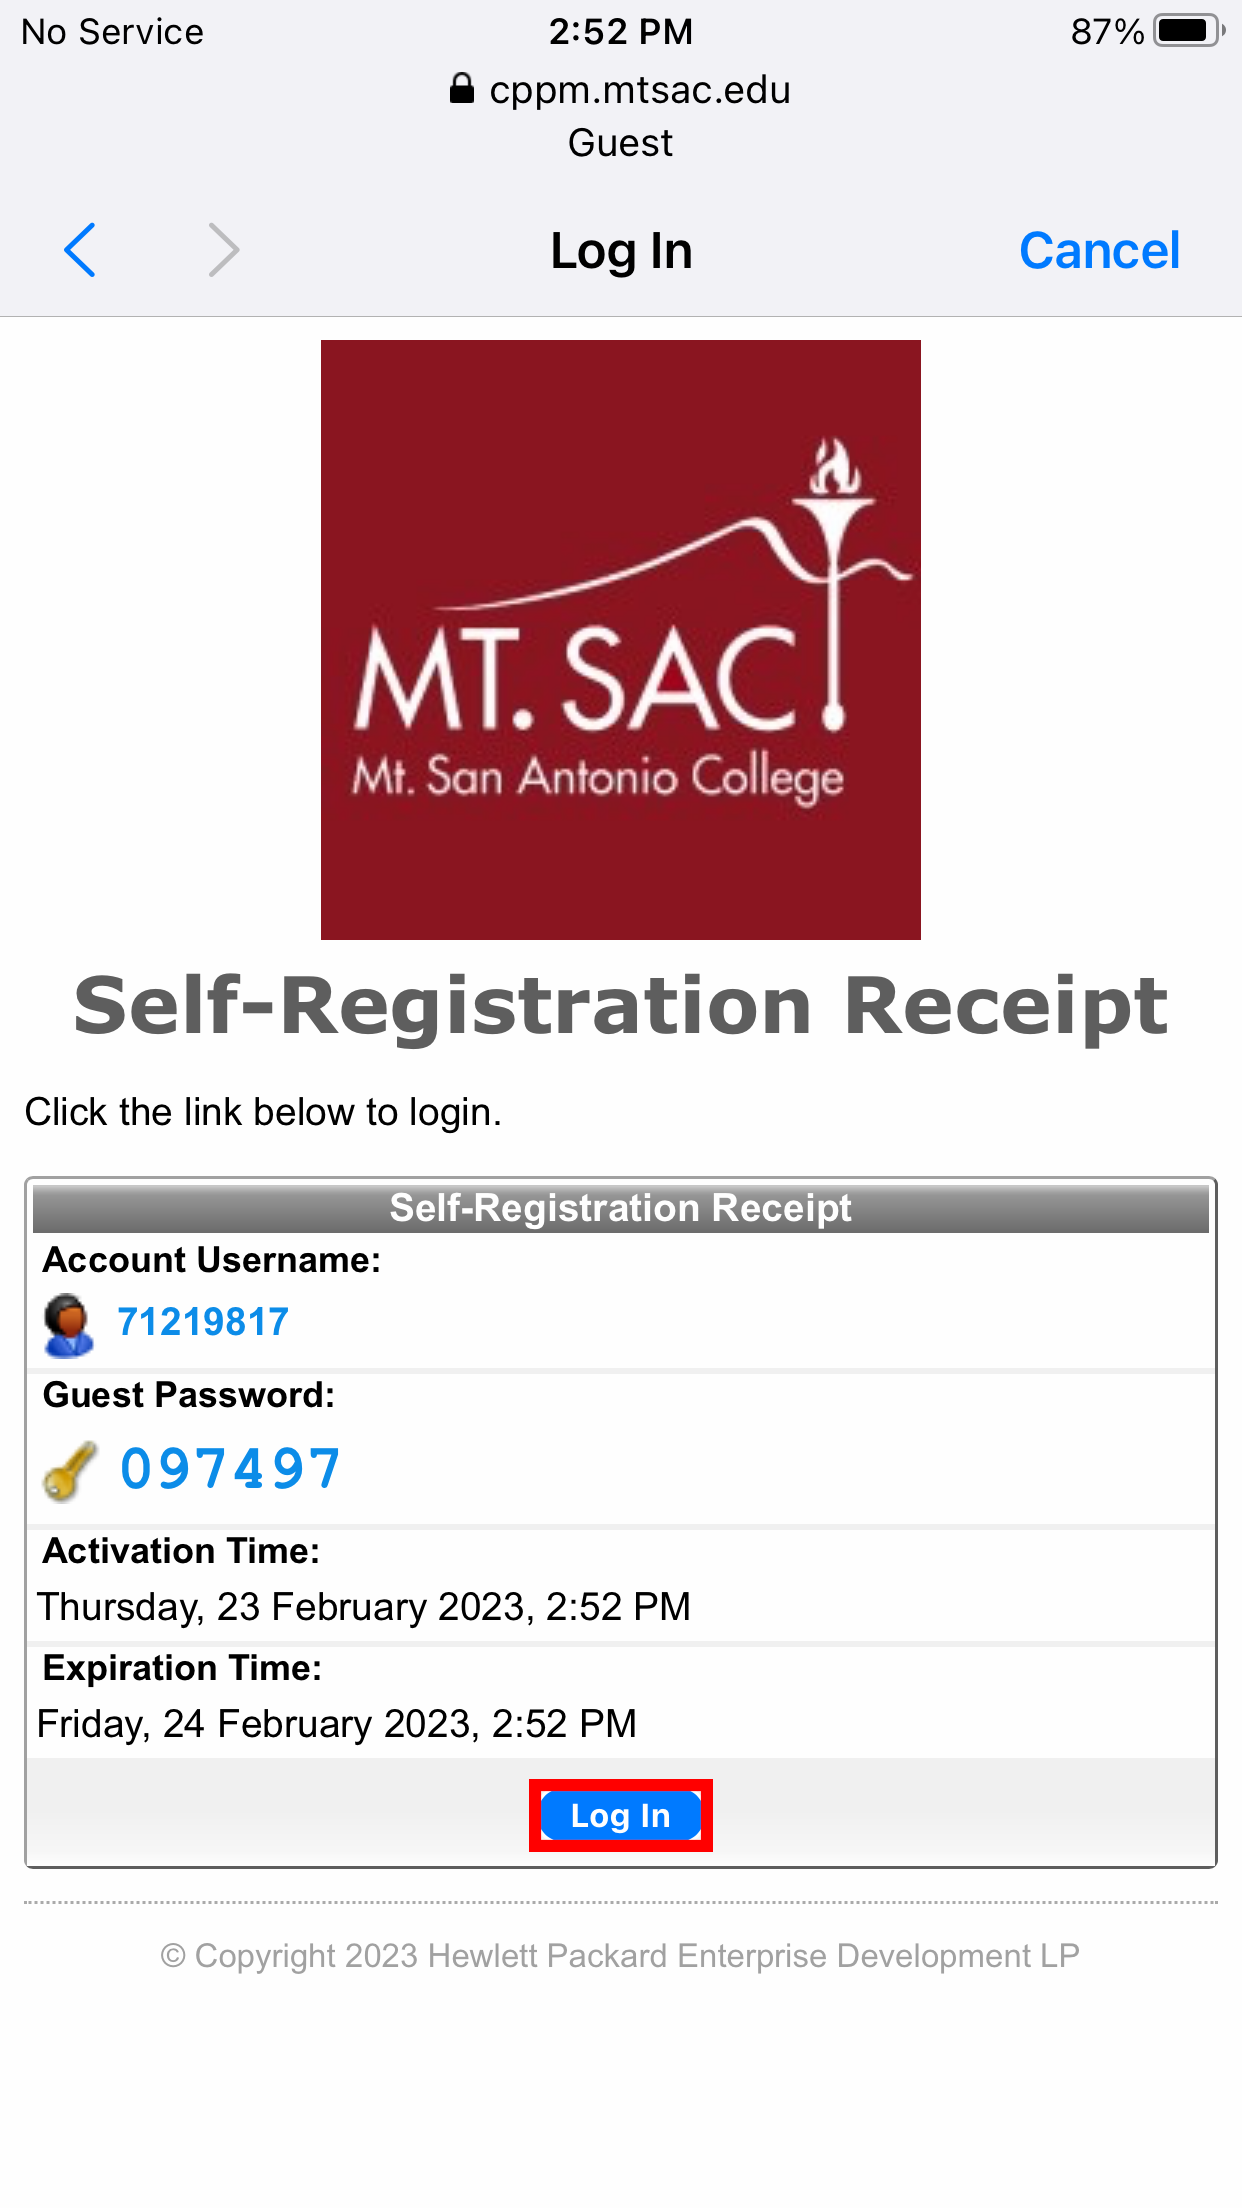
7. That's it! If you're having trouble connecting, make sure you're in range of the network and you've accepted the Terms of Use.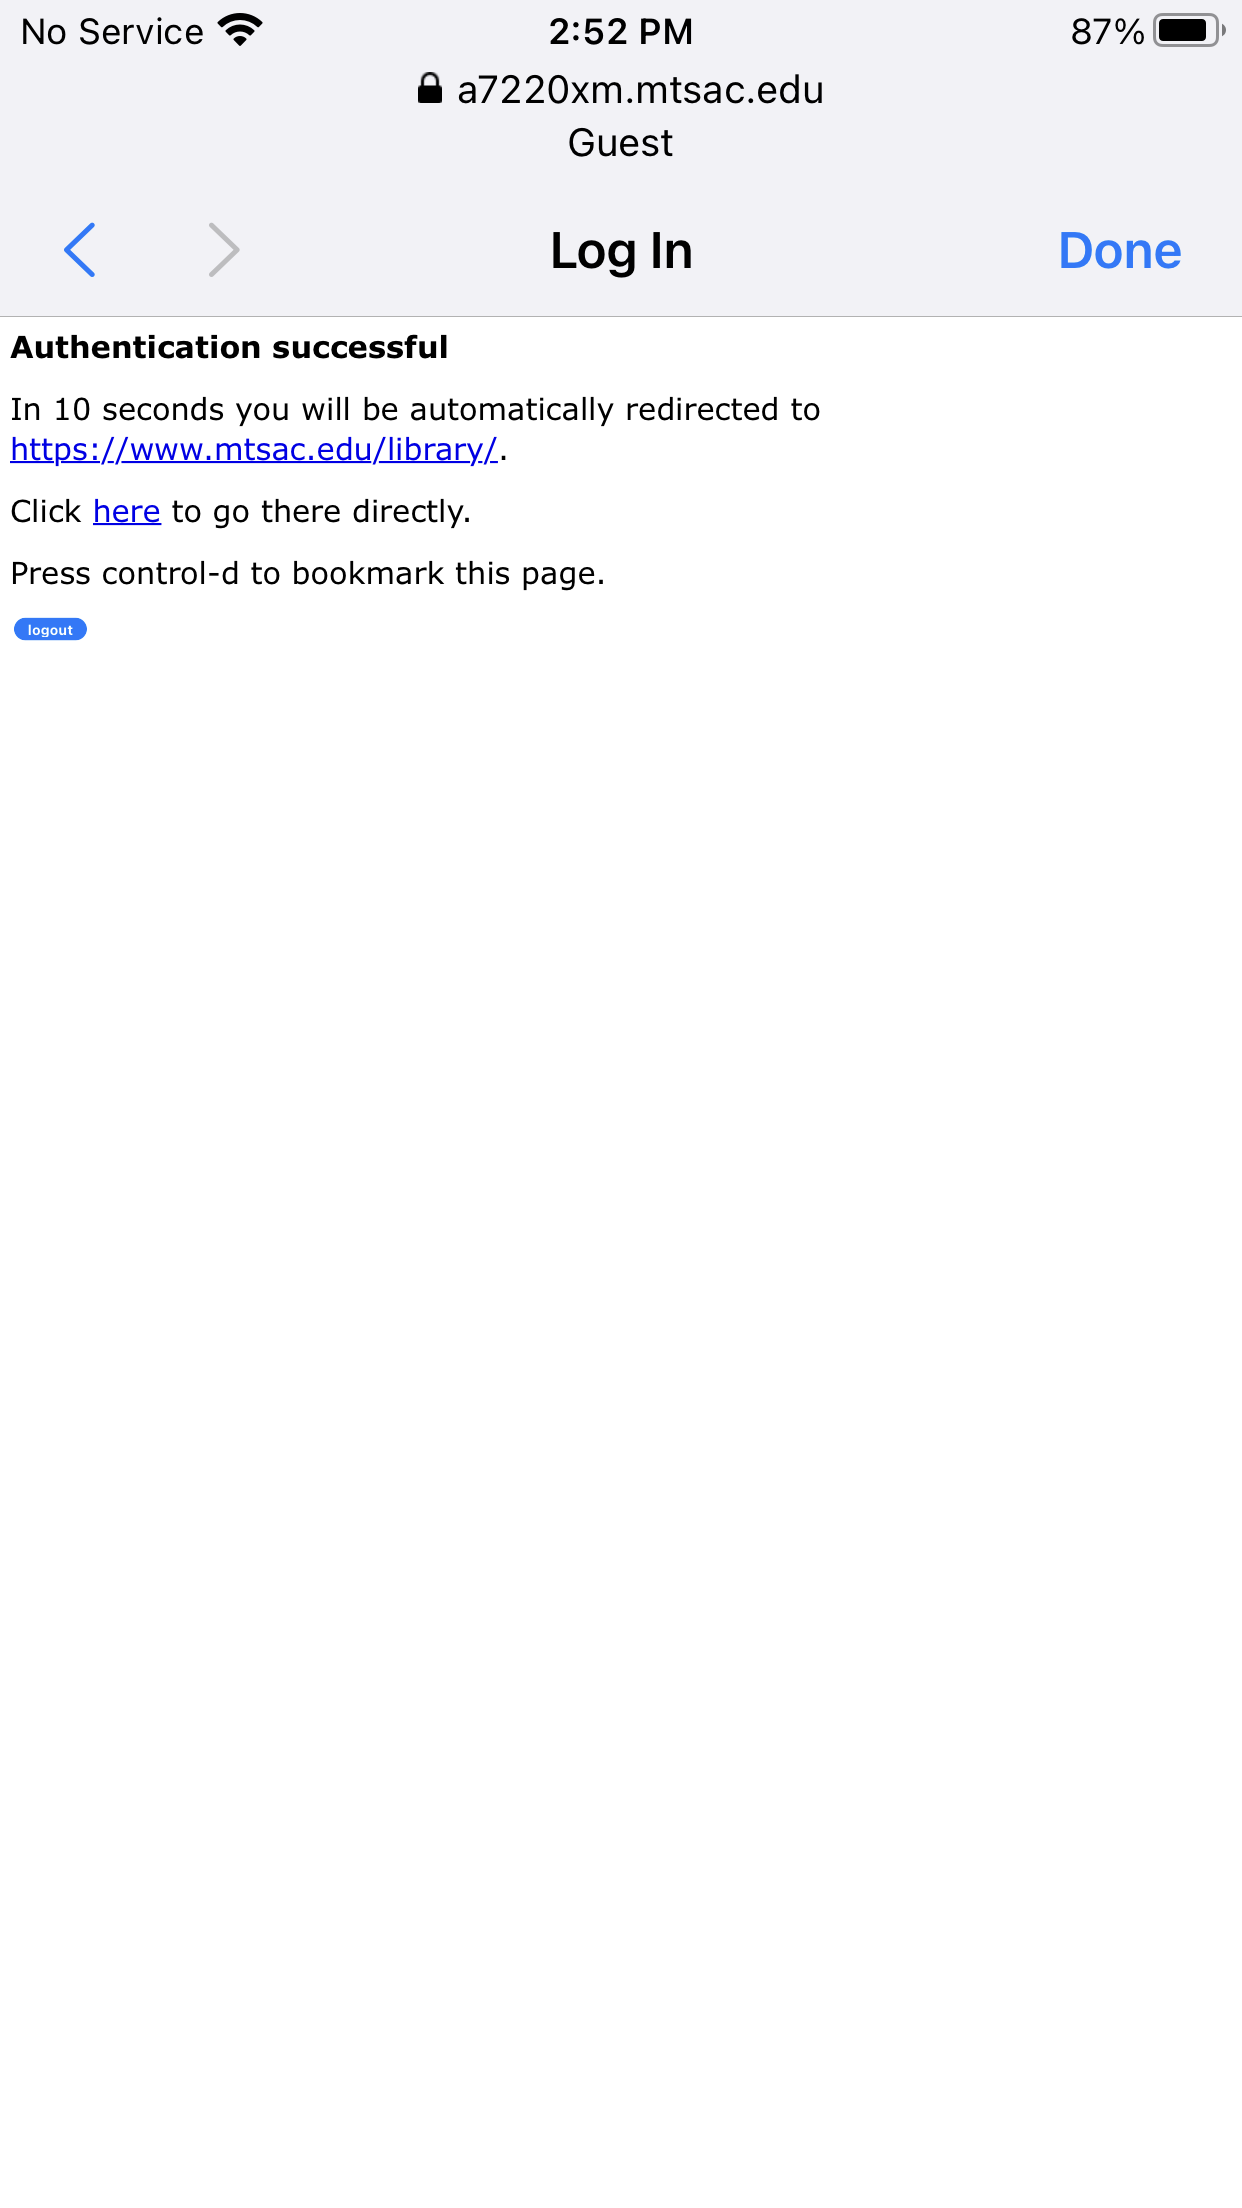
- Using a MacOS (Apple) PC
1. Click on the Wi-Fi icon on the menu bar located on the top right corner of the screen.
2. If the Wi-Fi is not turned on, tap the toggle to turn it on.
3. From the list of available Wi-Fi networks select the Guest Wi-Fi network.
4. You will connect to the Guest network and a new window will open displaying the Terms of Use. You will need to accept the terms by checking the box and clicking the Register button.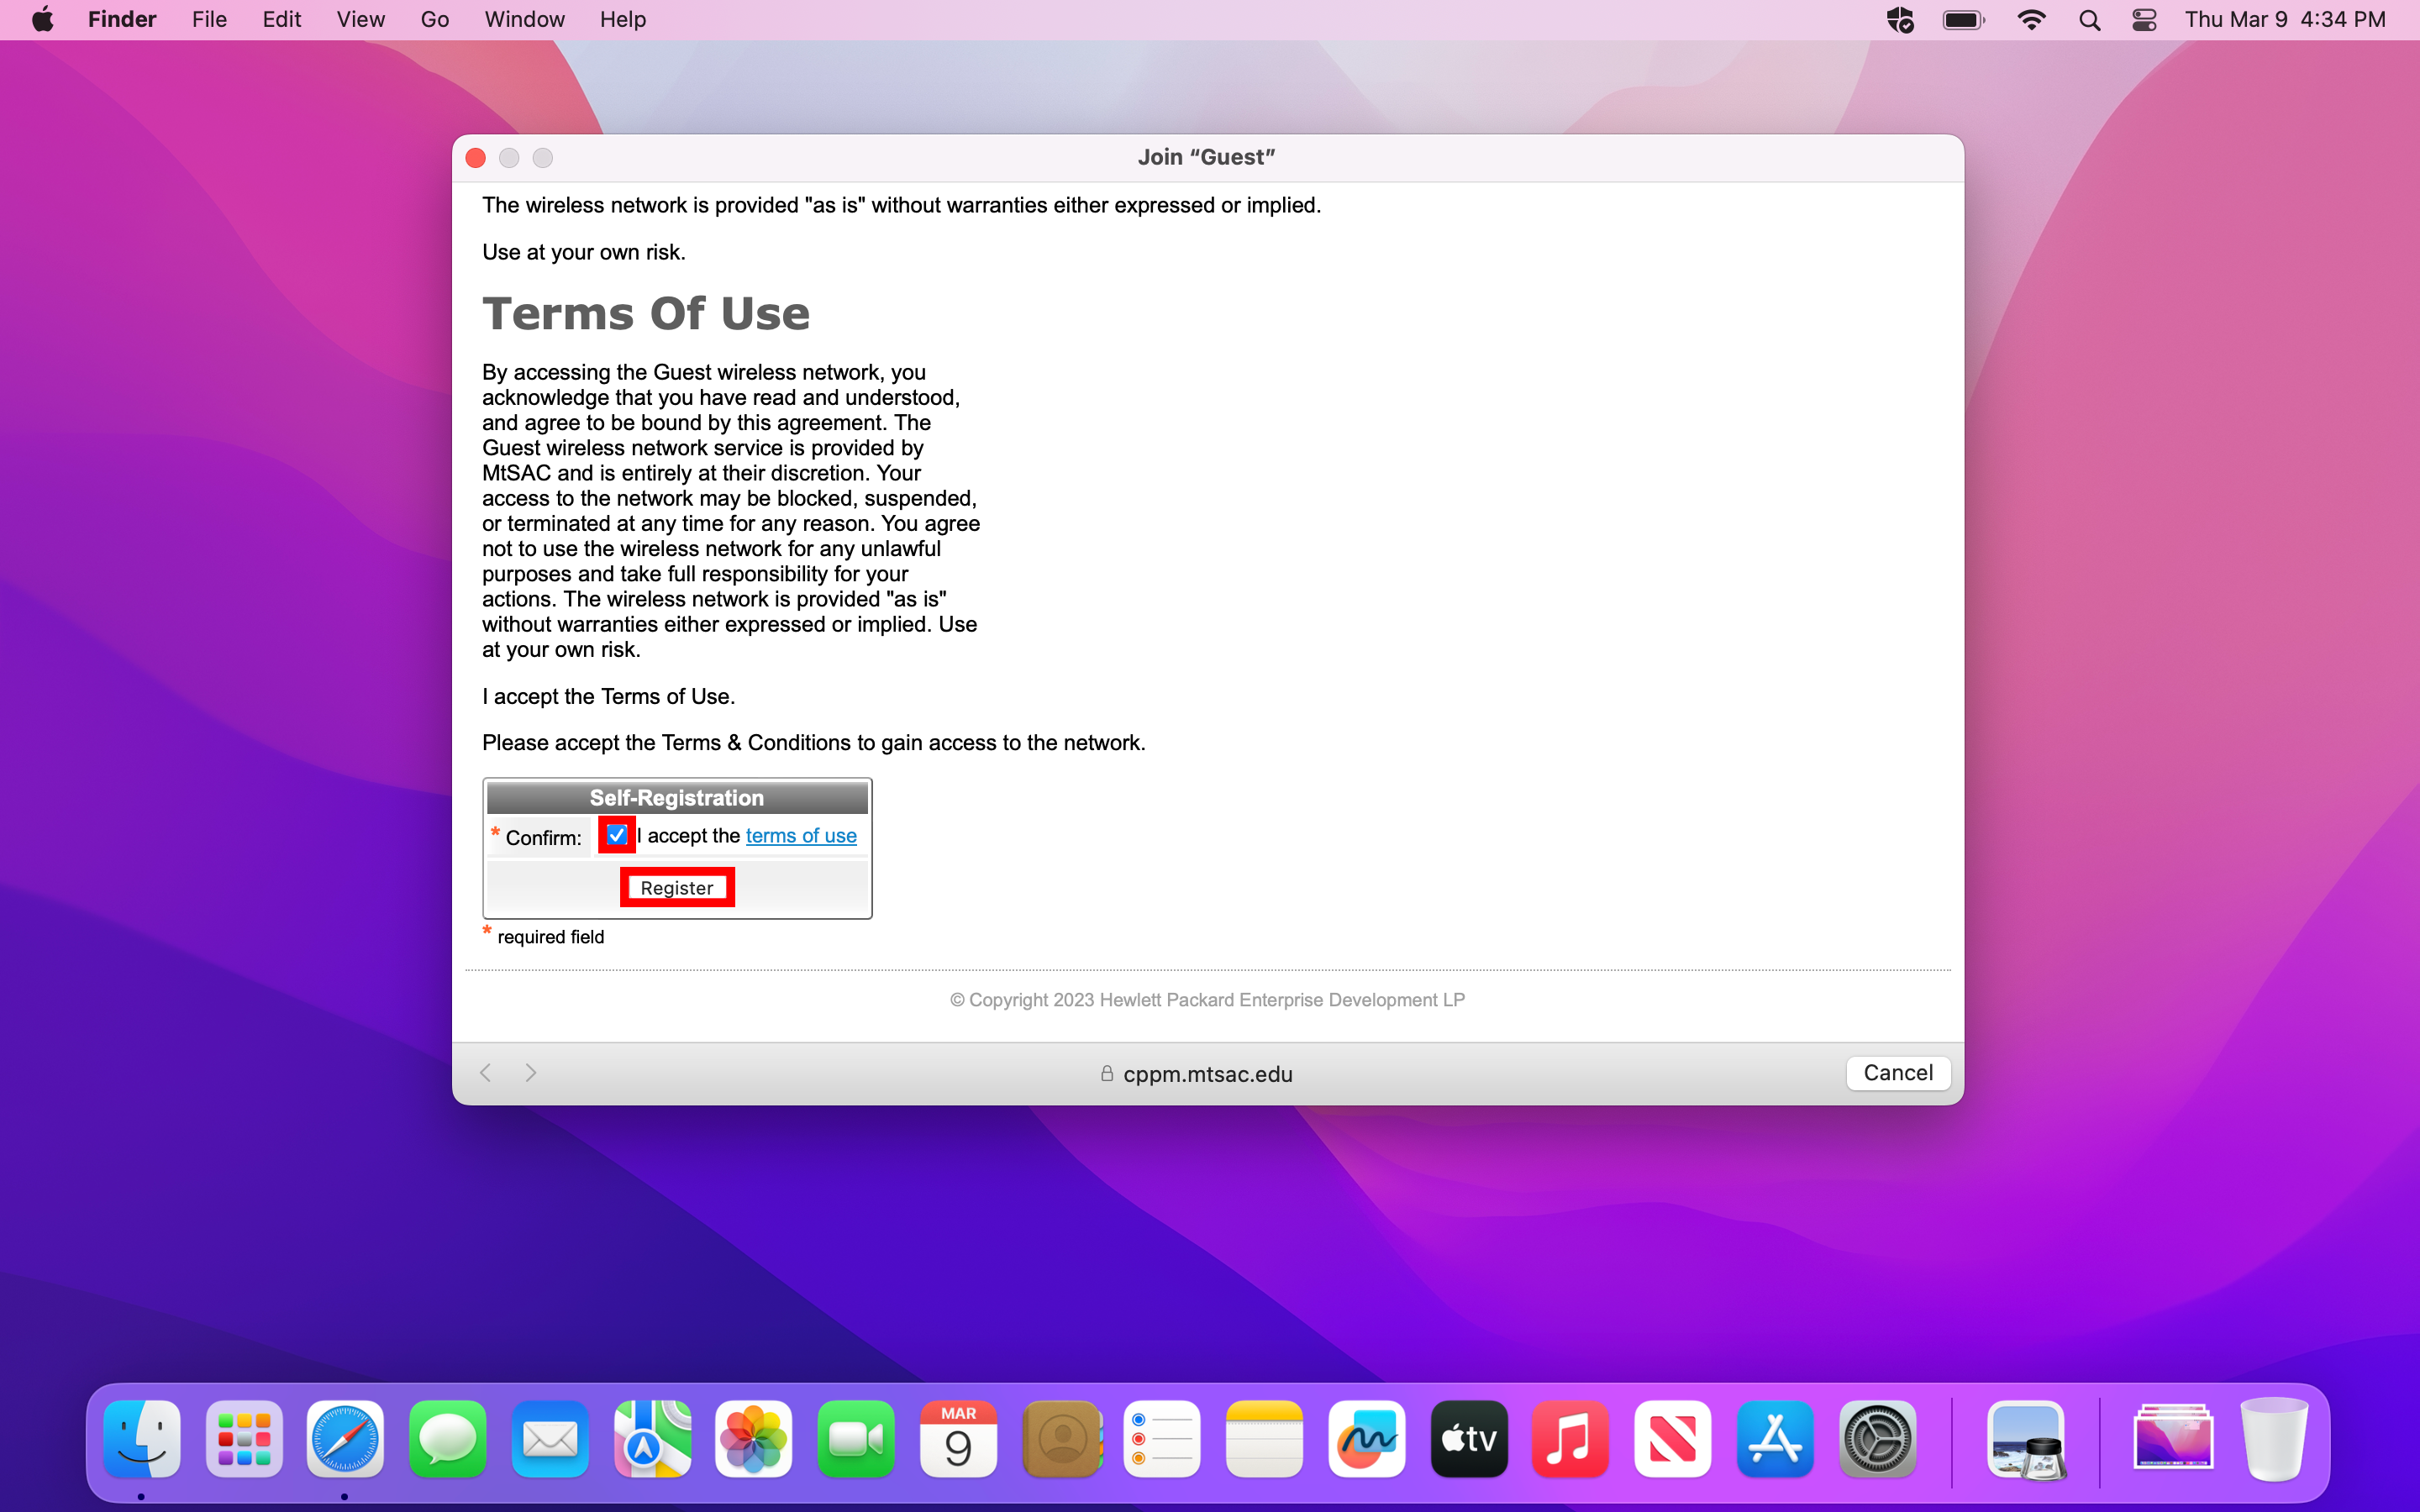
5. You will be assigned a generated Account Username and Guest Password. Your activation and expiration time will also be displayed. To finish connecting click the Log In button.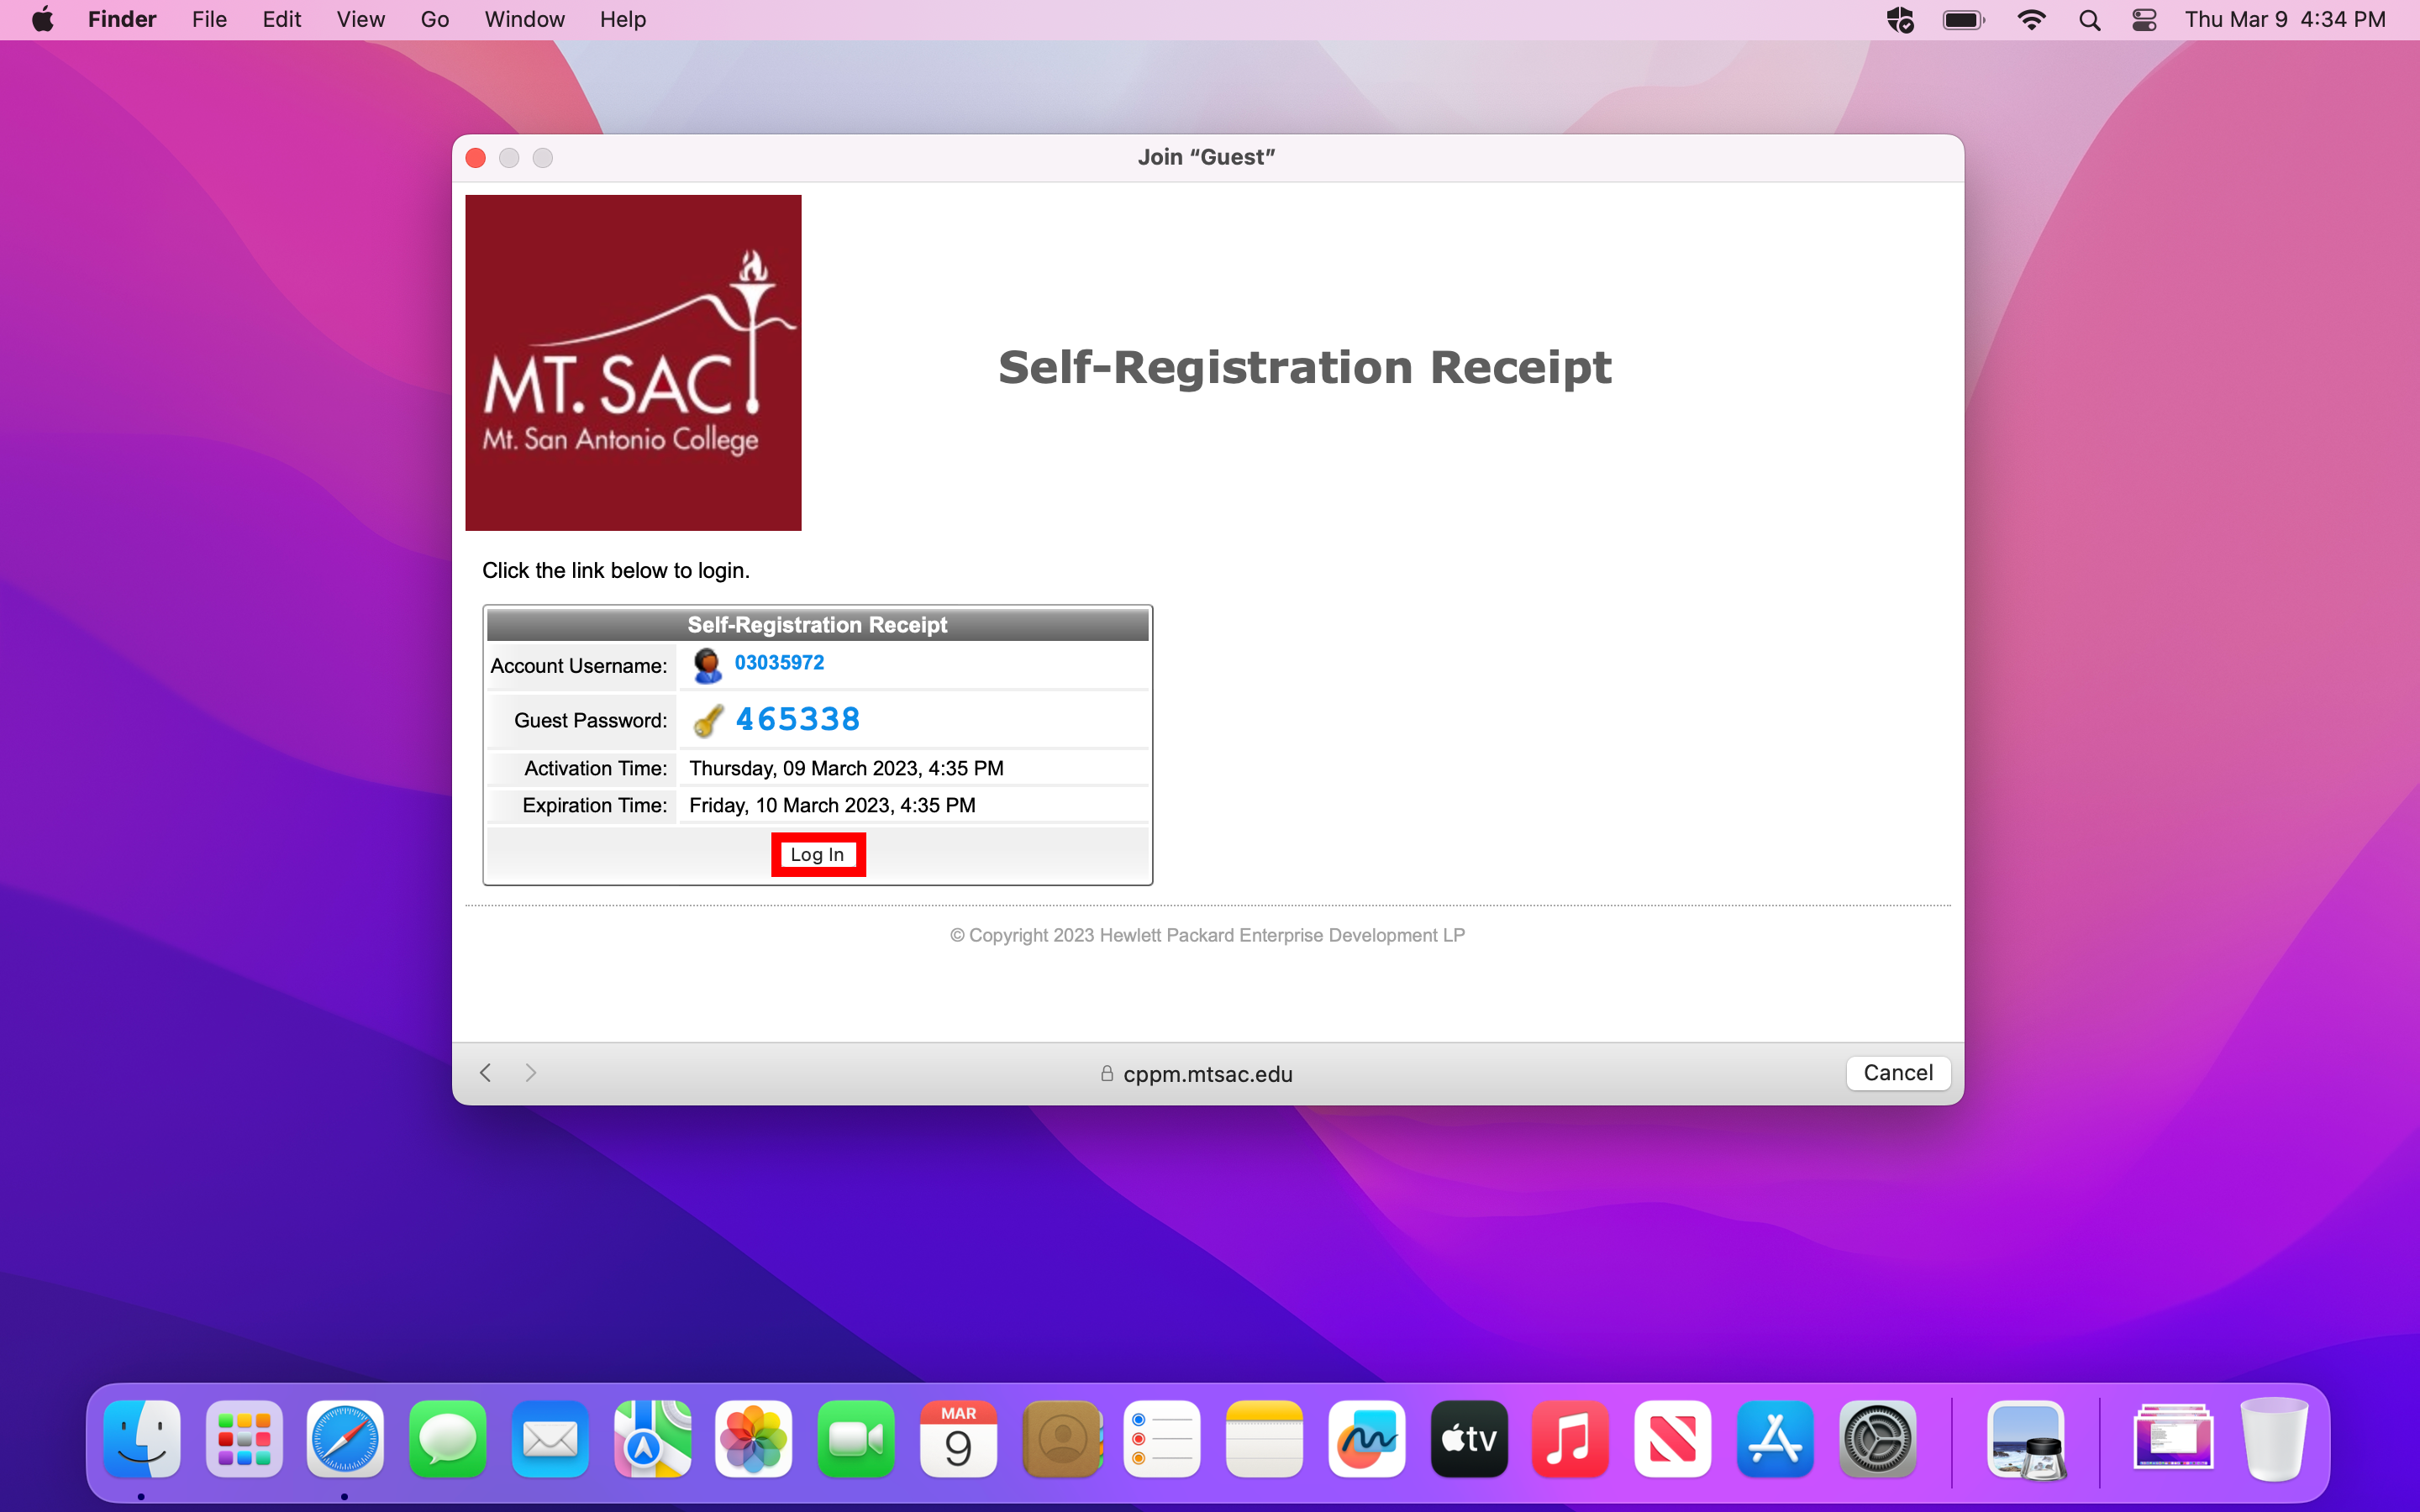
6. That's it! If you're having trouble connecting, make sure you're in range of the network and you've accepted the Terms of Use.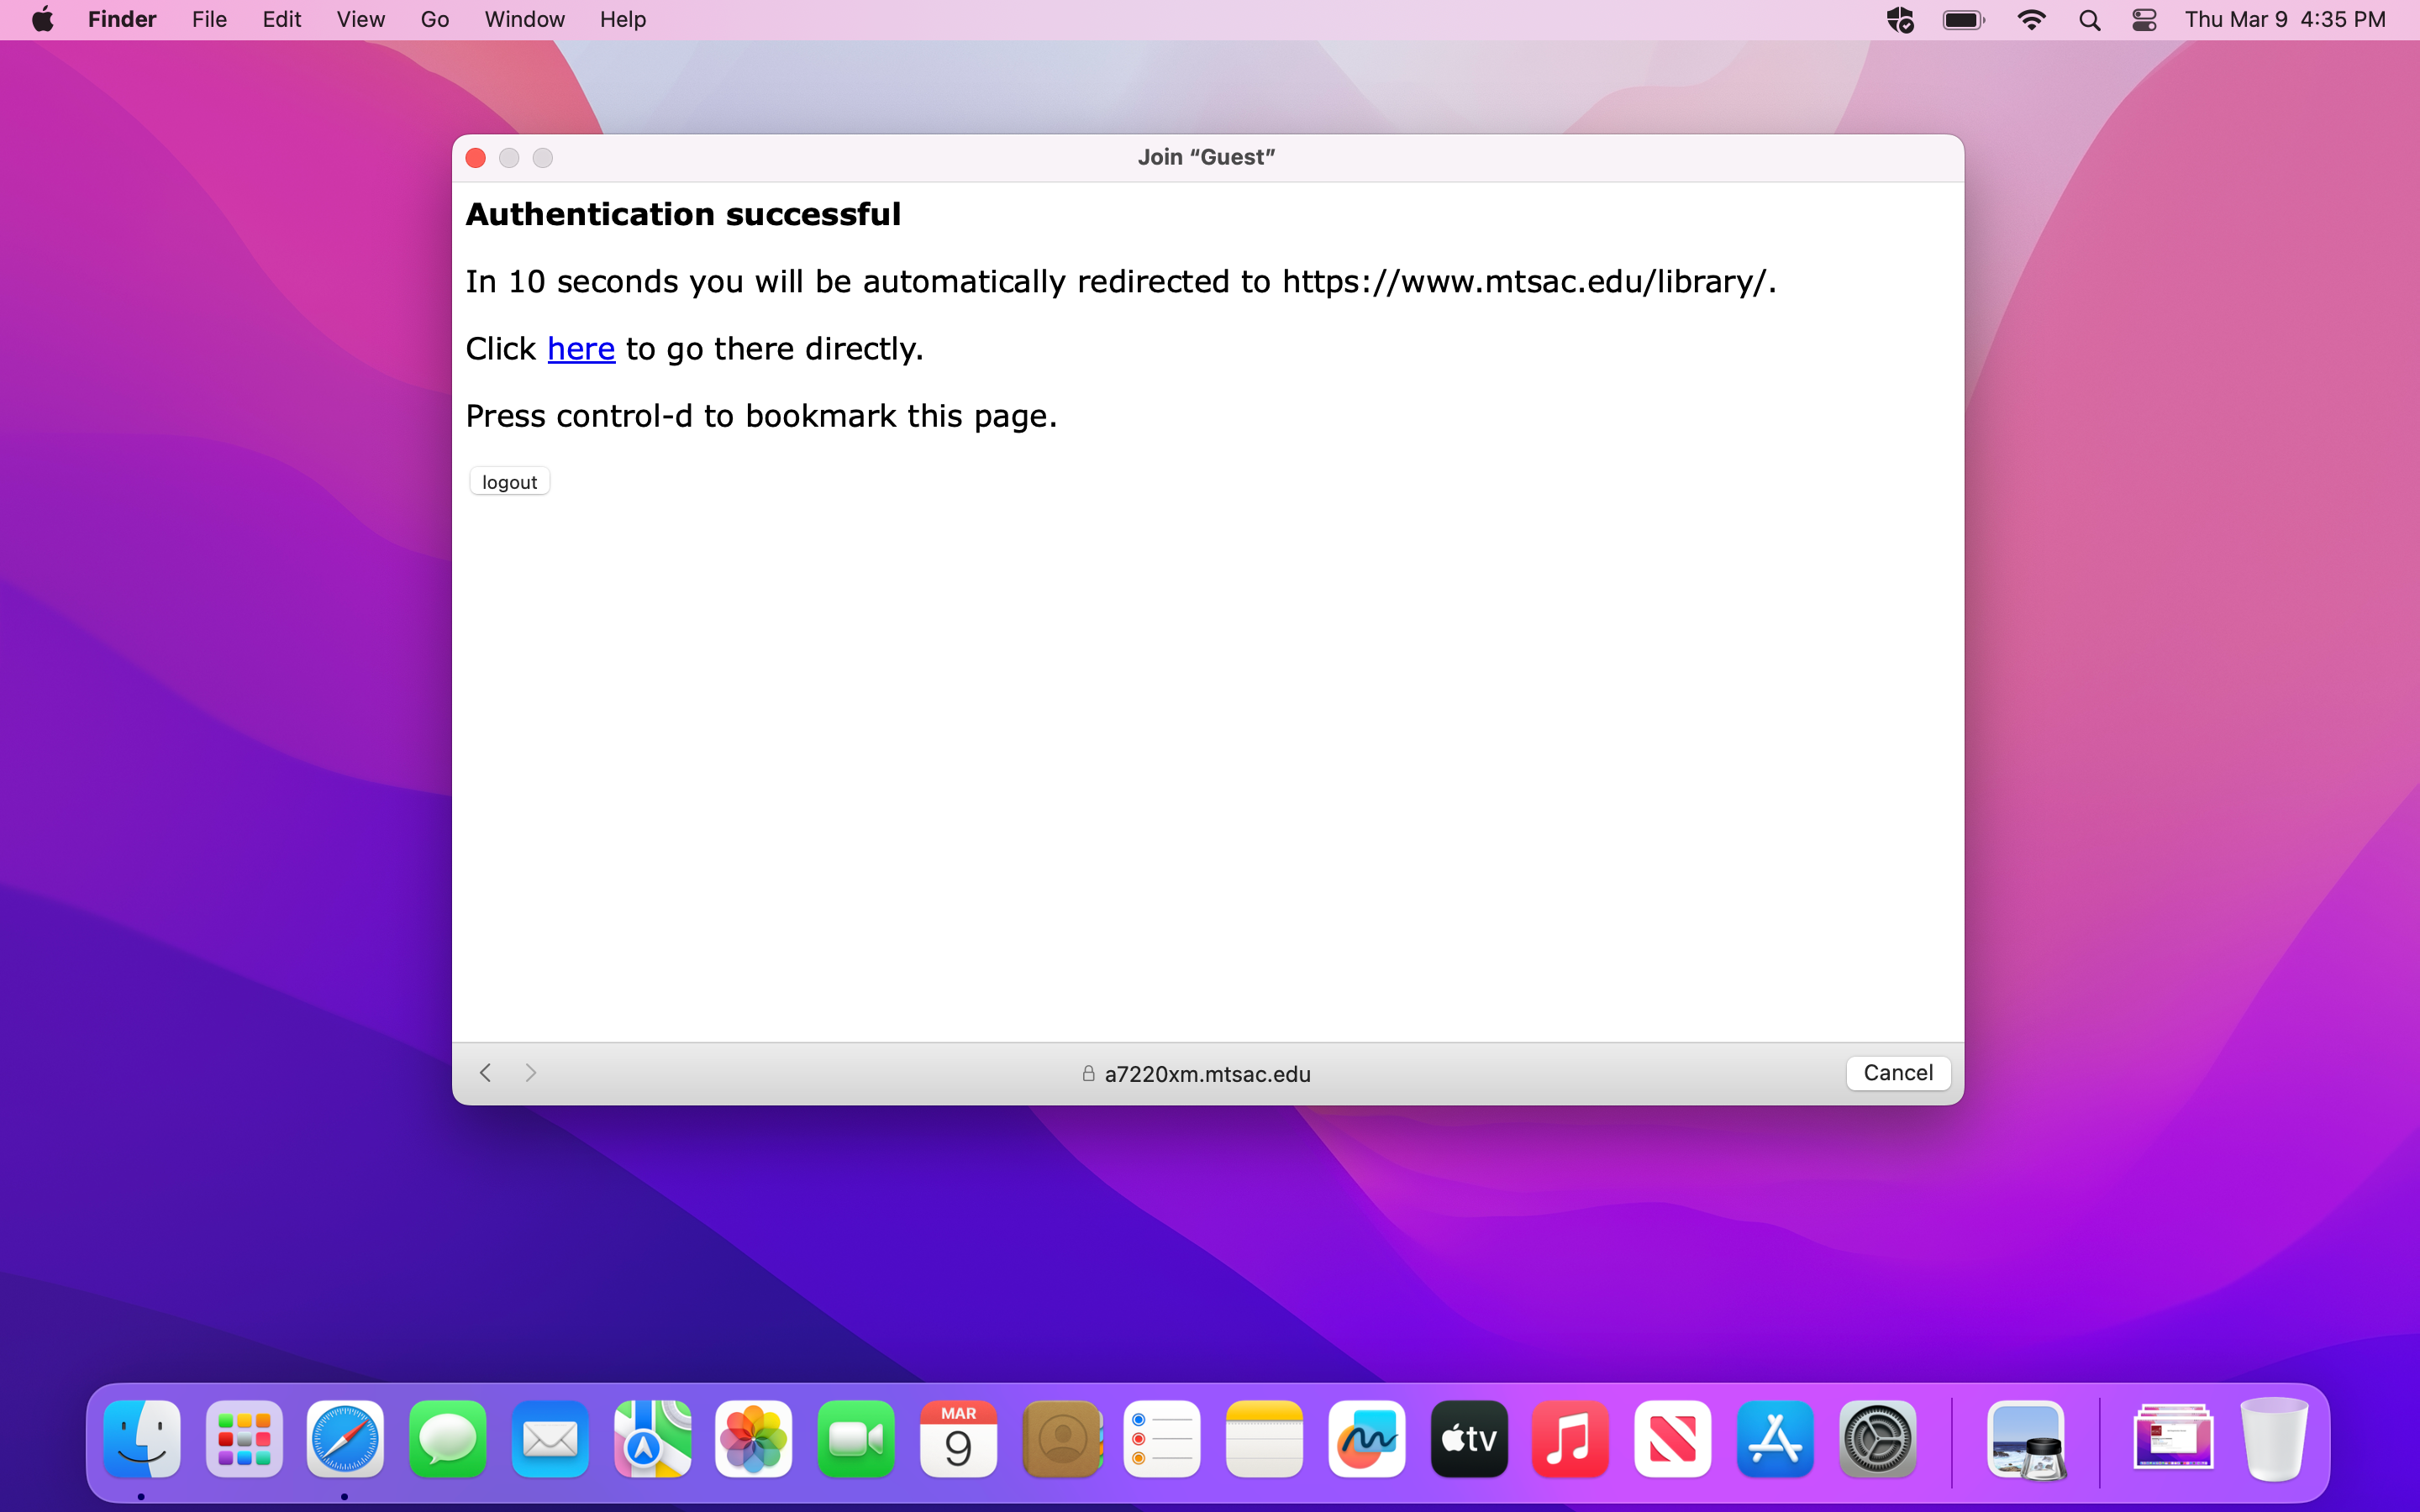
- Using a Chromebook
Note: Directions are using the ChromeOS operating system. Different versions may look different but will generally follow the same steps.
1. In the bottom right of your taskbar click the network icon to bring up network settings. If your Chromebook's Wi-Fi is turned off click the Wi-Fi icon to turn it back on.
2. You will see a list of available Wi-Fi networks. Click the Guest network.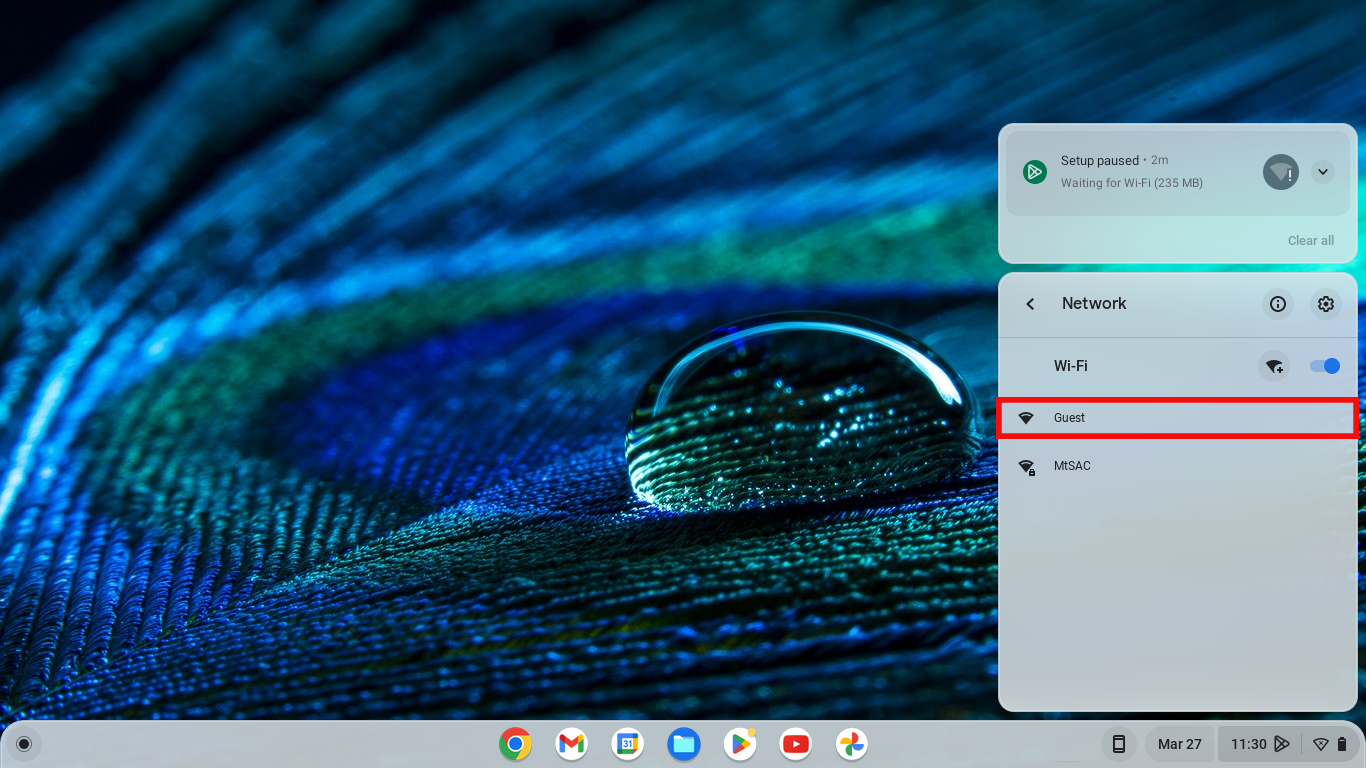
3. You will connect to the Guest network. Click the Guest network name and a new window will open displaying the Terms of Use. You will need to accept the terms by checking the box and clicking the Register button.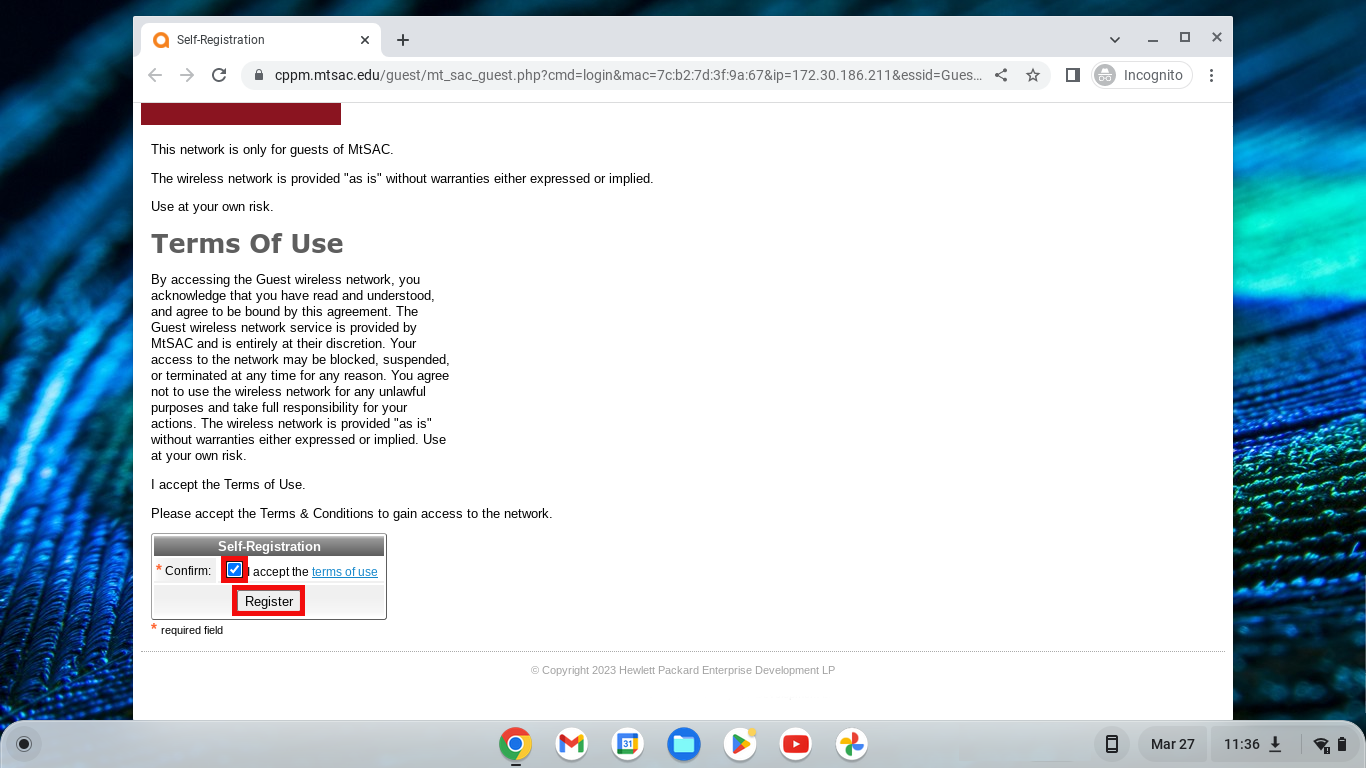
4. You will be assigned a generated Account Username and Guest Password. Your activation and expiration time will also be displayed. To finish connecting click the Log In button.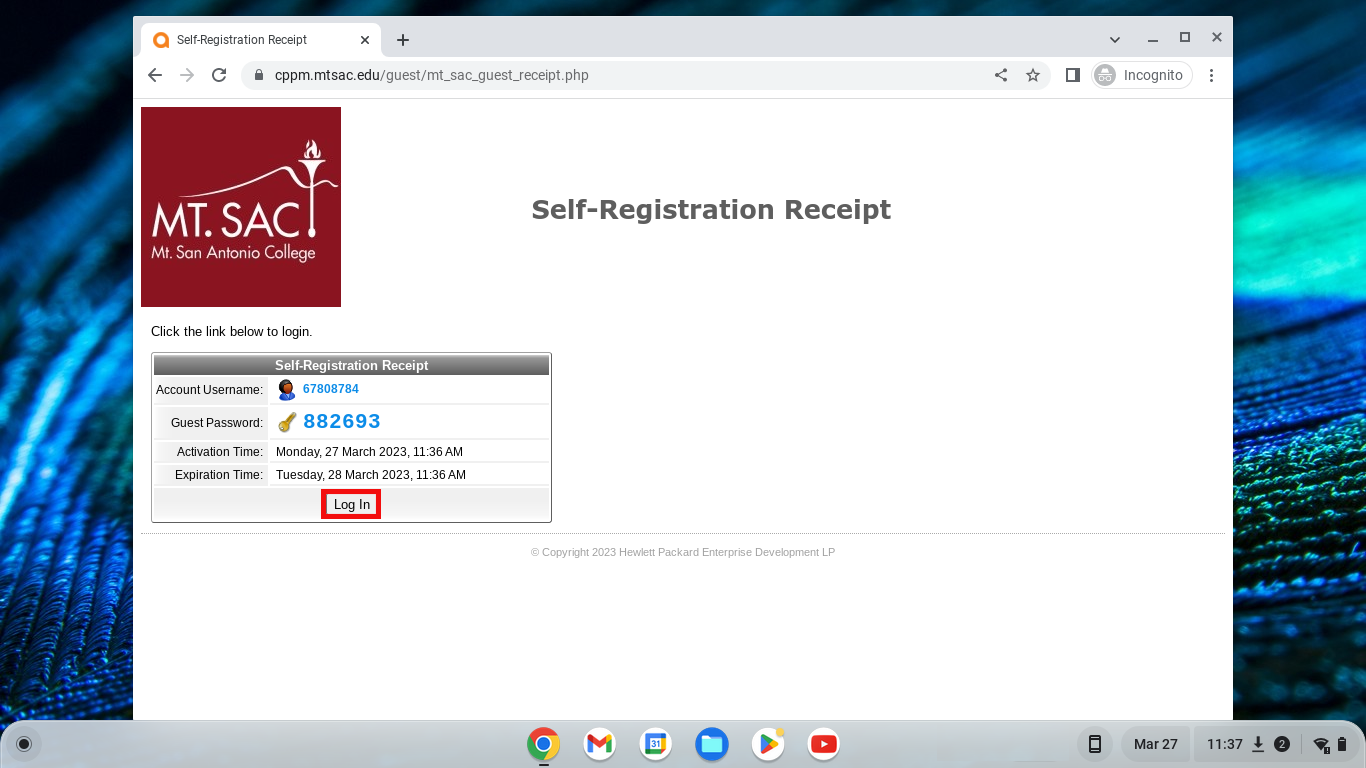
5. That's it! If you're having trouble connecting, make sure you're in range of the network and you've accepted the Terms of Use.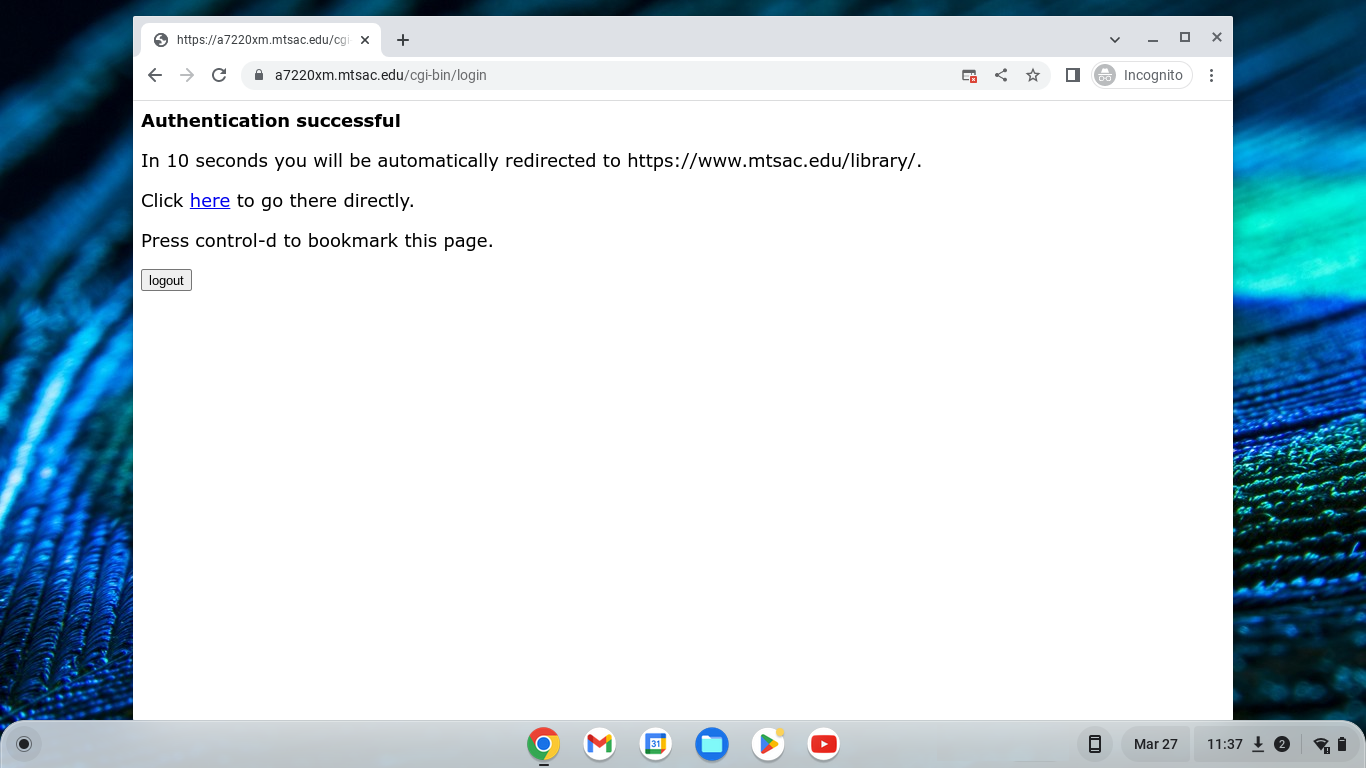
- Using an Android Smartphone or Tablet
