SCE EAB Navigate Training Resources
Core Functions:
How to Create Scheduled Appointments
How to Create Drop-in Appointments
How to Add Additonal Services to Appointment Summaries
How to Create Prospective Students
-Duplicate Student Record SmartSheet Form
How to Upload a Student List to Create Mass Appointment Summaries
How to View, Export, and Save Reports
Useful Tips and Tricks for Counselors:
How to Create Ad-Hoc Appointment Summaries (No Appointment Confirmation Email Sent)
How to Set Default Tabs for the Home and Student Profile Pages
How to Send Student Emails Through Navigate to an Alternative Email Address
Navigate Student Scheduler Walkthrough/Promotional Video
How to Create Scheduled Appointments
- Open the Appointment Center by clicking the 9 blocks from the top right toolbar and
click the Appointment Center link.

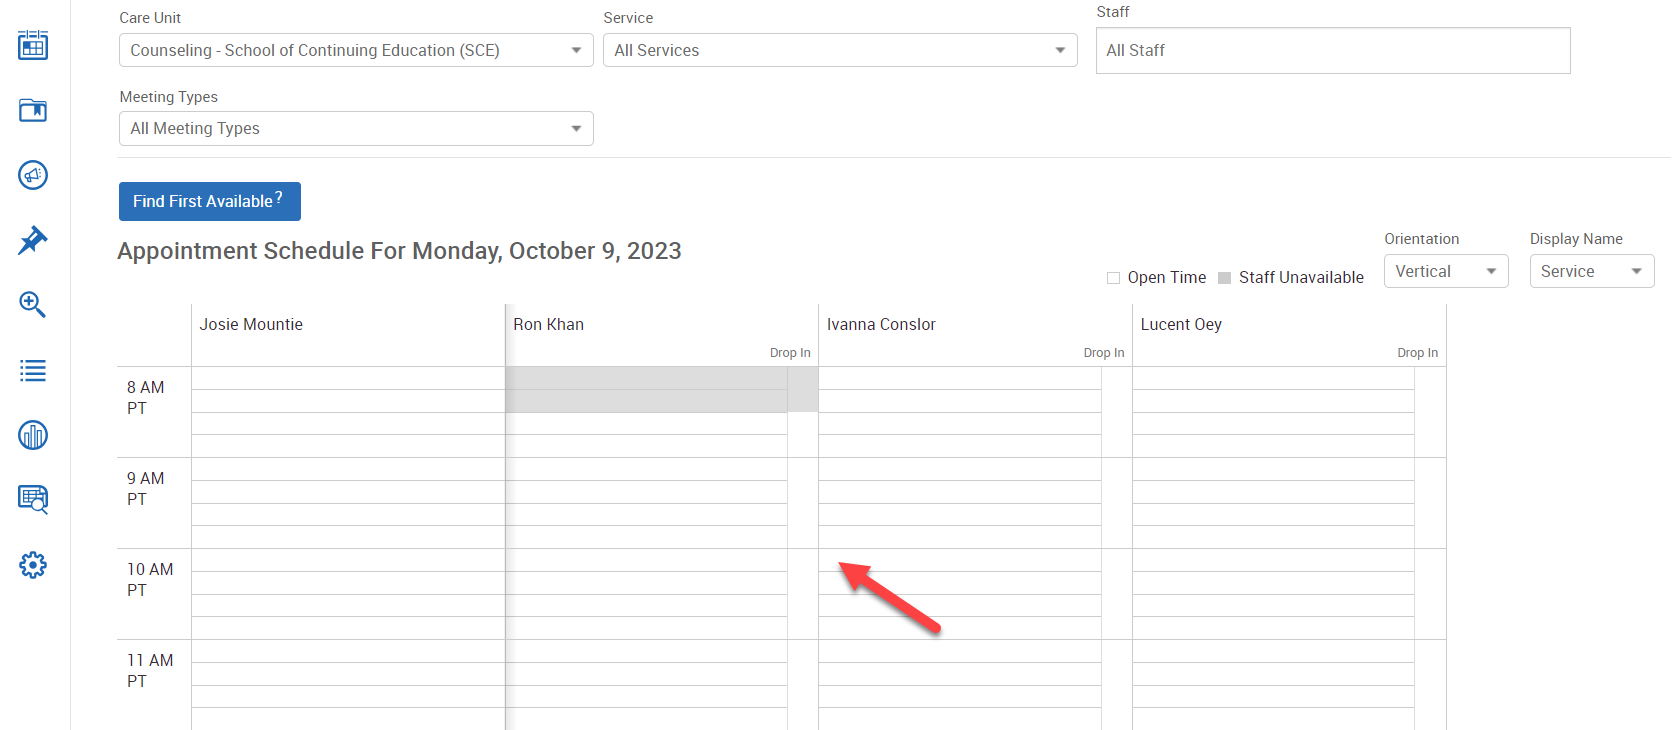
- Next select the location of the person you are schedeling the appointment for.
- In the "Enter Student Name" field type in the A#, email address, or name of the student to bring up a list of results. Click on the correct result to select that student.
- Once the student is selected scroll down the page to view the "grid" of available
counselor schedules.
- You can change the date and time frames shown by selecting different values from the Scheduling Grid drop-downs.
- Click the area on the grid that corresponds to the conselor and time you want to schedule
the appointment for, Oct. 9th at 10 AM for Ivanna Conslor in this example.
- This will open the create an appointment menu. Fill out all the fields and click the
Create Appointment button.
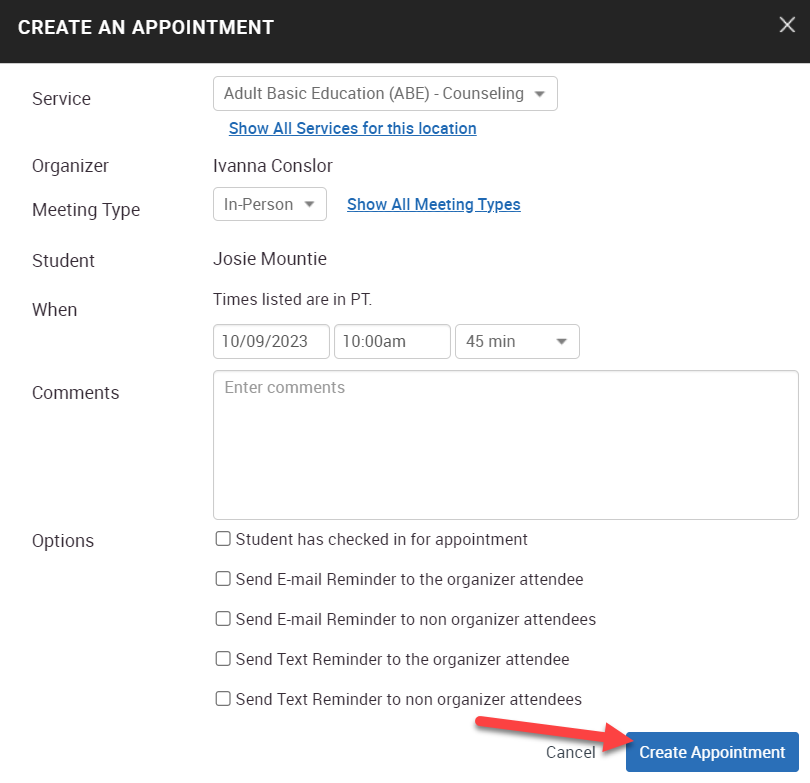
- The appointment will now be scheduled and appear on that counselors grid. A confirmation email will automatically be sent to the both the counselor and student with information about the appointment.
How to Create Drop-in Appointments
- Open the Appointment Center by clicking the 9 blocks from the top right toolbar and
click the Appointment Center link.
- Next select the location of the person you are schedeling the drop-in appointment for.
- In the "Enter Student Name" field type in the A#, email address, or name of the student to bring up a list of results. Click on the correct result to select that student.
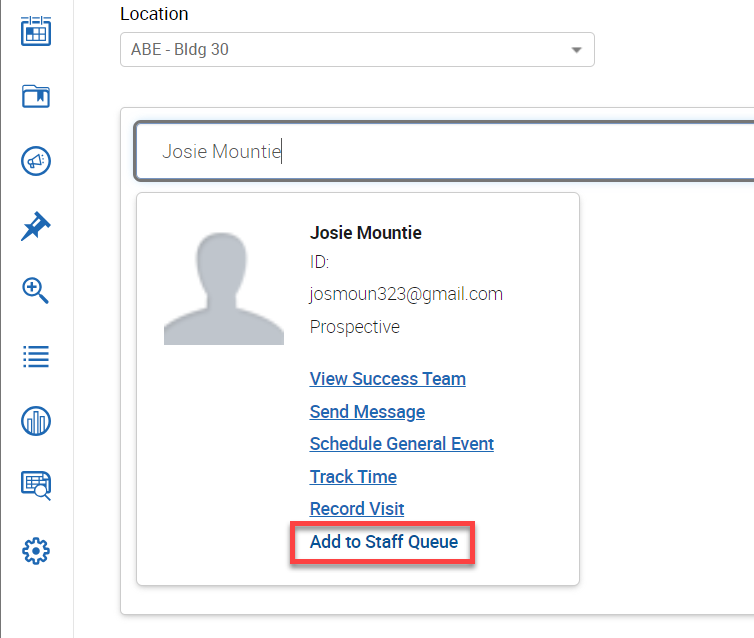
- Once the student is selected you will see a new menu with the student's information.
Click the Add to Staff Queue link.
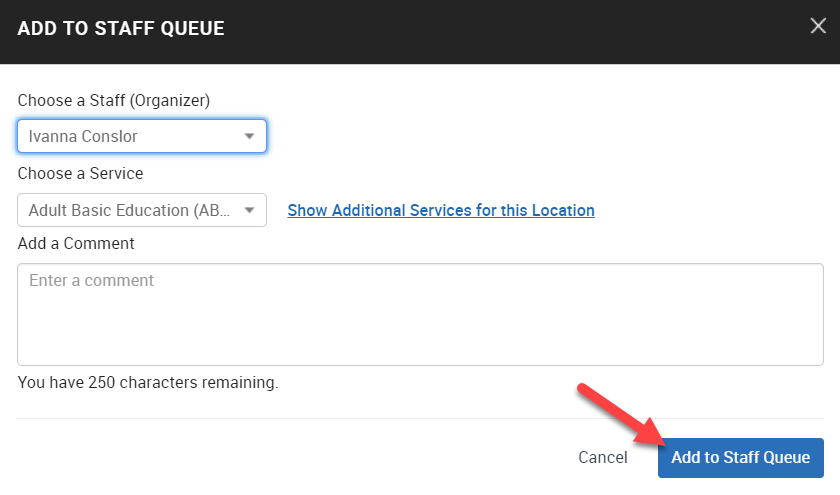
- This will open the ADD TO STAFF QUEUE menu. Select the staff member and service from
the drop-down, add any comments you would like that staff member to see, then click
the Add to Staff Queue button to finish the process.
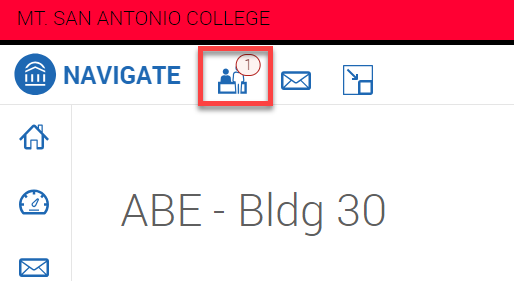
- This will place the student in that staff memebers queue, a notification will sound
on their computer and there will now be a numbered badge on their queue icon.
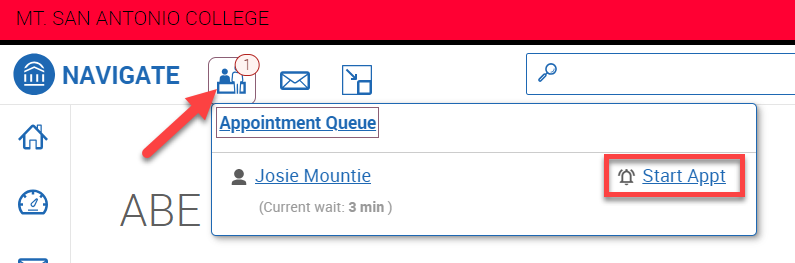
- If you are the counselor meeting with this student, you can easily add an appointment
summary by clicking on the queue icon and selecting the Start Appt link next to that
student's name.
- This will open the Appointment Summary menu where you will fill it out as usual.
How to Add Additional Services to Appointment Summaries
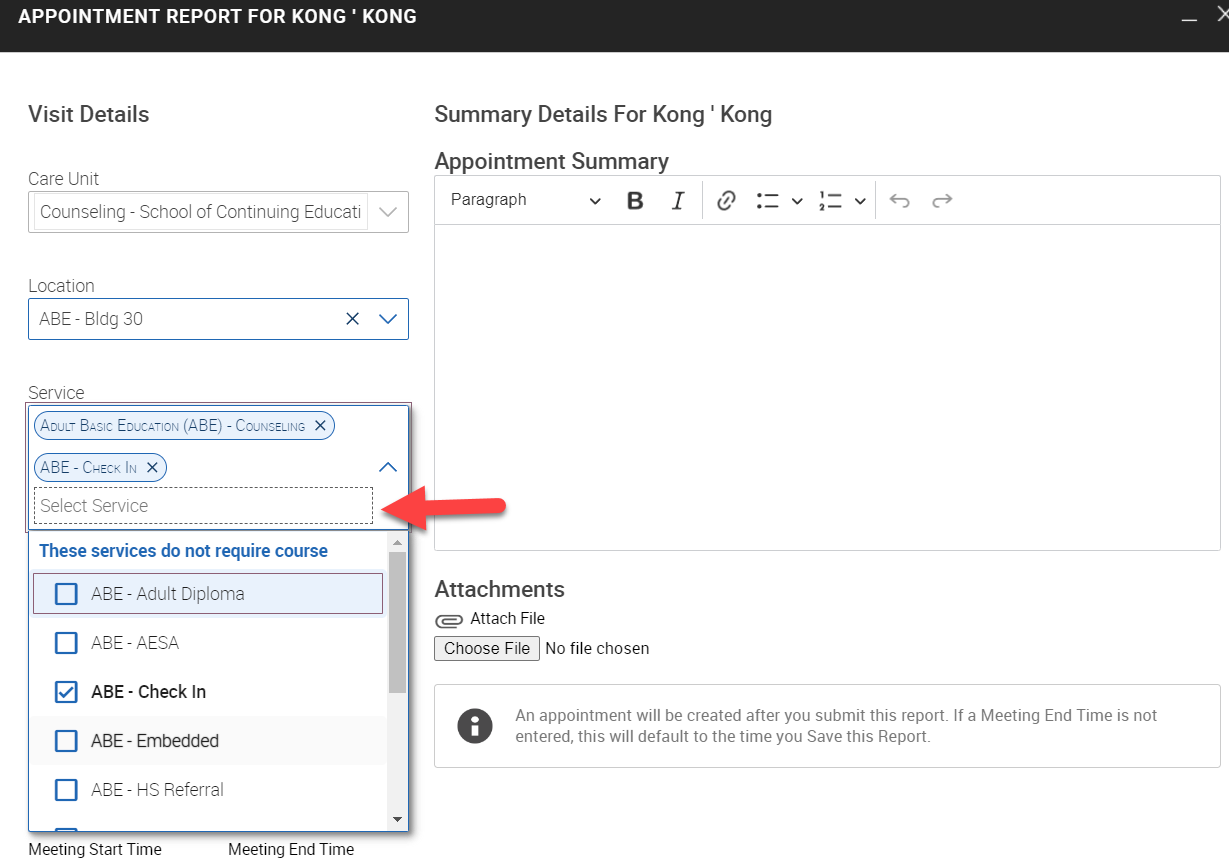
- Open the Appoinment Summary menu.
- On the side panel click the Service drop-down.
- Select each addtional service you would like to add to the Appointment Summary.
How to Create Prospective Students
- Before creating a prospective student you must first check Banner to see if that student can be found.
- If that student is found in Banner, use their A# to search for them in Navigate.
- If you get a match searching by their A#, do not create a prospective student, use that account to schedule an appointment.

- If you get a match searching by their A#, do not create a prospective student, use that account to schedule an appointment.
- If a student is not found in Banner or if a found student's A# does not have any results
in Navigate, search Navigate for that student using their personal email address and/or
name.
- If you get a match searching by their personal email address or name, do not create
a prospective student, use that account to schedule the appointment.

- If you get a match searching by their personal email address or name, do not create
a prospective student, use that account to schedule the appointment.
- If you have searched Navigate by A#, personal email address, name and that student does not have a result in Navigate than you can create a prospective student.
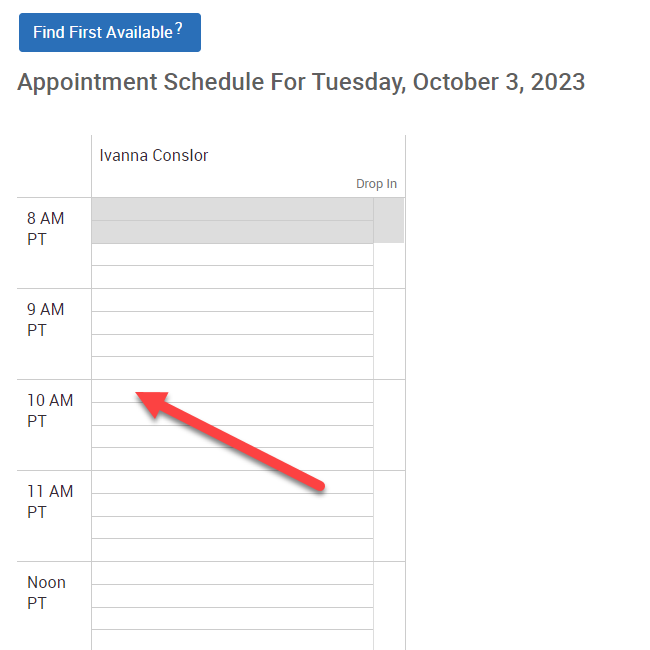
- To create a prospective student account click on the scheduled time of the counselor
with whom that person would like to make an appointment with. In this example it is Ivanna at 10 AM on 10/3/23.
- This will bring up the CREATE AN APPOINTMENT form. Select the generic service in the
service drop-down and add the meeting type. For the STUDENT field click the Create
a Student link.
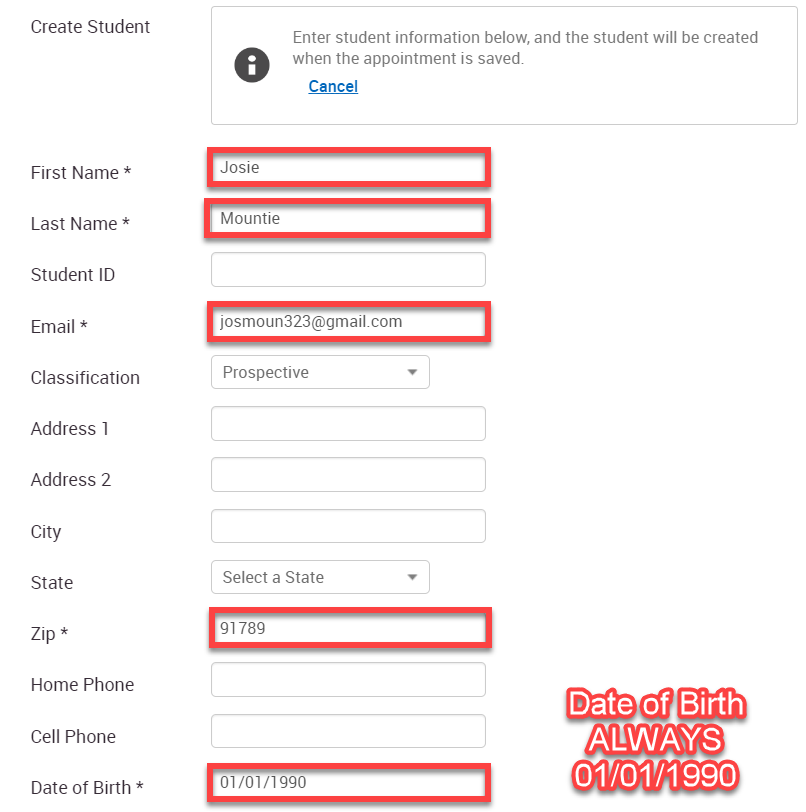
- This will open additional fields where you can enter the persons information.
- If you were able to find this persons account in Banner but not able to find them in Navigate using A# or email address: enter first name, last name, student id, email address, zip code into the fields as it appears in Banner. The classification should default to Prospective. The date of birth field will ALWAYS be 01/01/1990 regardless of what it is in Banner.
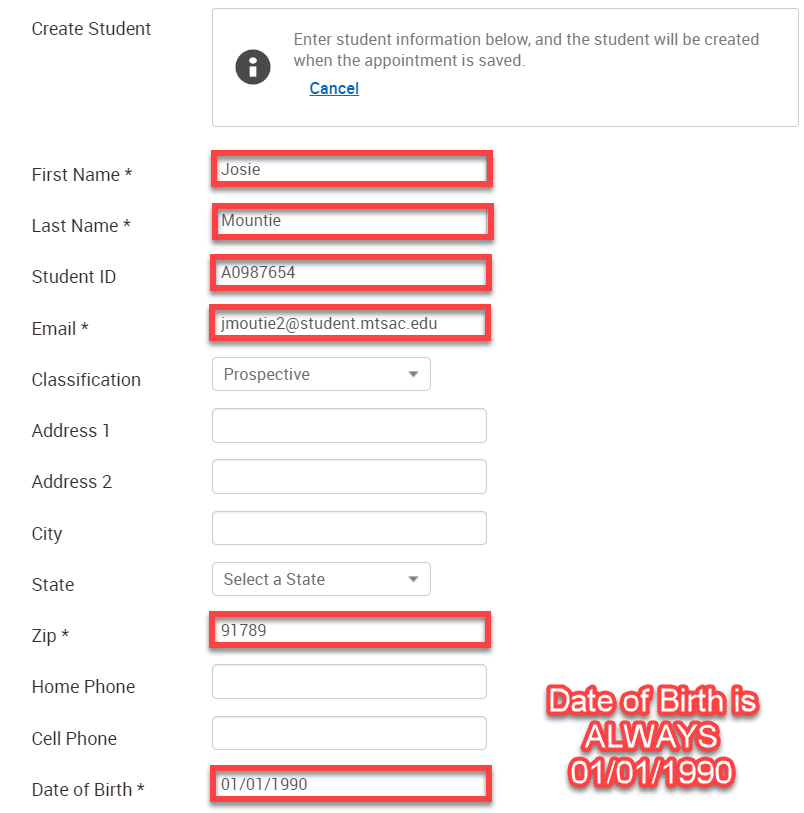
- If you were not able to find this person in Banner and Navigate: enter first name, last name, personal email address, zip code into the fields as it appears in their provided identification (ex. Passport, Drivers License, etc). You will not enter a student id in this instance and the classification should default to Prospective. The date of birth field will ALWAYS be 01/01/1990 regardless of what it is on their identification.
- Once you have entered the information scroll down and fill out the rest of the appointment
information and click the blue Create Appointment button.
- This will create the prospective student and schedule the appointment with them. This prospective student will continue to exist in Navigate and can have appointments scheduled just like regular student account.
- When selecting a student from the search results you may come across this or a similar
banner image at the top of your webpage.

- This means a created prospective student account has matched a student account that was imported into Banner. In these instances click the view options button to see which two accounts have matched with each other.
- Once you know which two accounts are matched you must fill out this Prospective Student Merge Tracker SmartSheet form with information from both accounts.


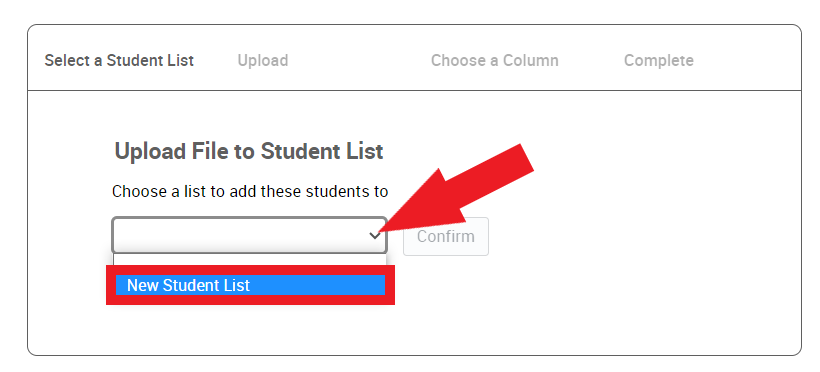
How to Upload a Student List to Create Mass Appointment Summaries
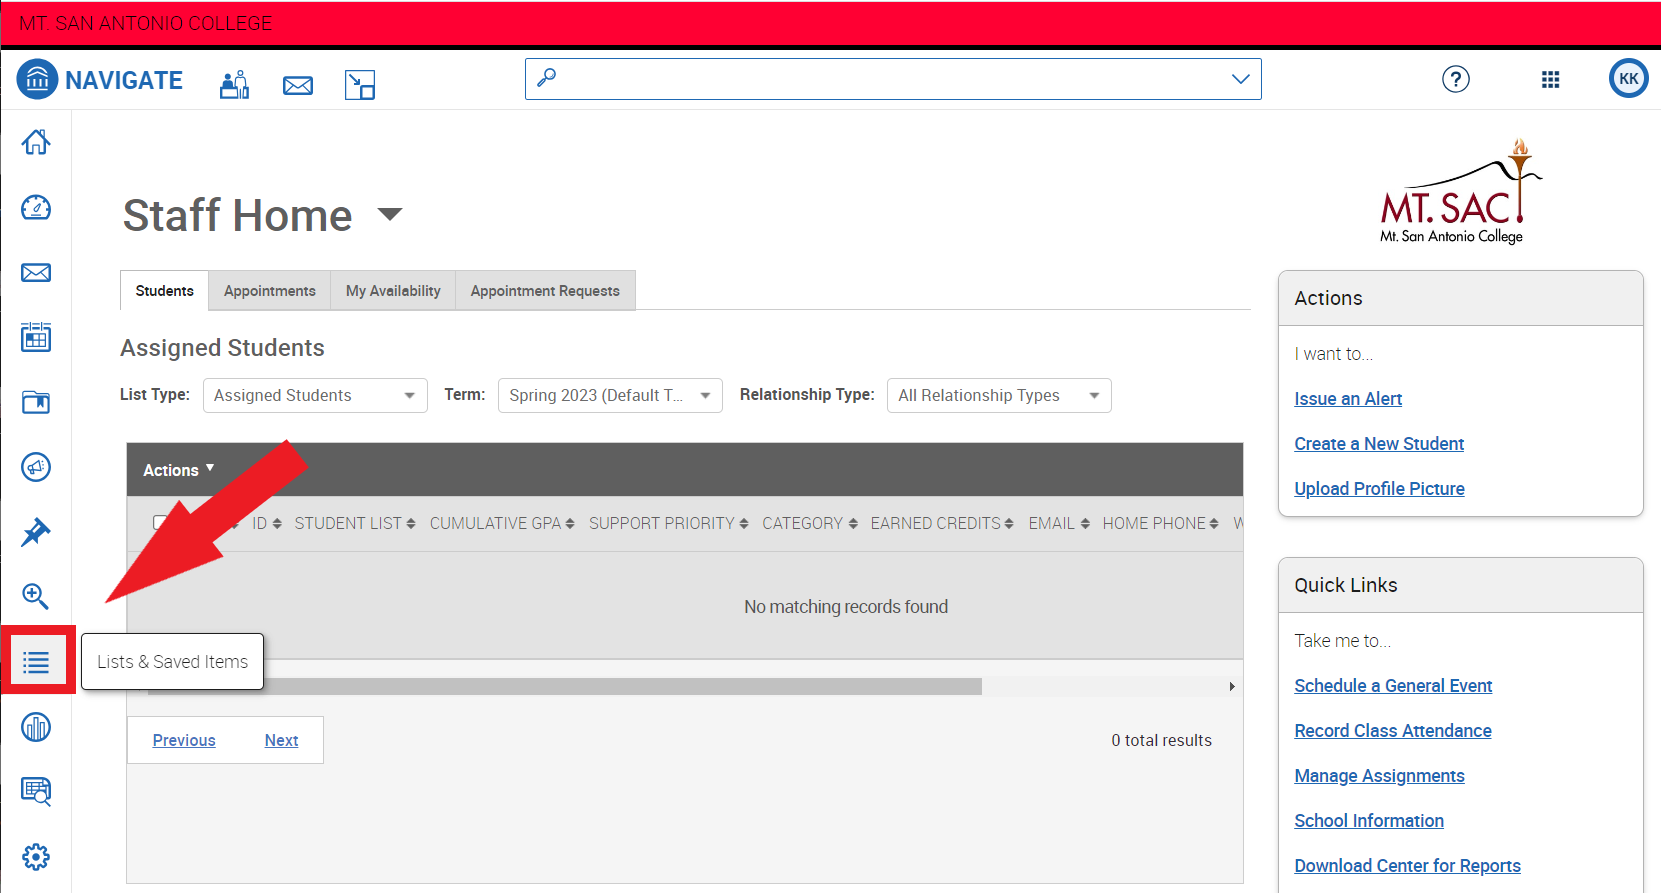
1. Open the Lists & Saved Items Dashboard by clicking the icon from the side toolbar.
2. Under Student Lists, click the Actions link and select Upload Student List
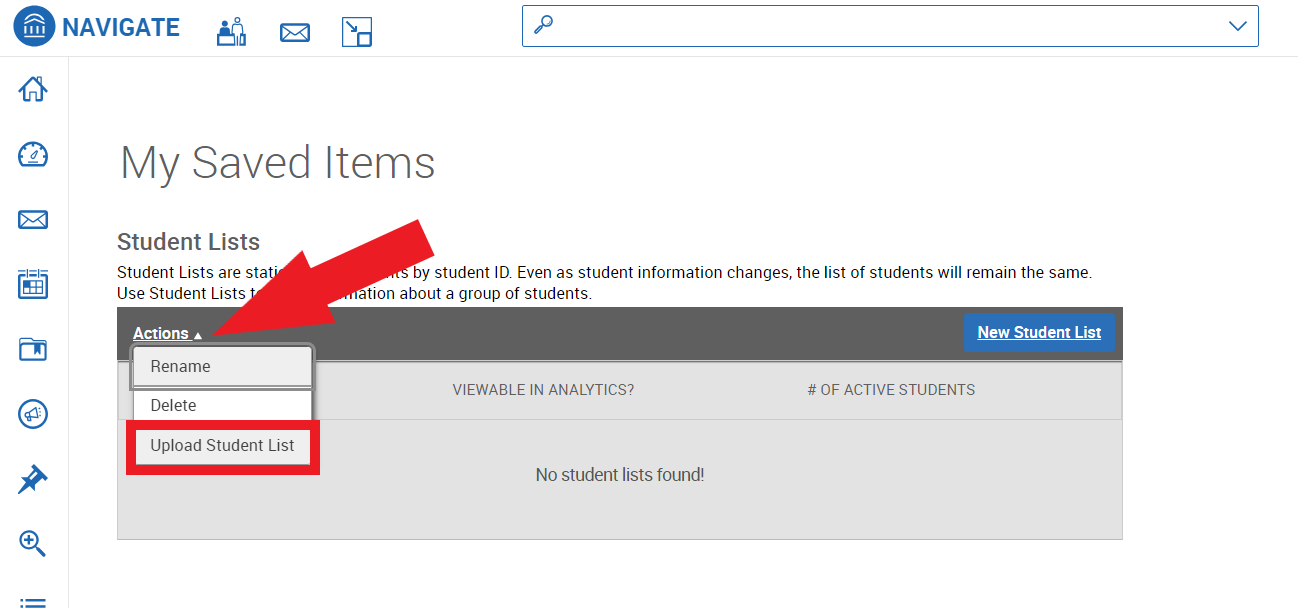
3. If you already have a list created you can select it from the drop-down. Otherwise to create a new student list select the New Student List option and click the Confirm button.
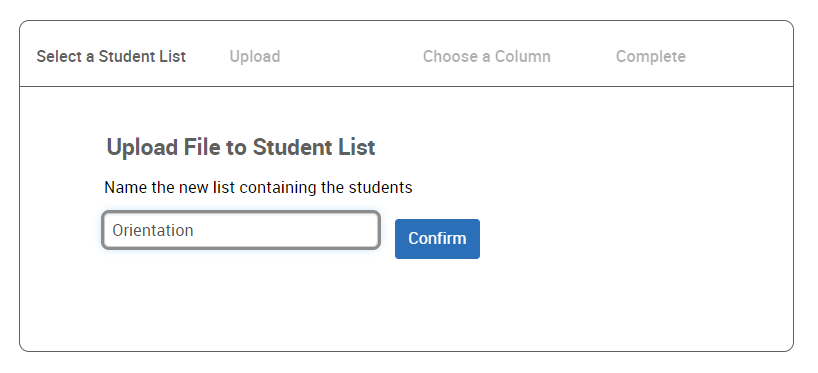
4. Give the New Student List a name and click the Confirm button.
5. Now you will need to upload a CSV file with a list of A#s. Click the Choose File button, browse to the CSV file on your computer, select it, and click the Open button.
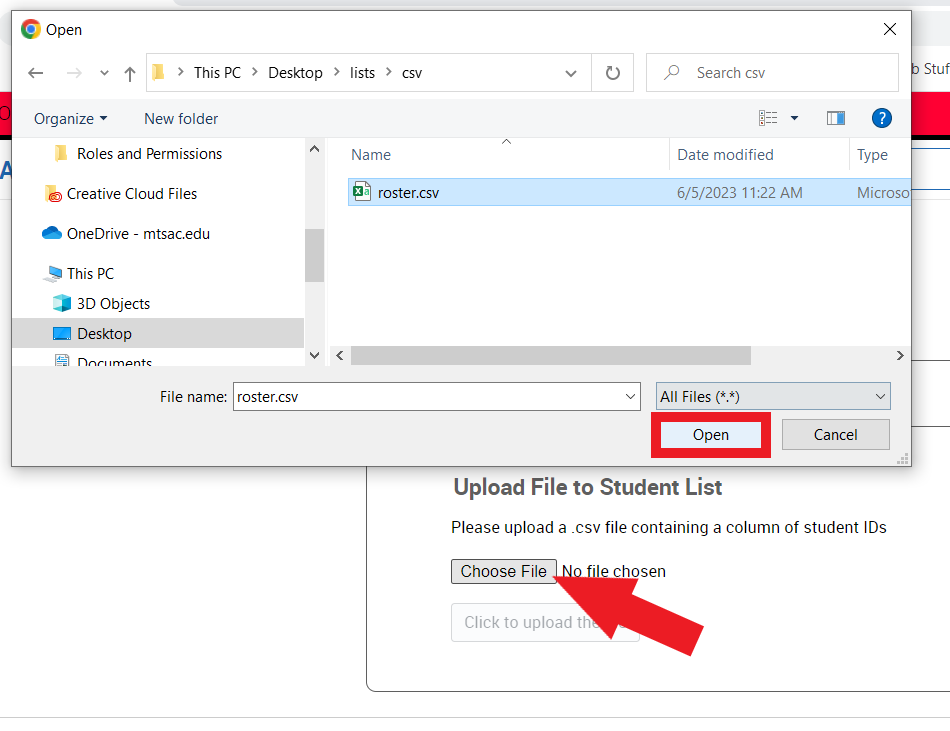
Note: CSV files only need one column and one header. The header can have any name,
and a list of the A#s you would like to import should be below it.
For example:
| A# |
| A012345678 |
| A012345679 |
| A012345680 |
6. With the file now selected select the Click to upload the file button.

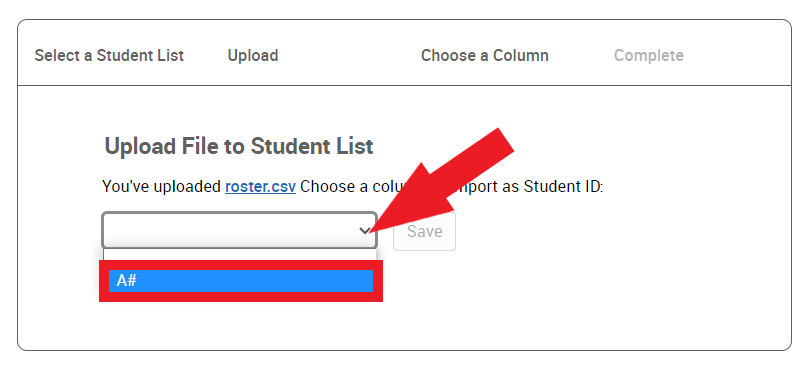
7. Now select the header row of the A#s from the drop-down and click the Save button.
8. The records from the CSV are now uploaded to the student list you created. You can go back to the Student Lists dashboard by clicking the View my Student Lists link or selecting the icon from the side toolbar again.

9. In the Student Lists Dashboard your newly created list will appear. Click on the name to open it up.

10. The list of students you imported from the CSV file will be displayed. Select the checkbox in the header next to the NAME column to select all students. Note: Navigate will not give you any indication a record could not be imported, so it's important to know how many records were in your CSV file and that it matches with the number of imported students Navigate is showing in your list.
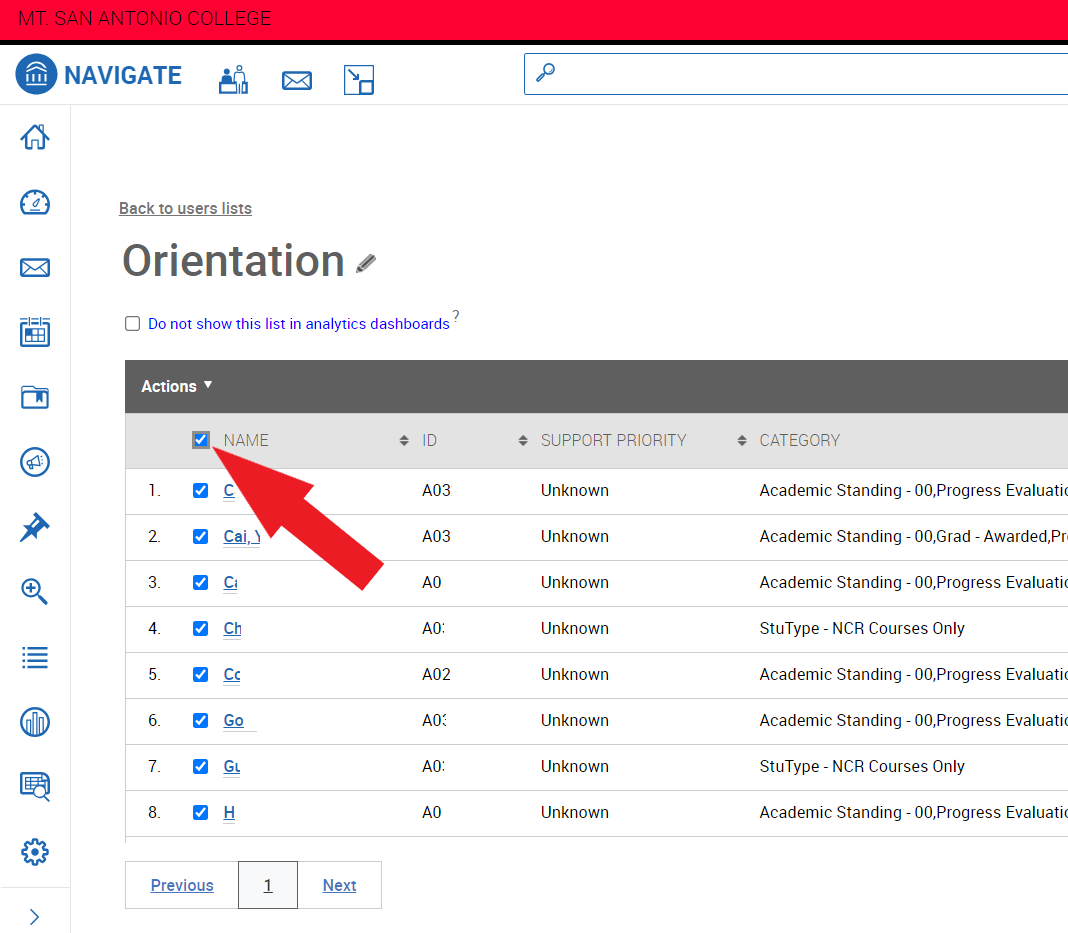
11. Click the Actions link form the List header and select the Create Ad hoc Appointment Summary option from the drop-down.
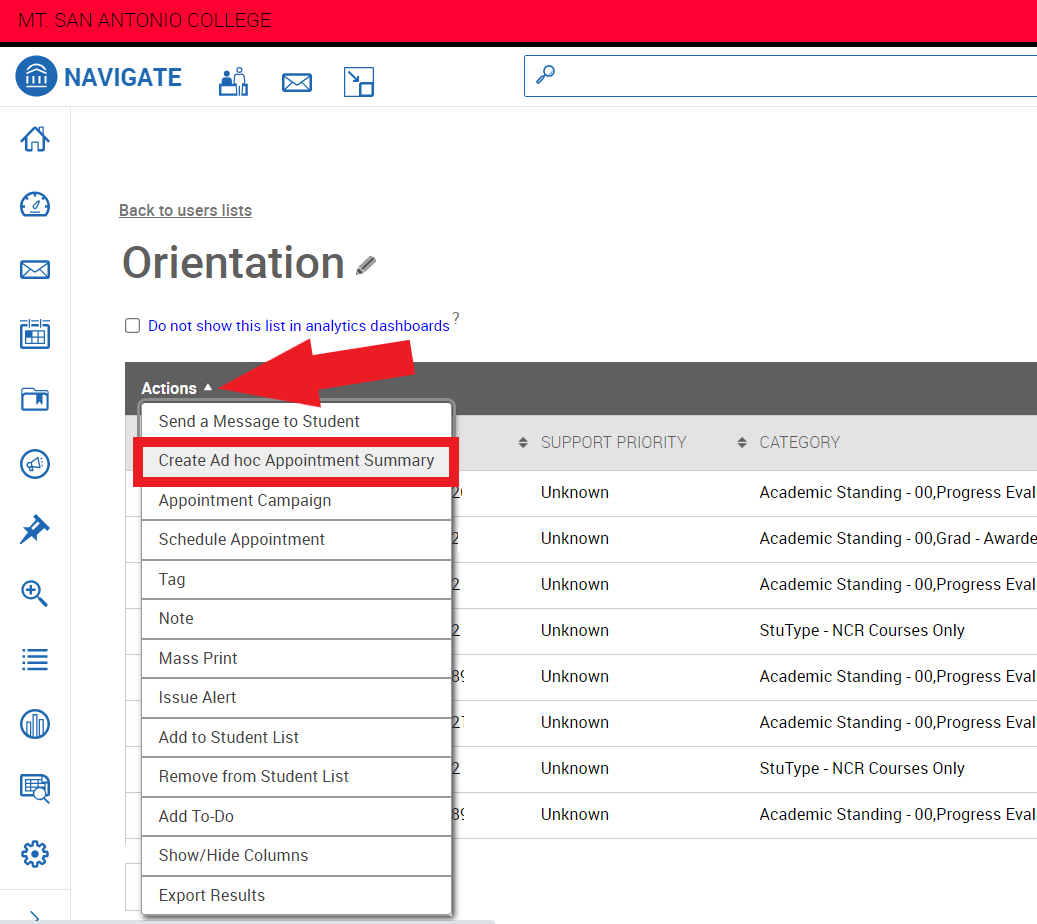
12. Now you can create an Appointment Summary like usual and it will be applied to all students in your list.

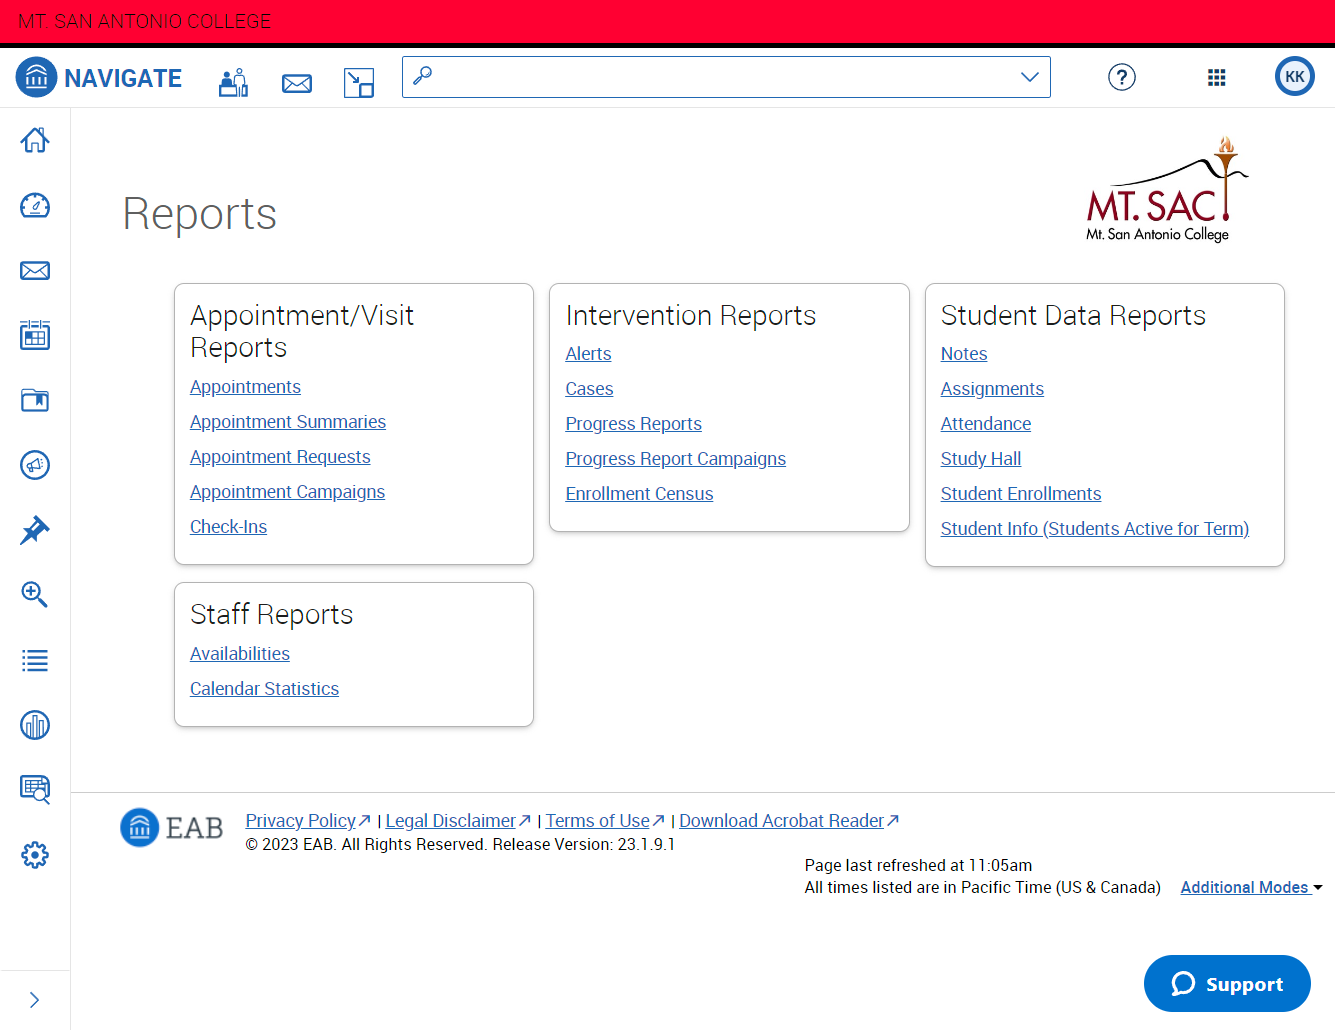
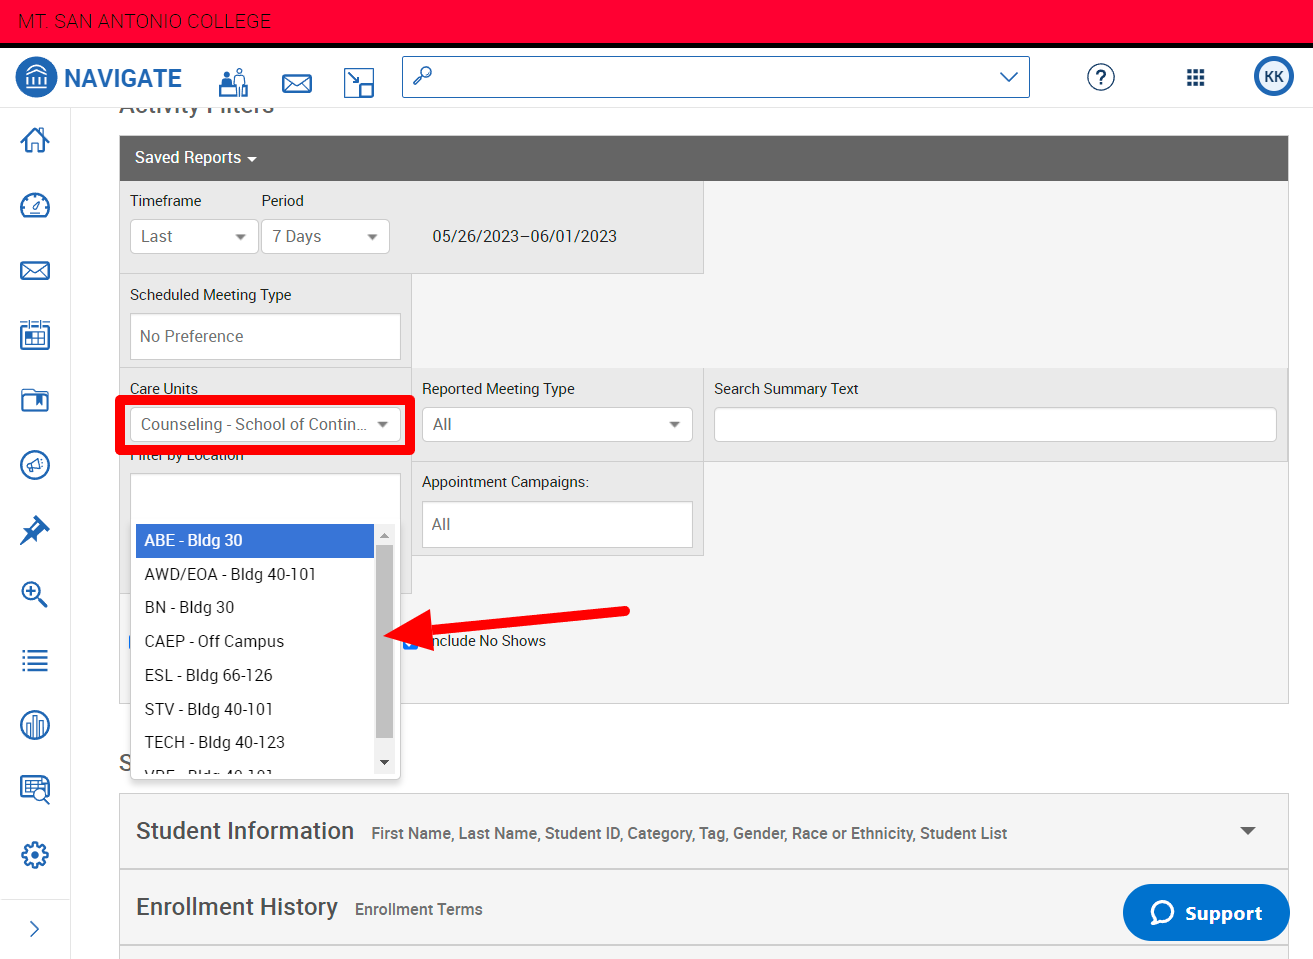
How to View, Export, and Save Reports
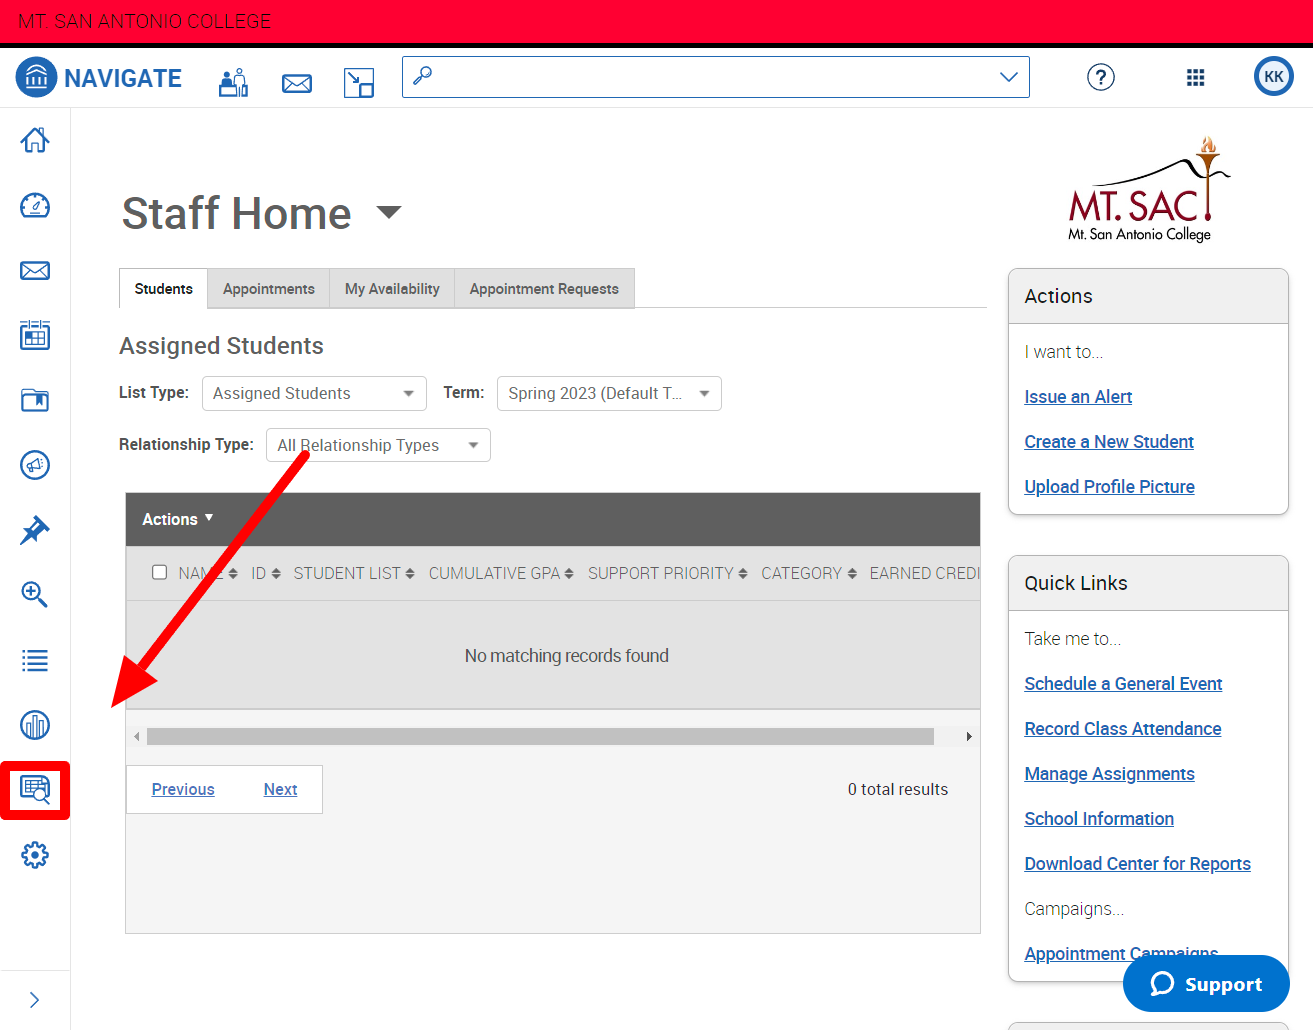
1. Open the reports dashboard by clicking on the Reports icon from the side toolbar.
2. Select the report you would like to run. Appointment Summaries will be used in this example.
3. Use filters to narrow down the results. This example is using the Care Unit filter "Counseling - School of Continuing Education" (SCE) and Location filter "ABE - Bldg 30" to limit results to SCE reports from ABE (Adult Basic Education). Scroll down and click the "Search" button to run the report.
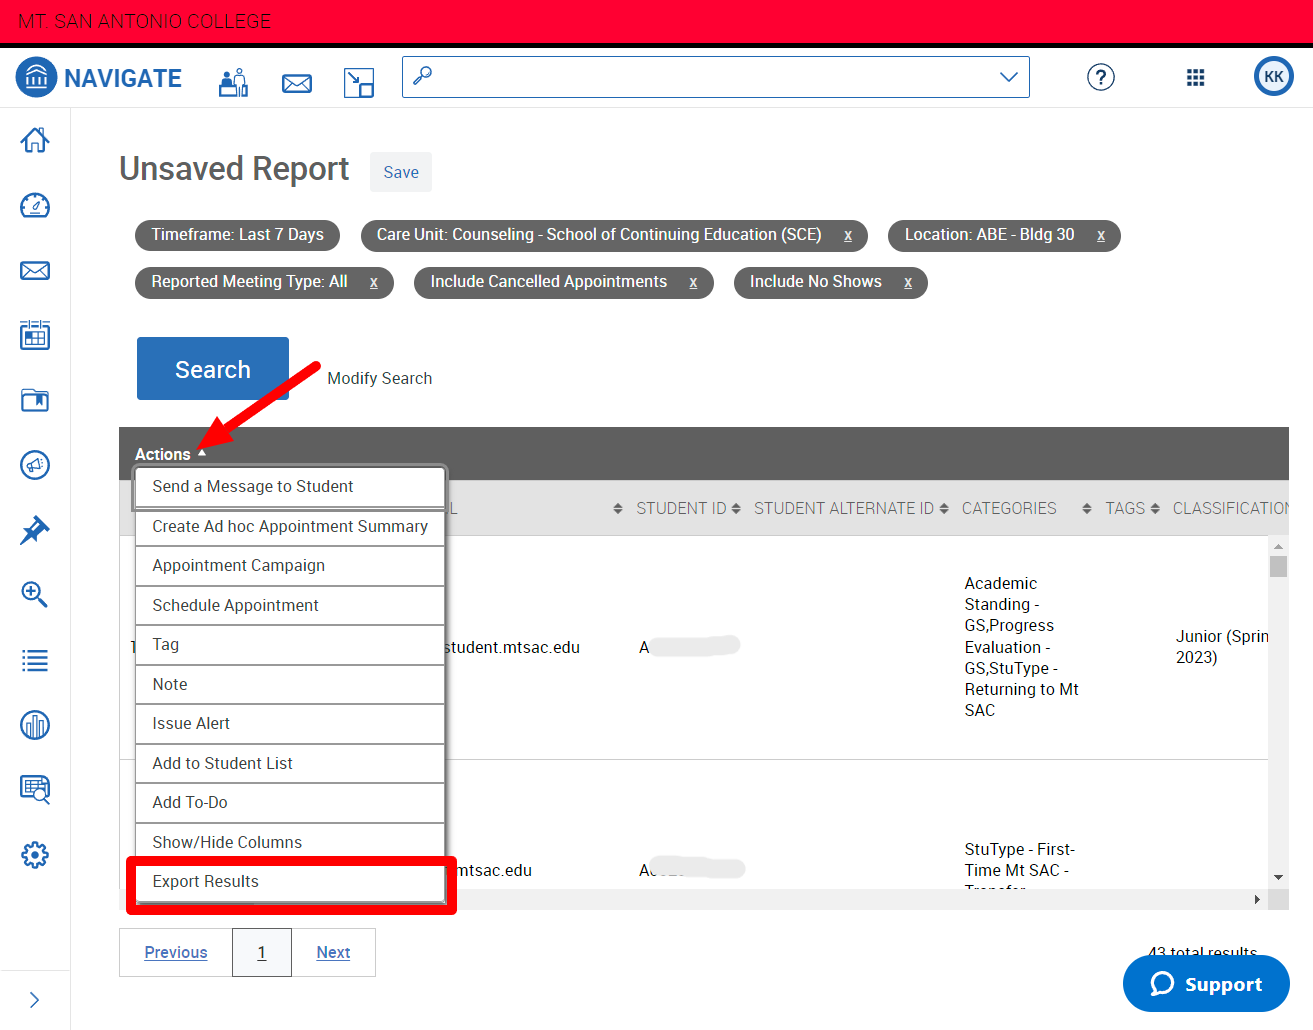
4. Once you have the results you can export them to a CSV file by clicking the Actions link from the results toolbar and selecting "Export Results".
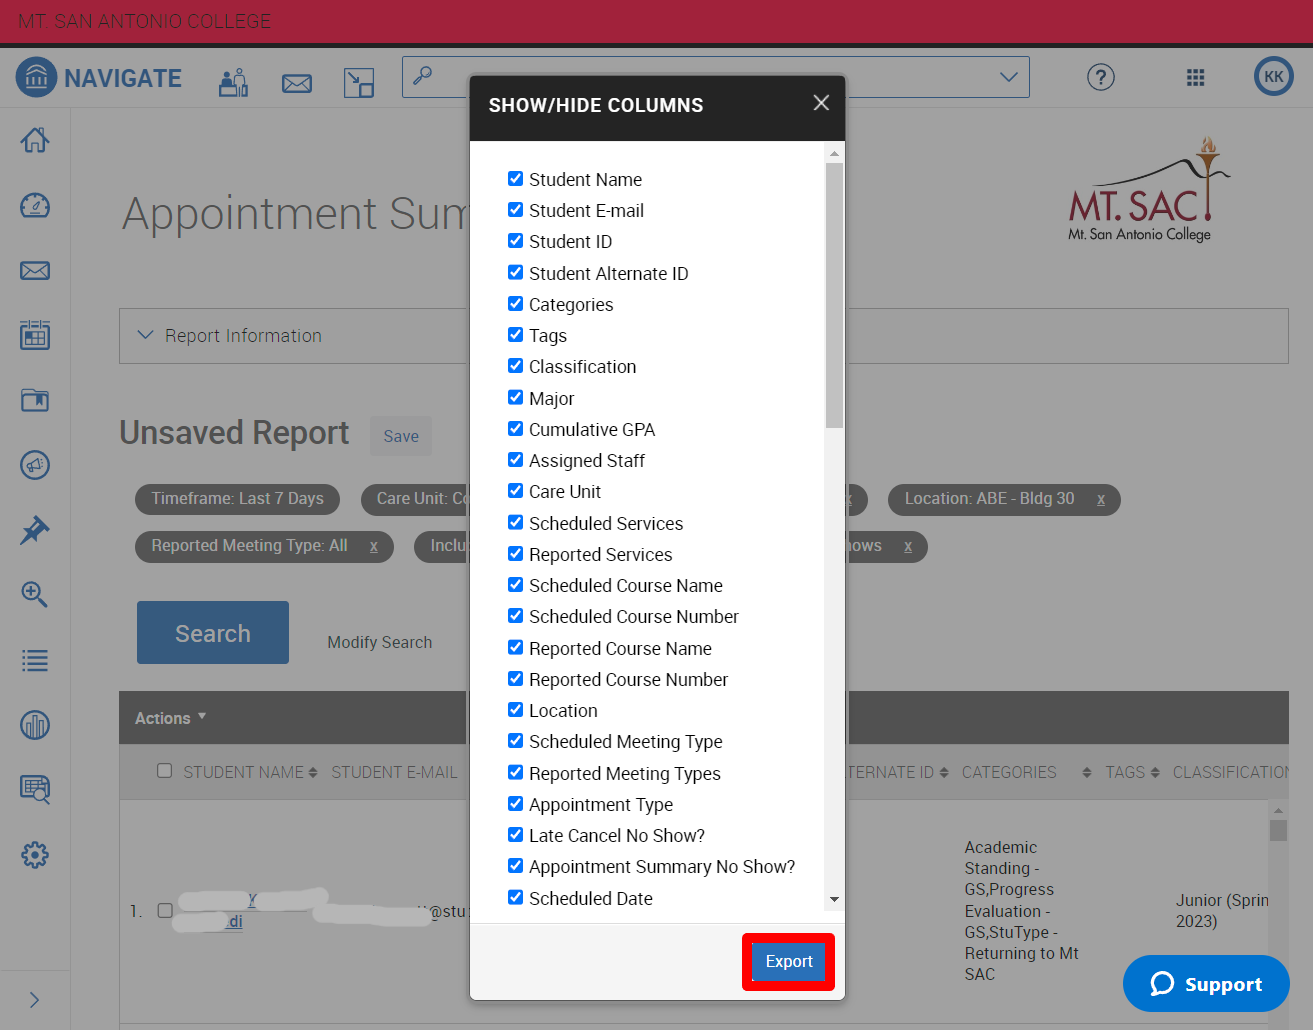
5. Select the columns you would like exported into the CSV file and click the Export button.
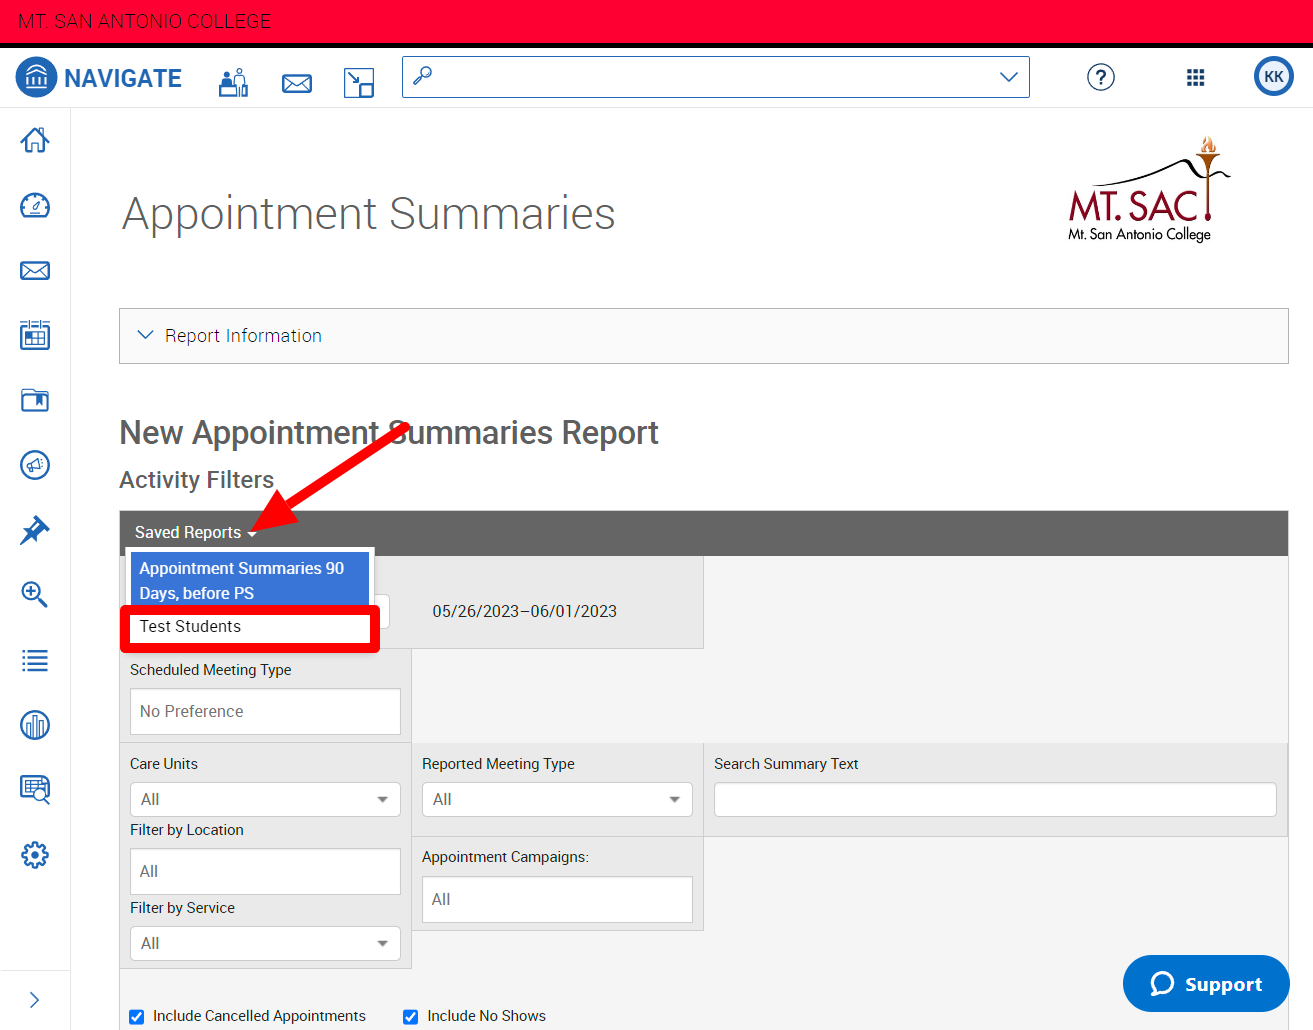
7. To save the report to be able to run easily in the future, click the Save button next to the report name. Give the report a new name and click the Save Report button.
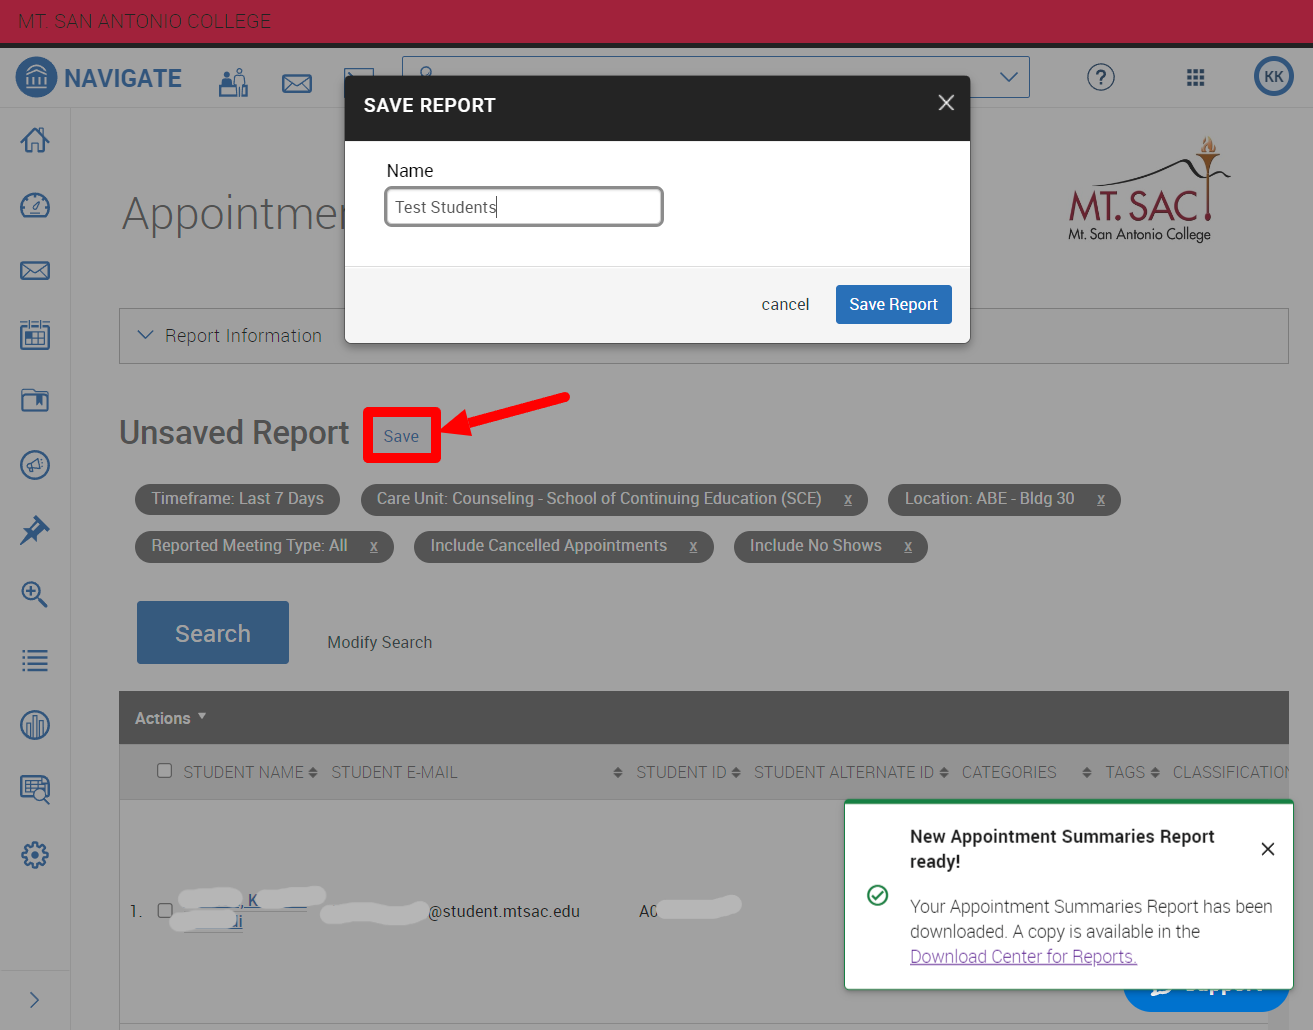
8. You can now run that saved report with all the filters pre-selected by clicking the "Saved Reports" link from the Activity Filters toolbar and selecting you saved report name.
How to Create Ad-Hoc Appointment Summaries (No Appointment Confirmation Email Sent)
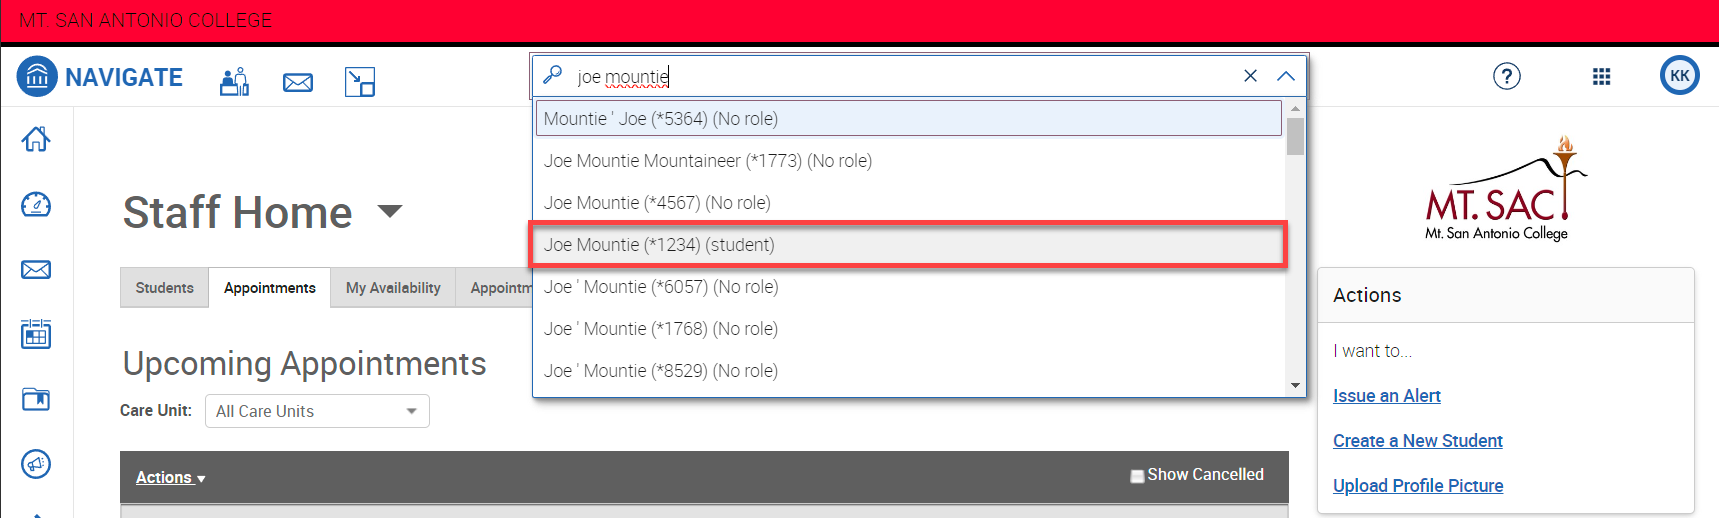
1. Search for the student you would like to add an appointment summary to from the quick search field at the top.
2. In the student's profile, click on the "Report on Appointment" link from the Options toolbar on the right.
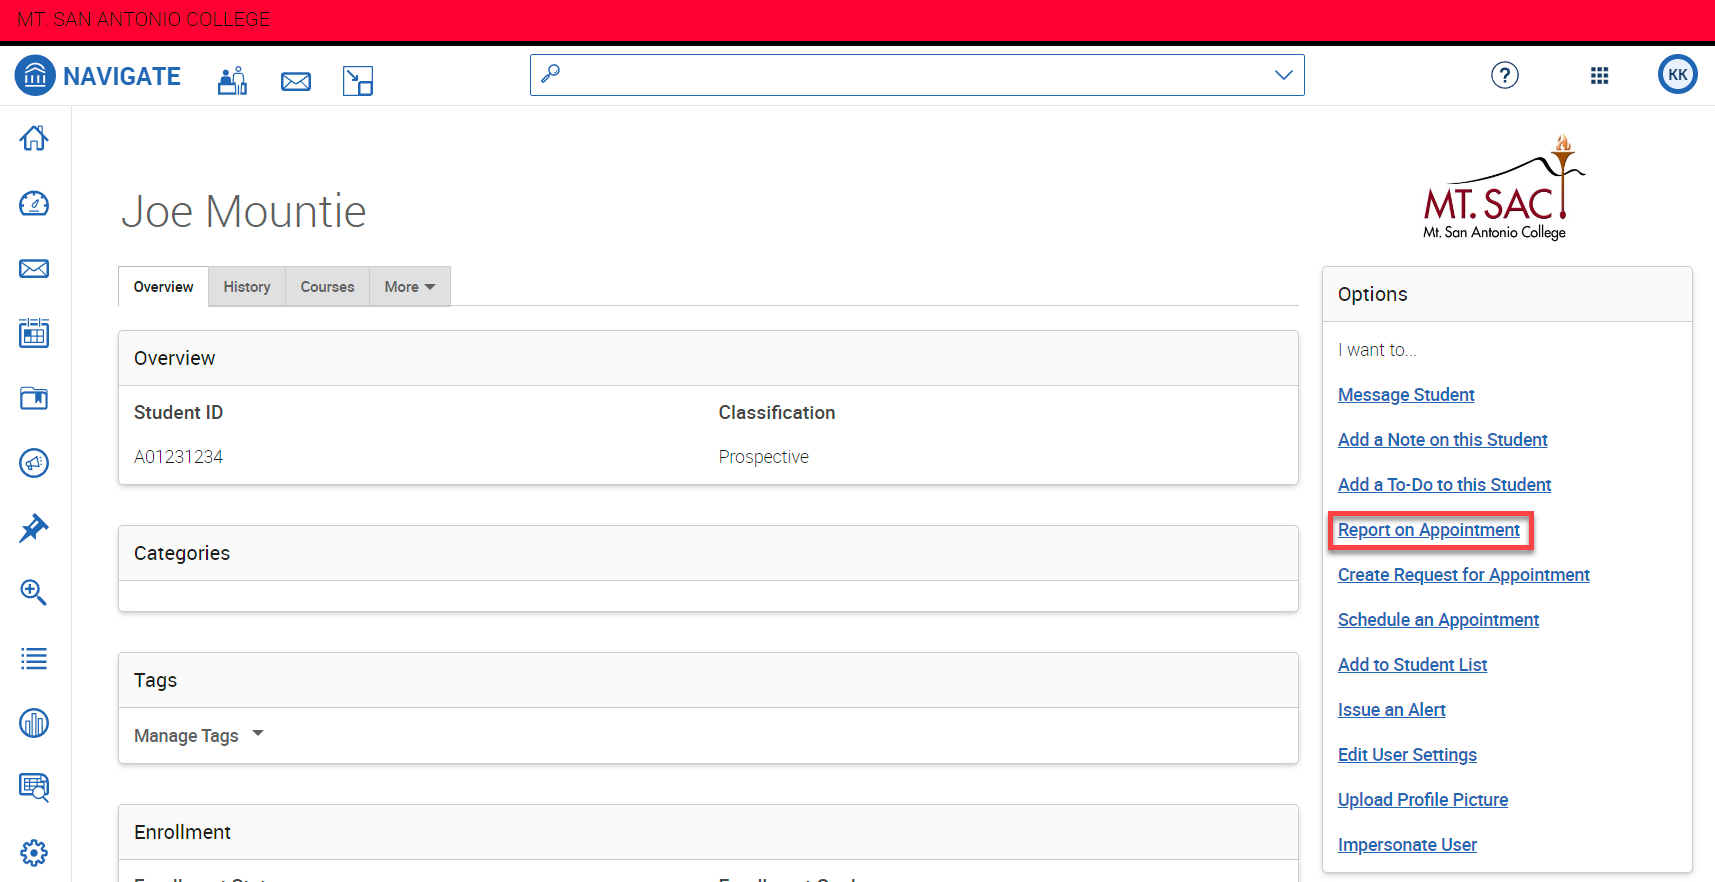
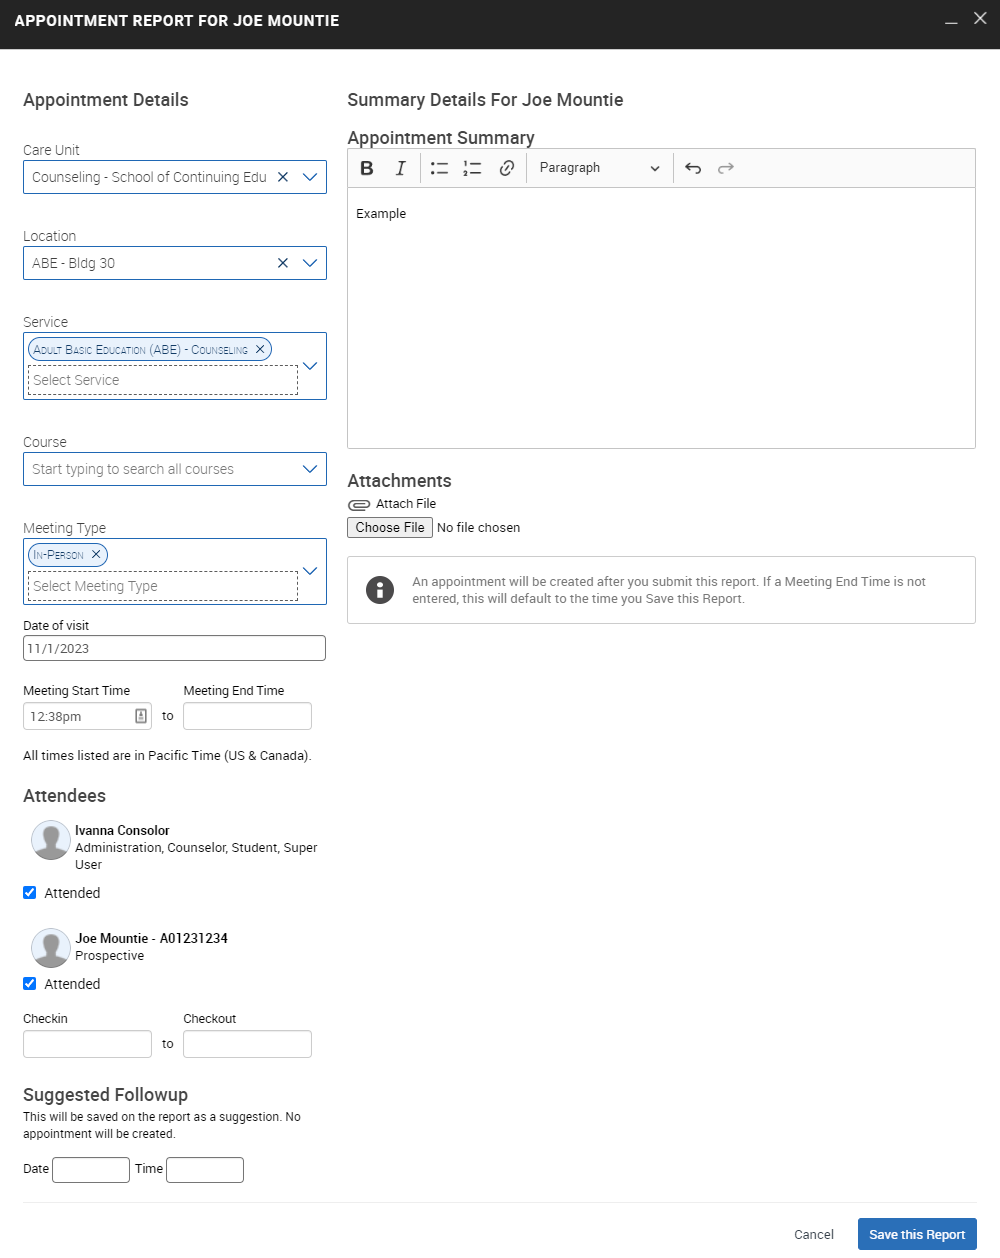
3. Now just add your appointment summary as usual. When you save it, no appointment confirmation email will be sent.
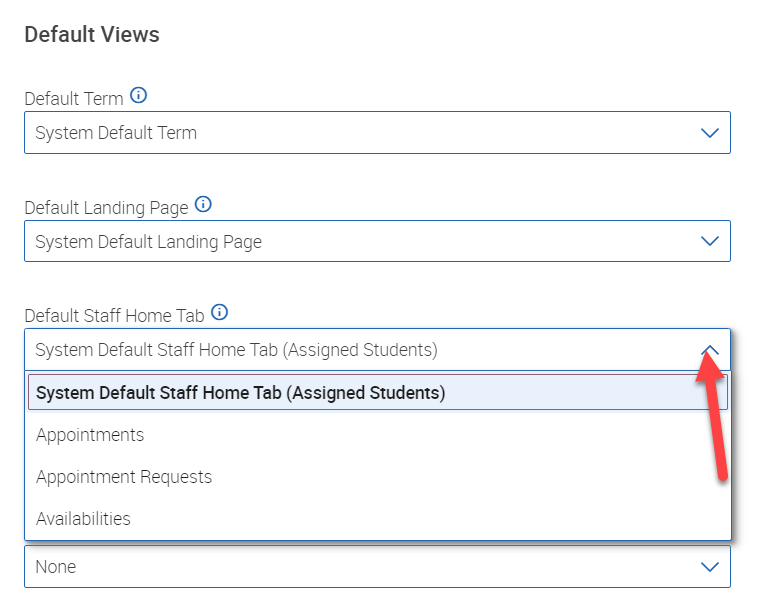
How to Set Default Tabs for the Home and Student Profile Pages
1. Click on your profile icon from the top right of the toolbar, and select the "User Settings" link.

2. This will open up the User Settings menu. Using the drop-downs you can change your default Landing Page, Staff Home Tab, and Student Profile Tab.
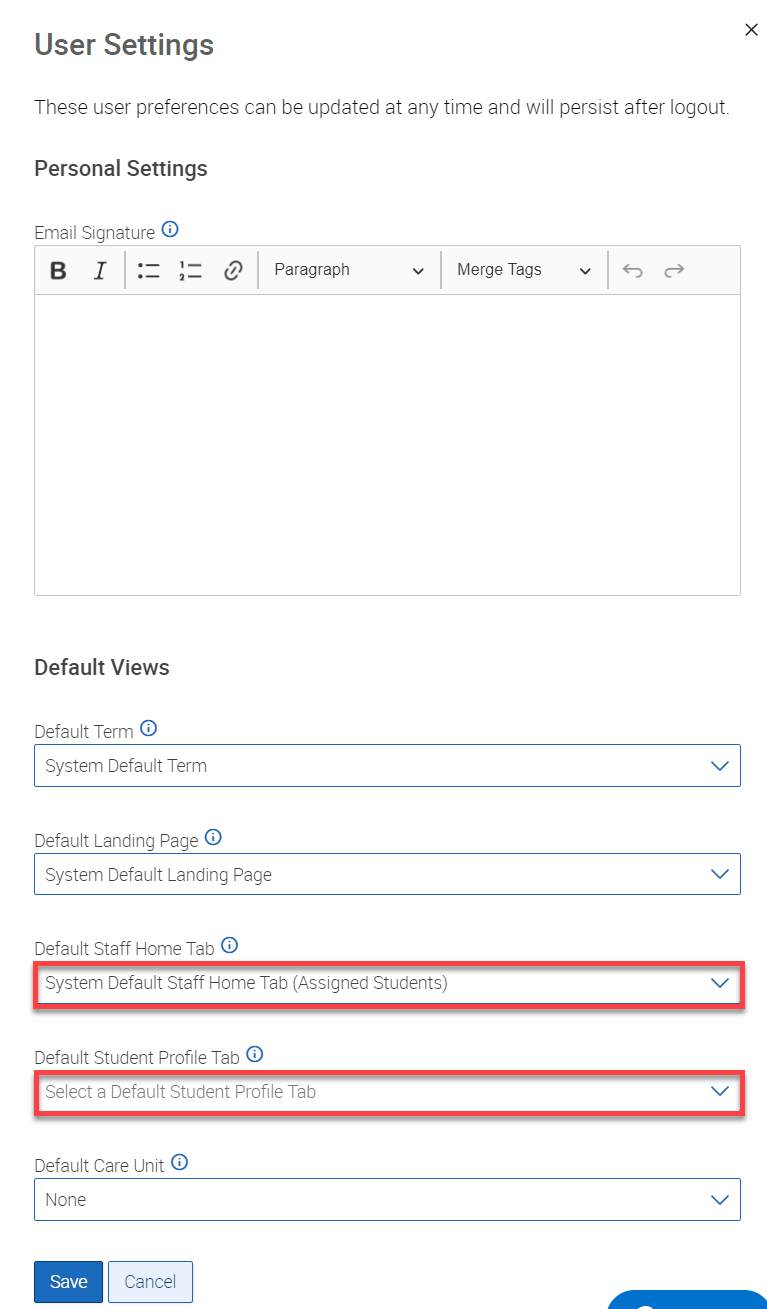
3. I'd generally recommend setting your Default Staff Home Tab to Appointments and Default Student Profile Tab to History, but select the one that best optimizes your workflow. When your finished click the Save button.
How to Send Student Emails Through Navigate to an Alternative Email Address
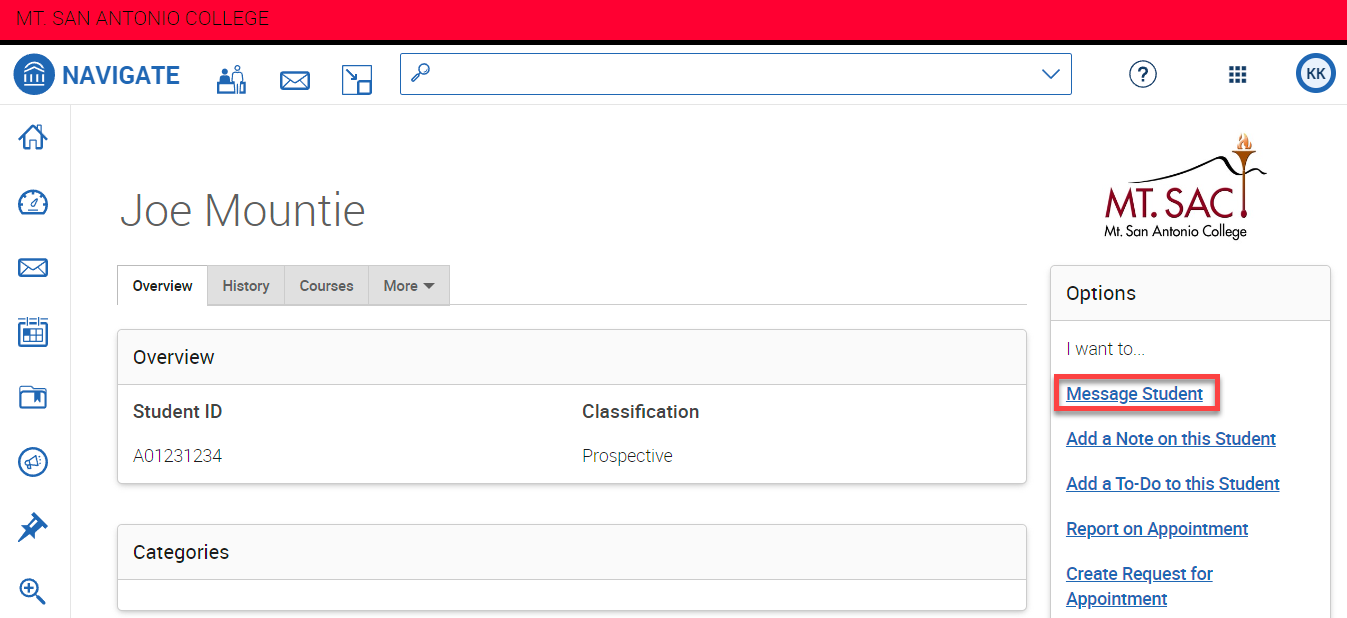
1. Search for the student you would like to send an email to from the quick search field at the top.
2. In the student's profile, click on the "Message Student" link from the Options toolbar on the right.
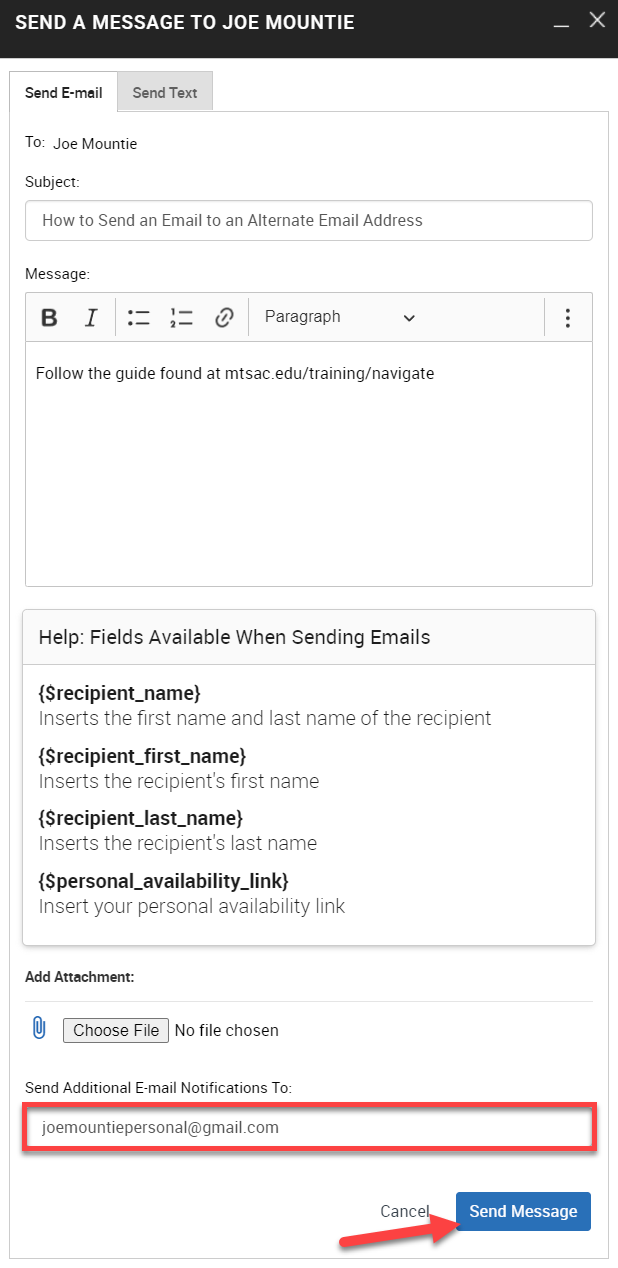
3. This will bring up the Send a Message menu. Fill out the subject and message of the email you would like to send. At the bottom you have the option to enter another email adderess. Once you've entered in the information click the Send Message button. This email will be sent to the email address associated to the student's profile, in most cases their Mt. SAC email, and whatever email address you entered at the bottom.
Navigate Student Scheduler Walkthrough/Promotional Video
Additional information on Navigate for students can be found at Mt. SAC's Student Navigate Homepage.
